

The Repeater field turns one set of controls into as many rows as the user needs. You define the fields once (a name, a price, a description) and anyone editing the widget in Elementor can add, duplicate, reorder, and remove items from the panel, exactly like the repeaters in Elementor’s own Icon List or Testimonial Carousel widgets. Inside the Master Addons Widget Builder, the Repeater is how you build card grids, menus, feature lists, team sections, and anything else where the item count is up to the site owner, not the widget author.
The Repeater pairs with both companion systems: Conditions shows or hides the control in the panel, and the Twig-syntax template engine renders its rows on the front end with {% for item in my_repeater %} loops and dotted tokens like {{ item.title }}. Both guides cover setup and limitations.
The Repeater works together with the template loop in your HTML: a {% for %} block prints your markup once per row. Three items render three cards; add a fourth in the panel and a fourth card appears, no code changes.
What the Repeater field does #
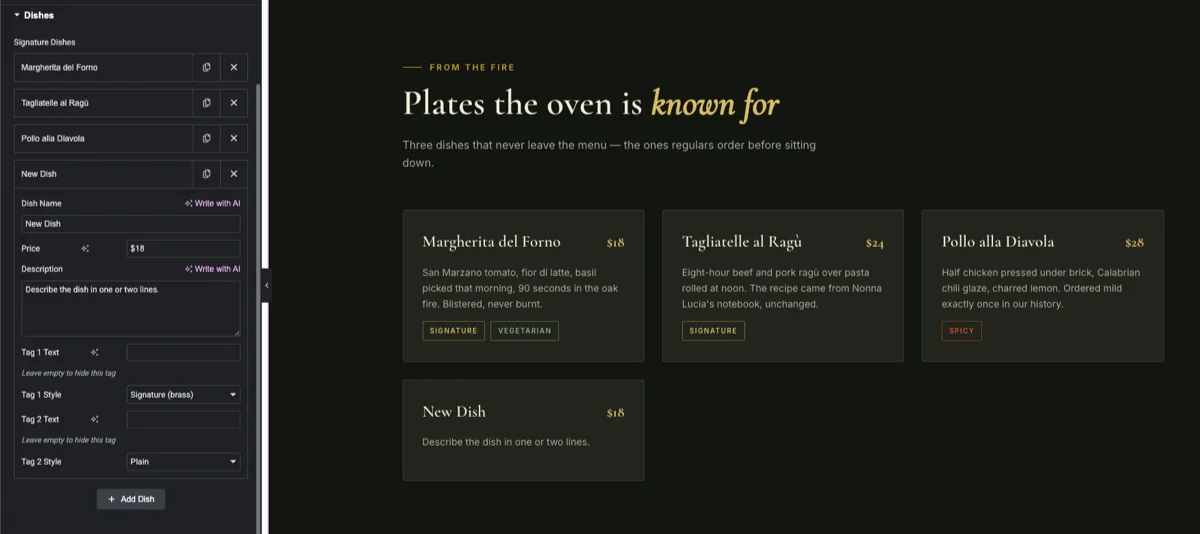
A Repeater field renders Elementor’s standard repeater control in your widget’s option panel. When someone selects the widget, they see a stack of collapsible rows with four familiar actions:
- Add Item: a button below the rows creates a new item with your default values.
- Duplicate: the copy icon clones a row, settings and all.
- Reorder: rows drag and drop into a new order, and the page updates to match.
- Remove: the delete icon takes a row out.
Each row expands to show the sub-fields you defined: text, textarea, select, media, URL, icons, and the other Widget Builder field types can all live inside a Repeater. This differs from the single-value fields like Text in one important way: the connection to your HTML is a loop, not a one-off shortcode. If you are new to building widgets, start with the Widget Builder overview first.
Before you start #
- WordPress with Elementor installed and active.
- Master Addons for Elementor installed and active. New to the plugin? See the installation guide.
- A custom widget open in the Widget Builder editor. Our example is a restaurant “signature dishes” section that renders a 3-column grid of cards, one card per Repeater row.
How to add a Repeater field #
In the Widget Builder editor, scroll the fields panel on the left until you find the Repeater field, listed with the other structural fields.
Drag the Repeater into a section under the Content tab, where repeating content belongs. Once it lands, the field’s options open on the left, and this is where the real setup happens: defining the sub-fields each row will carry.
Repeater field options explained #
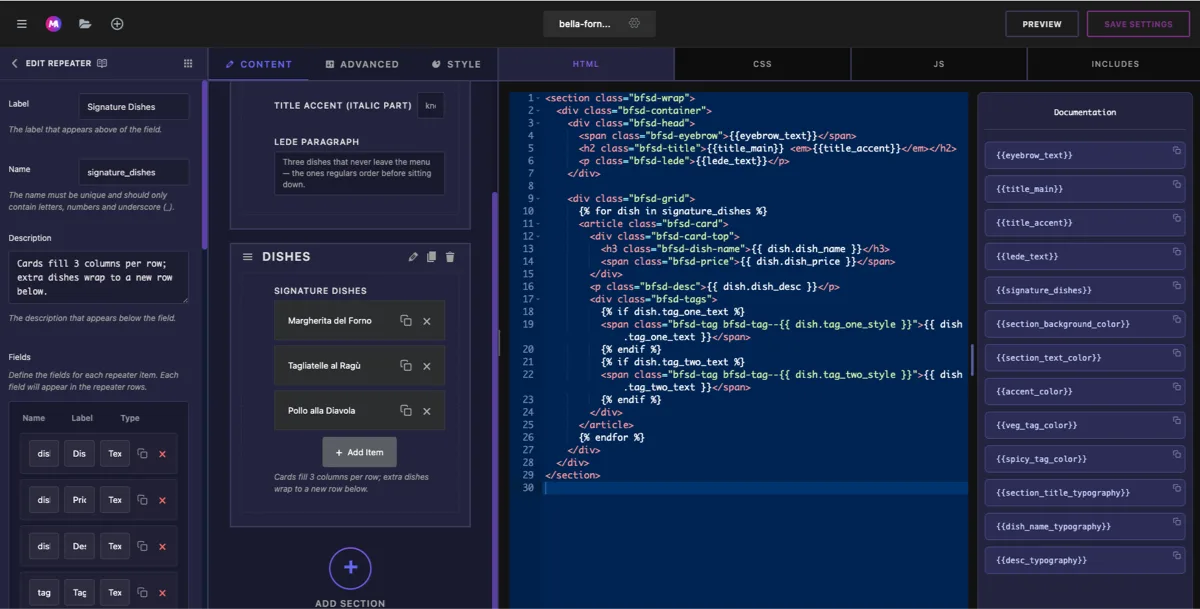
- Label: the heading shown above the rows in Elementor, for example “Signature Dishes”.
- Name: the unique identifier for the whole repeater, letters, numbers, and underscores only. This is the name your loop refers to, for example
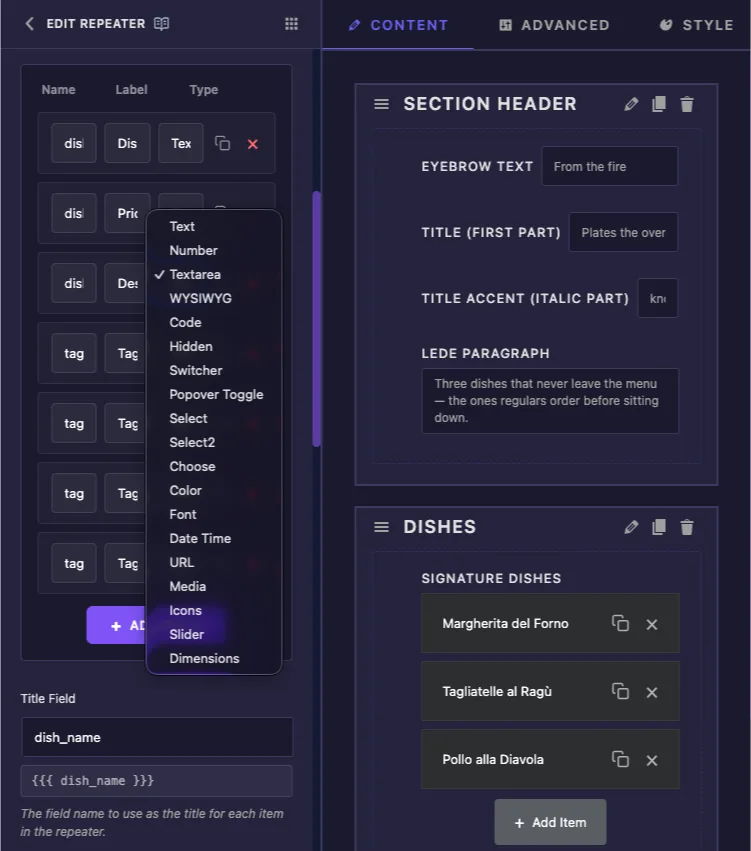
signature_dishes. - Fields: the sub-fields every row contains. Add one per piece of per-item content — in the dish example: a Dish Name text field, a Price text field, a Description textarea, and a Tag Style select.
- Title Field: which sub-field labels the collapsed row, written as
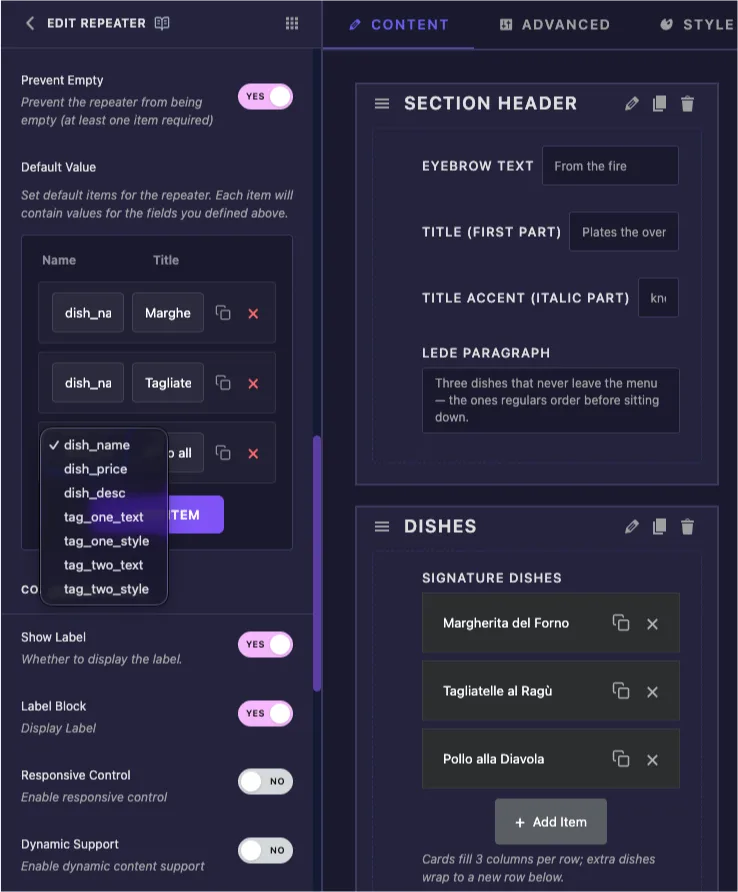
{{{ dish_name }}}. Defaults to the first sub-field, which is usually what you want. - Default: the rows the widget starts with. Ship two or three filled-in items so the widget looks alive on first drop.
- Button Text: the label on the add button, for example “Add Dish” instead of the generic “Add Item”.
- Prevent Empty: stops the user from deleting the last remaining row.
- Min / Max Items: optional bounds on how few or how many rows are allowed.
Connect the Repeater to your HTML with a loop #
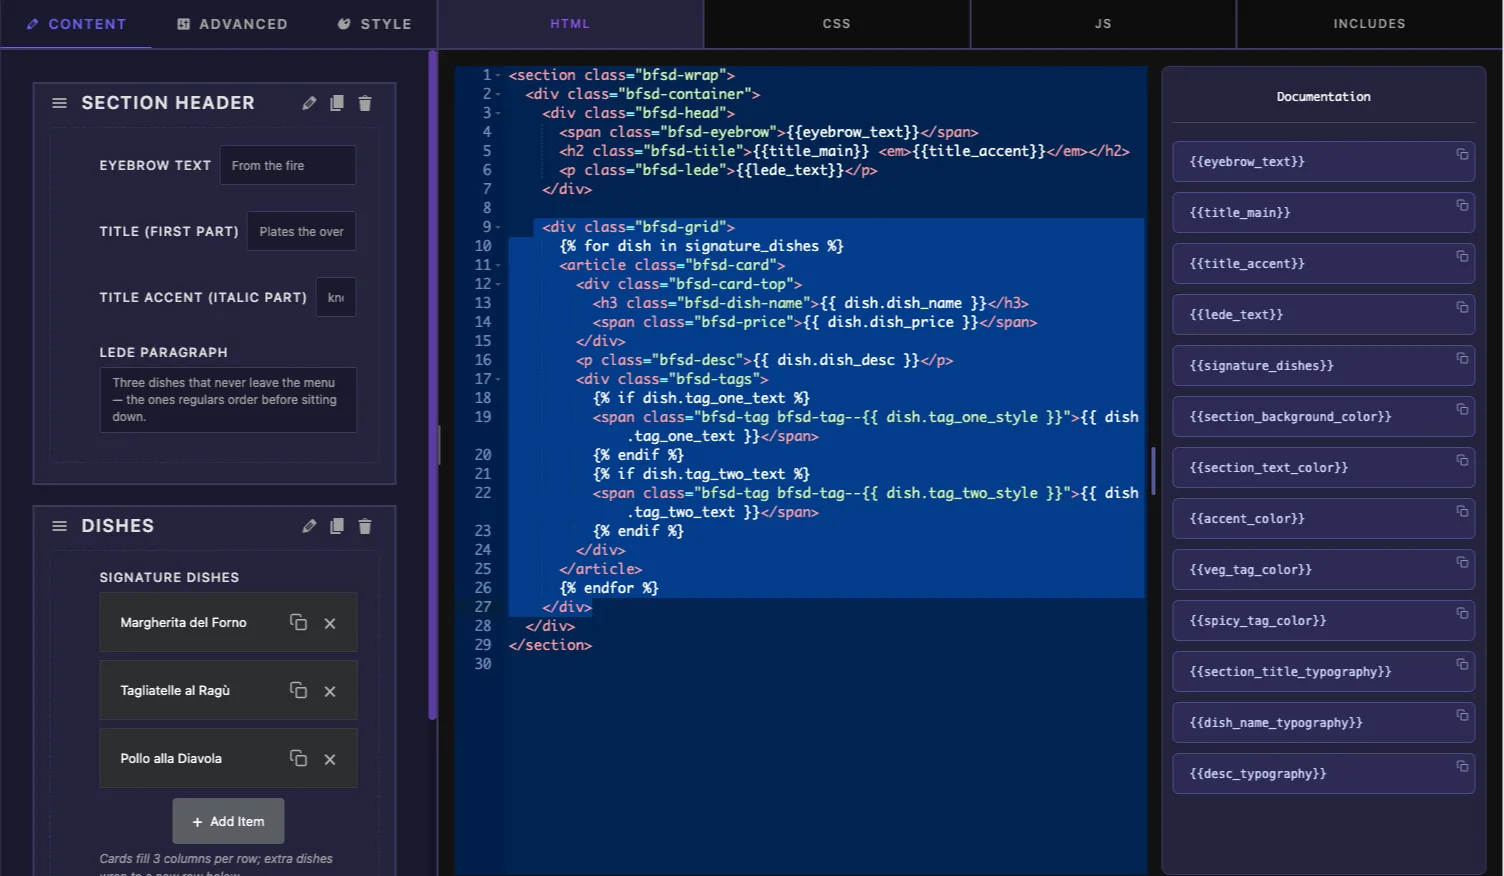
Here is the part that works differently from every single-value field: the Repeater has no plain {{shortcode}}. Its value is a list of rows, so your HTML wraps the repeating markup in a {% for %} block. Inside the loop, each sub-field is available on the loop variable:
<div class="dish-grid">
  {% for dish in signature_dishes %}
  <article class="dish-card">
    <h3>{{ dish.dish_name }}</h3>
    <span class="price">{{ dish.dish_price }}</span>
    <p>{{ dish.dish_desc }}</p>
  </article>
  {% endfor %}
</div>signature_dishesis the Repeater’s Name.dishis a loop variable you invent on the spot; call it anything.{{ dish.dish_name }}prints that row’s Dish Name. Every sub-field works the same way:{{ dish.<sub_field_name> }}.- Everything between
{% for %}and{% endfor %}prints once per row, in the order the rows sit in the panel.
Optional fields inside the loop #
Wrap anything optional in an {% if %} block so empty fields don’t leave stray markup behind. In the dish example, each card has an optional tag badge:
{% if dish.tag_text %}
<span class="tag tag--{{ dish.tag_style }}">{{ dish.tag_text }}</span>
{% endif %}
A row with an empty Tag Text renders no badge at all. The {% if %} block also accepts comparisons like {% if dish.tag_style == 'spicy' %} when you need markup that changes per value.
Media and link sub-fields #
An image sub-field prints its URL directly, as in <img src="{{ dish.photo }}">, and a URL sub-field exposes its address the same way. Nested properties are available with dot notation when you need them.
Use the Repeater in Elementor #
Add your custom widget to a page in Elementor, or reload the editor if the page was already open. The Repeater shows up as a stack of rows under the label you set, each row titled by its Title Field.
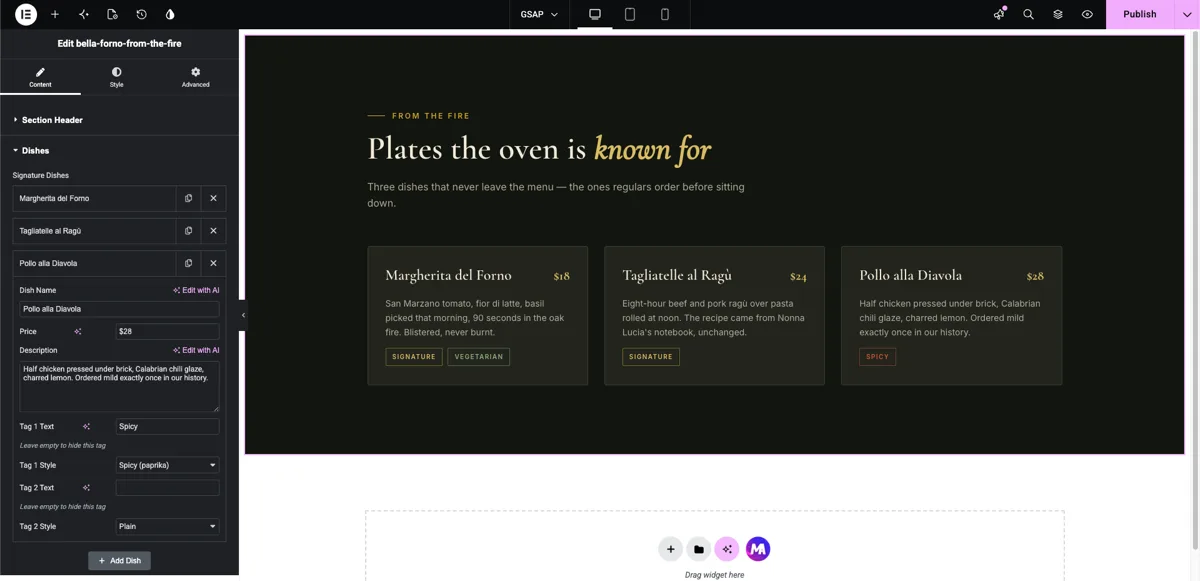
Click a row to expand its sub-fields and edit them; the preview updates live. If a new row renders nothing at all, check that the loop name in your HTML matches the Repeater’s Name field exactly — a mismatch fails silently instead of throwing an error. Click Add Dish (or whatever your Button Text says) and a new row appears with your default values, ready to edit. Drag the handle on any row to reorder, and the cards on the page follow.
Because the loop prints every row, the layout grows with the content. In our 3-column dish grid, the first three cards fill a row; a fourth dish starts a second row underneath, automatically, because that is how the widget’s CSS grid wraps.
Common use cases #
- Card grids — services, features, pricing tiers, dishes, or team members, one row per card.
- Menus and price lists — restaurants, salons, and gyms where items change weekly.
- Logo walls and client lists — an image sub-field per row.
- FAQ and accordion sections — a question text field and an answer textarea per row.
- Timelines and process steps — ordered rows the user can drag into sequence.
Tips for working with the Repeater field #
- The loop is the connection. There is no
{{repeater_name}}shortcode to print on its own; the repeater only makes sense inside{% for %}…{% endfor %}. - Ship real defaults. Two or three filled-in rows make the widget presentable the moment it is dropped, and they double as an example of what each field expects.
- Set the Title Field. Collapsed rows labeled “Margherita del Forno” are far easier to manage than three rows all labeled “Item”.
- Guard optional fields with
{% if %}. Empty spans and empty wrappers are invisible until they break your spacing. - Let CSS handle the row count. A grid with
repeat(3, 1fr)wraps extra items to new rows on its own; the loop just prints cards. - Name sub-fields clearly.
{{ dish.dish_price }}reads better in a template than{{ dish.field_2 }}, for you and for whoever inherits the widget.
Frequently Asked Questions #
What is the Repeater field in the Master Addons Widget Builder?
The Repeater field adds Elementor’s repeatable-rows control to a custom widget. You define a set of sub-fields once, and users add, duplicate, reorder, and remove rows from the Elementor panel. Your HTML prints each row through a for loop, so the layout grows with the content.
How do I display Repeater items in my widget HTML?
Wrap the repeating markup in a loop: {% for item in my_repeater %} … {% endfor %}, where my_repeater is the Repeater’s Name. Inside the loop, print sub-fields with {{ item.sub_field_name }}. The block renders once per row, in panel order.
Which field types can go inside a Repeater?
The common Widget Builder field types work as sub-fields: text, textarea, select, choose, media, URL, icons, slider, and dimensions among them. Each row carries its own values for every sub-field you define.
Can I limit how many items a user can add?
Yes. Min Items and Max Items bound the row count, and Prevent Empty stops the last row from being deleted. Leave them unset and the list is unlimited.
How do the extra cards flow after the first row is full?
That is the widget CSS’s job, not the Repeater’s. A grid container with, say, three columns wraps the fourth item to a new row automatically. The loop just outputs one block of markup per row and the layout takes it from there.
Why does my collapsed row say “Item” instead of its name?
The Title Field is unset or points at an empty sub-field. Set it to a triple-brace template like {{{ dish_name }}}, using your first sub-field’s name, and each collapsed row shows its own value.
Wrapping up #
The Widget Builder Repeater field is what turns a fixed layout into a living one: define the sub-fields, print them in a {% for %} loop, and every content decision after that happens in the Elementor panel: add a card, drag it into place, delete it next season. Pair it with the Typography field for editor-controlled fonts and the Border field for card styling, and a single widget covers a whole section of the page. Explore the rest of the Master Addons widgets and extensions, and see the pricing page for what each plan includes.


