

Die Repeaterfeld Verwandeln Sie einen Satz Steuerelemente in so viele Zeilen, wie der Benutzer benötigt. Sie definieren die Felder einmal (einen Namen, einen Preis, eine Beschreibung) und jeder, der das Widget in Elementor bearbeitet, kann Elemente hinzufügen, duplizieren, neu bestellen und aus dem Panel entfernen, genau wie die Repeater in Elementors eigenen Icon List- oder Testimonial Carousel-Widgets. Innerhalb der Master-Add-ons Widget-builderMit dem Repeater erstellen Sie Kartenraster, Menüs, Funktionslisten, Teamabschnitte und alles andere, bei dem die Anzahl der Elemente dem Websitebesitzer und nicht dem Widget-Autor überlassen bleibt.
Der Repeater paart sich mit beiden Begleitsystemen: Bedingungen Zeigt oder versteckt die Steuerung im Panel und die Twig-Syntax-Vorlagen-Engine Rendert seine Reihen am vorderen Ende mit {% for item in my_repeater %} Schleifen und gepunktete Token wie {{ item.title }}. Beide Leitfäden behandeln Einrichtung und Einschränkungen.
Der Repeater arbeitet zusammen mit der Template-Schleife in Ihrem HTML: a {% for %} Block druckt Ihr Markup einmal pro Zeile Drei Elemente rendern drei Karten; fügen Sie eine vierte im Panel hinzu und eine vierte Karte erscheint, kein Code ändert sich.
Was das Repeater-Feld tut #
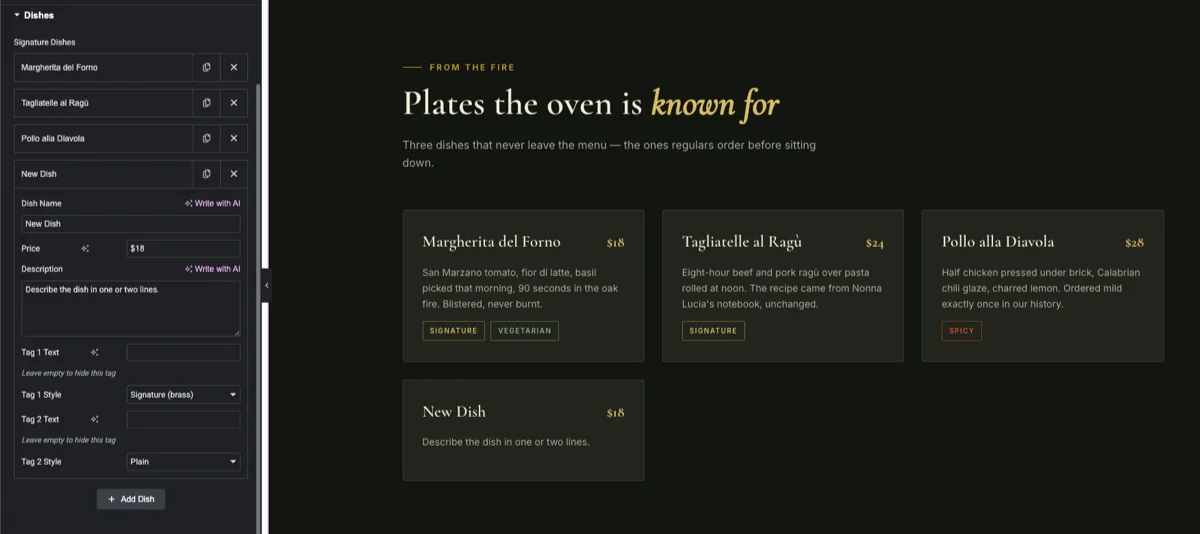
Ein Repeater-Feld rendert die Standard-Repeater-Steuerung von Elementor im Optionsfeld Ihres Widgets. Wenn jemand das Widget auswählt, sieht er einen Stapel zusammenklappbarer Zeilen mit vier bekannten Aktionen:
- Artikel hinzufügen: Ein Button unter den Zeilen erstellt ein neues Element mit Ihren Standardwerten.
- Duplizieren: Das Kopiersymbol klont eine Zeile, Einstellungen und alles.
- Nachbestellen: Zeilen werden per Drag-and-Drop in eine neue Reihenfolge gezogen und die Seite wird entsprechend aktualisiert.
- Entfernen: Das Löschsymbol führt eine Zeile aus.
Jede Zeile wird erweitert, um die von Ihnen definierten Unterfelder anzuzeigen: Text, Textbereich, Auswahl, Medien, URL, Symbole, und die anderen Widget Builder-Feldtypen können alle innerhalb eines Repeaters leben Dies unterscheidet sich von den einwertigen Feldern wie Text In einer wichtigen Weise: Die Verbindung zu Ihrem HTML ist eine Schleife, kein einmaliger Shortcode, wenn Sie neu im Erstellen von Widgets sind, beginnen Sie mit dem Übersicht über Widget Builder Zuerst.
Bevor Sie beginnen #
- Wordpress Mit Elementer Installiert und aktiv.
- Master-Addons für Elementor Installiert und aktiv Neu im Plugin? siehe die Installationsführung.
- Ein benutzerdefiniertes Widget öffnet sich im Widget Builder Editor Unser Beispiel ist ein Restaurant “Signaturgeschirr” Abschnitt, der ein 3-Spalten-Raster von Karten rendert, eine Karte pro Repeater-Reihe.
So fügen Sie ein Repeater-Feld hinzu #
Scrollen Sie im Widget Builder-Editor im Feldfenster auf der linken Seite, bis Sie das gefunden haben Repetierer Feld, mit den anderen Strukturfeldern aufgeführt.
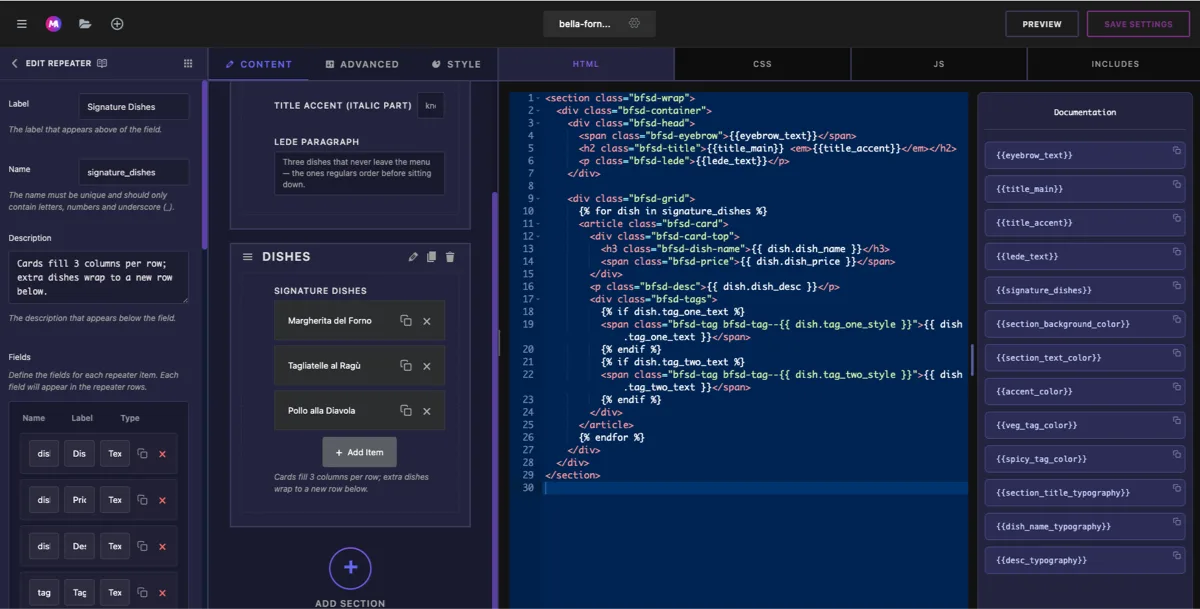
Ziehen Sie den Repeater in einen Abschnitt unter dem Inhalt Tab, wo sich wiederholende Inhalte hingehören Sobald es gelandet ist, öffnen sich links die Optionen des Feldes, und hier geschieht das eigentliche Setup: Definieren der Unterfelder, die jede Zeile tragen wird.
Optionen für Repeater-Feld erklärt #
- Etikett: Die über den Zeilen in Elementor abgebildete Überschrift, zum Beispiel “Signaturgerichte”.
- Name: Die eindeutige Kennung für den gesamten Repeater, Buchstaben, Zahlen und Unterstriche nur Dies ist der Name, auf den sich Ihre Schleife bezieht, zum Beispiel
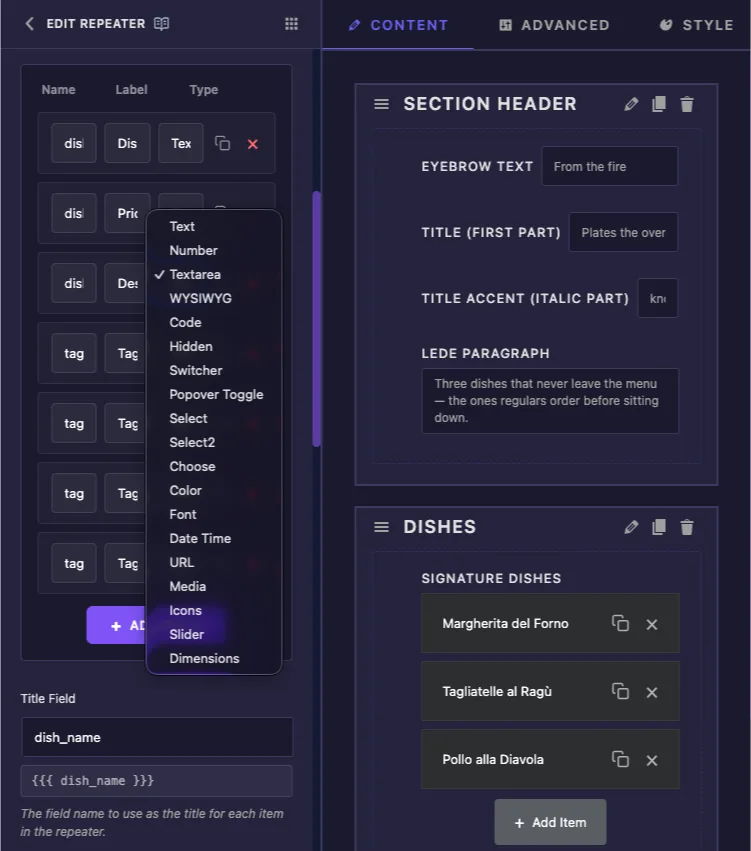
signature_dishes. - Felder: Die Unterfelder jeder Zeile Fügen Sie pro Stück einen Inhalt pro Element hinzu. Preis im Schüsselbeispiel: ein D-Name-Textfeld, ein Beschreibungsfeld, ein Beschreibungstext und eine Tag-Stilauswahl.
- Titelfeld: Welches Unterfeld bezeichnet die zusammengeklappte Zeile, geschrieben als
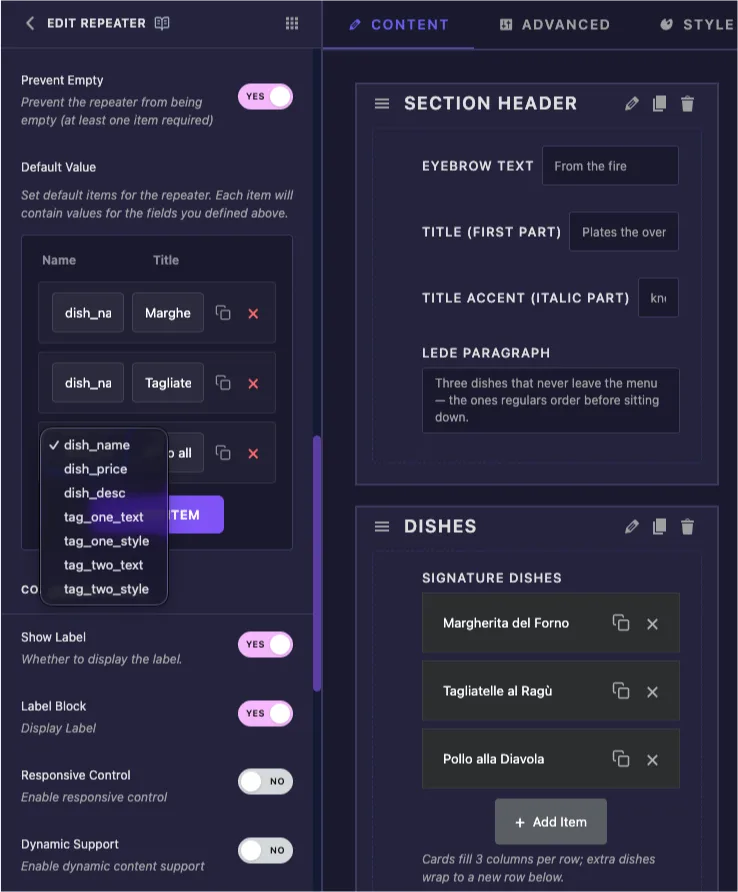
{{{ dish_name }}}. Standardmäßig zum ersten Unterfeld, was normalerweise das ist, was Sie wollen. - Standard: Die Zeilen, mit denen das Widget beginnt Versand zwei oder drei ausgefüllte Elemente, damit das Widget beim ersten Drop lebendig aussieht.
- Tastentext: Die Beschriftung auf dem Add-Button, zum Beispiel “Add Dish” statt des generischen “Add Item”.
- Leere verhindern: Hält den Benutzer davon ab, die letzte verbleibende Zeile zu löschen.
- Min. / Max. Artikel: Optionale Grenzen dafür, wie wenige oder wie viele Zeilen zulässig sind.
Verbinden Sie den Repeater mit einer Schleife mit Ihrem HTML #
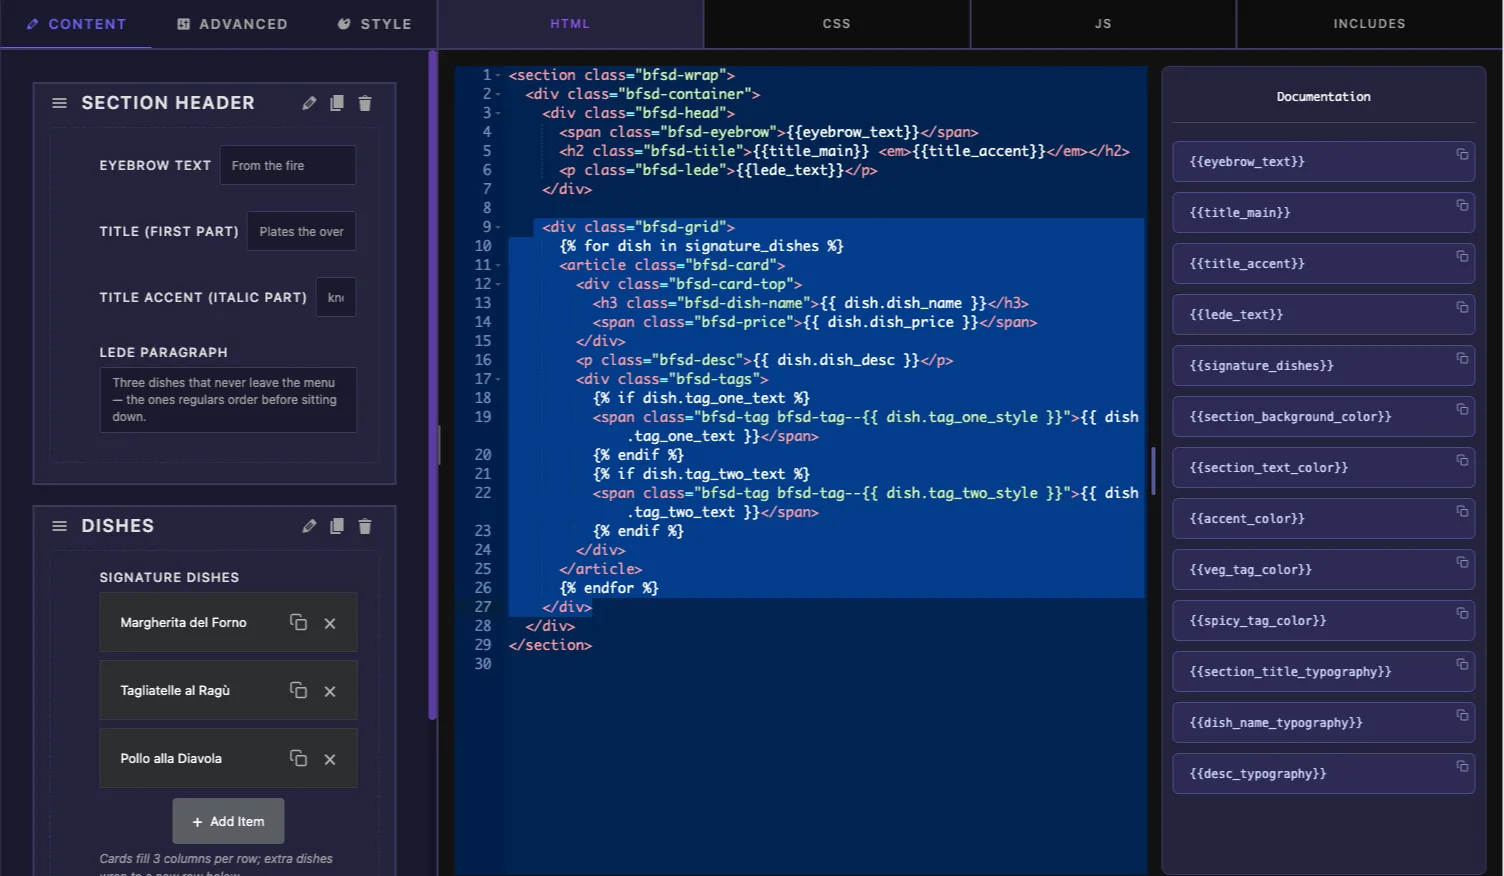
Hier ist der Teil, der von jedem Einzelwertfeld anders funktioniert: Der Repeater hat keine Ebene {{shortcode}}. Sein Wert ist eine Liste von Zeilen, also wickelt Ihr HTML das sich wiederholende Markup in a {% for %} Block. Innerhalb der Schleife steht jedes Unterfeld auf der Schleifenvariablen zur Verfügung:
<div class="dish-grid">
  {% for dish in signature_dishes %}
  <article class="dish-card">
    <h3>{{ dish.dish_name }}</h3>
    <span class="price">{{ dish.dish_price }}</span>
    <p>{{ dish.dish_desc }}</p>
  </article>
  {% endfor %}
</div>signature_dishesName des Repeaters ist.dishSchleifenvariable ist, die Sie vor Ort erfinden; nennen Sie es alles.{{ dish.dish_name }}Druckt den Dish-Namen dieser Zeile. Jedes Unterfeld funktioniert auf die gleiche Weise:{{ dish.<sub_field_name> }}.- Alles zwischen
{% for %}und{% endfor %}Druckt einmal pro Reihe, in der Reihenfolge, in der die Reihen im Panel sitzen.
Optionale Felder innerhalb der Schleife #
Verpacken Sie alles, was optional ist, in ein {% if %} Block, damit leere Felder keine verirrten Markups hinterlassen Im Gerichtbeispiel hat jede Karte ein optionales Tag-Abzeichen:
{% if dish.tag_text %}
<span class="tag tag--{{ dish.tag_style }}">{{ dish.tag_text }}</span>
{% endif %}
Eine Reihe mit leerem Tag-Text rendert überhaupt kein Abzeichen Die {% if %} Block akzeptiert auch Vergleiche wie {% if dish.tag_style == 'spicy' %} Wenn Sie ein Markup benötigen, das sich pro Wert ändert.
Medien und Link-Teilfelder #
Ein Bildunterfeld druckt seine URL direkt aus, wie in <img src="{{ dish.photo }}">, und ein URL-Unterfeld legt seine Adresse genauso frei Verschachtelte Eigenschaften sind mit Punktnotation verfügbar, wenn Sie sie benötigen.
Verwenden Sie den Repeater in Elementor #
Fügen Sie Ihr benutzerdefiniertes Widget zu einer Seite in Elementor hinzu oder laden Sie den Editor neu, wenn die Seite bereits geöffnet war. Der Repeater wird als Zeilenstapel unter dem von Ihnen festgelegten Etikett angezeigt, wobei jede Zeile durch ihr Titelfeld betitelt wird.
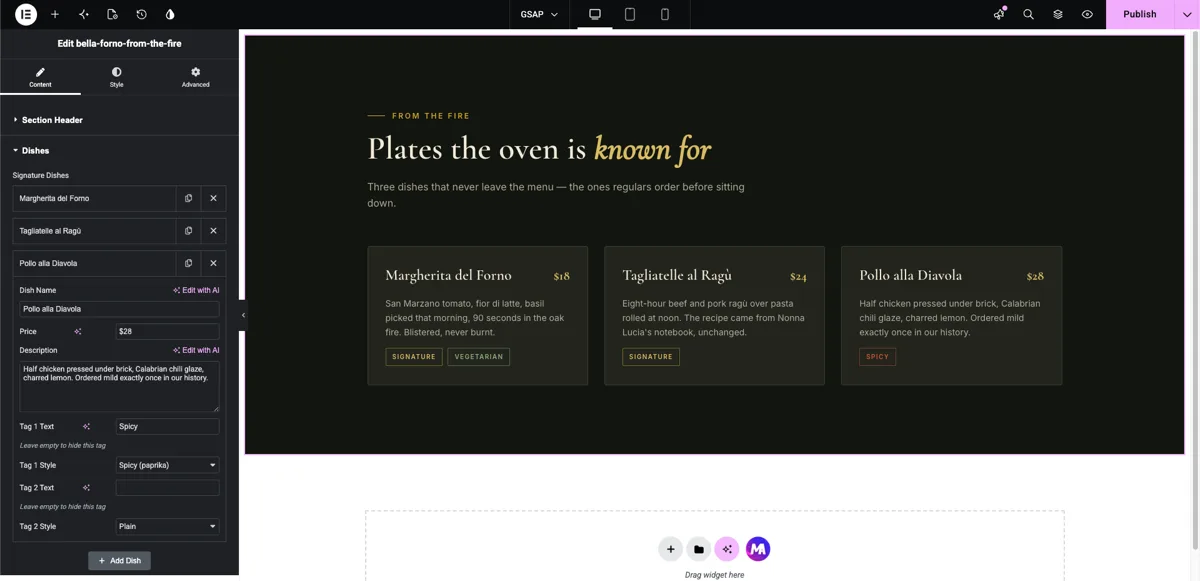
Klicken Sie auf eine Zeile, um ihre Unterfelder zu bearbeiten; die Vorschau aktualisiert live, Wenn eine neue Zeile überhaupt nichts rendert, überprüfen Sie, ob der Schleifenname in Ihrem HTML mit dem Feld Repeater's Name exakt übereinstimmt. Eine Nichtübereinstimmung schlägt im Stillen fehl, anstatt einen Fehler zu werfen. Klicken Sie. Gericht hinzufügen (oder was auch immer Ihr Schaltflächentext sagt) und eine neue Zeile mit Ihren Standardwerten erscheint, bereit zum Bearbeiten Ziehen Sie den Griff in eine beliebige Zeile, um ihn neu zu ordnen, und die Karten auf der Seite folgen.
Weil die Schleife jede Zeile ausdruckt, wächst das Layout mit dem Inhalt In unserem 3-Spalten-Schüsselraster füllen die ersten drei Karten eine Reihe; ein viertes Gericht startet eine zweite Reihe darunter, automatisch, denn so wickelt sich das CSS-Gitter des Widgets.
Häufige Anwendungsfälle #
- Kartengitter „Eine Reihe, Funktionen, Preisklassen oder Teammitglieder pro Karte.
- Menüs und Preislisten „Restaurants, Salons und Fitnessstudios, in denen sich die Artikel wöchentlich ändern.
- Logo-Wände und Client-Listen „Ein Unterfeld pro Zeile.
- FAQ und Akkordeon-Abschnitte „Ein Fragetextfeld und eine Antwort pro Zeile.
- Zeitpläne und Prozessschritte „Reihen, in die der Benutzer ziehen kann.
Tipps für die Arbeit mit dem Repeater-Feld #
- Die Schleife ist die Verbindung. Es gibt keine
{{repeater_name}}Shortcode zum Drucken für sich allein; der Repeater macht nur im Inneren Sinn{% for %}…{% endfor %}. - Reale Standardeinstellungen versenden. Zwei oder drei ausgefüllte Zeilen machen das Widget sofort sichtbar, wenn es weggelassen wird, und dienen gleichzeitig als Beispiel dafür, was jedes Feld erwartet.
- Legen Sie das Titelfeld fest. Zusammengebrochene Zeilen mit der Bezeichnung “Margherita del Forno” sind weitaus einfacher zu verwalten als drei Reihen, die alle mit “Item” gekennzeichnet sind.
- Wache optionale Felder mit
{% if %}. Leere Spannweiten und leere Umhüllungen sind unsichtbar, bis sie Ihren Abstand durchbrechen. - Lassen Sie CSS die Zeilenanzahl verwalten. Ein Gitter mit
repeat(3, 1fr)Verpackt zusätzliche Elemente selbstständig in neue Zeilen; Die Schleife druckt nur Karten. - Unterfelder klar benennen.
{{ dish.dish_price }}Liest sich in einer Vorlage besser als{{ dish.field_2 }}„für Sie und für denjenigen, der das Widget erbt.
Häufig gestellte Fragen #
Was ist das Repeater-Feld im Master Addons Widget Builder?
Das Repeater-Feld fügt die Steuerung wiederholbarer Zeilen von Elementor zu einem benutzerdefinierten Widget hinzu. Sie definieren einmal eine Reihe von Unterfeldern und Benutzer fügen Zeilen hinzu, duplizieren sie neu, ordnen sie neu und entfernen sie aus dem Elementor-Panel. Ihr HTML druckt jede Zeile durch eine for-Schleife, sodass das Layout mit dem Inhalt wächst.
Wie zeige ich Repeater-Elemente in meinem Widget HTML an?
Wickeln Sie das sich wiederholende Markup in eine Schleife: {% for item in my_repeater %} … {% endfor %}(wo my_repeater Ist der Name des Repeaters Drucken Sie innerhalb der Schleife Unterfelder mit {{ item.sub_field_name }}. Der Block wird einmal pro Zeile in Panel-Reihenfolge gerendert.
Welche Feldtypen können in einen Repeater gelangen?
Die gängigen Widget Builder Feldtypen arbeiten als Unterfelder: Text, Textarea, Select, Choose, Media, URL, Icons, Slider, und Dimensionen unter ihnen Jede Zeile trägt für jedes von Ihnen definierte Unterfeld eigene Werte.
Kann ich begrenzen, wie viele Elemente ein Benutzer hinzufügen kann?
Ja. Min Items und Max Items haben die Zeilenanzahl gebunden, und Prevent Leer stoppt das Löschen der letzten Zeile Lassen Sie sie ungesetzt und die Liste ist unbegrenzt.
Wie fließen die Extrakarten, nachdem die erste Reihe voll ist?
Das ist die Aufgabe des Widgets CSS, nicht die des Repeaters Ein Grid-Container mit sagen wir drei Spalten wickelt das vierte Element automatisch in eine neue Zeile aus Die Schleife gibt nur einen Block Markup pro Zeile aus und das Layout nimmt es von dort.
Warum steht in meiner zusammengebrochenen Reihe “Artikel” statt seines Namens?
Das Titelfeld ist ungesetzt oder zeigt auf ein leeres Unterfeld Setzen Sie es auf eine Triple-Brace-Vorlage wie {{{ dish_name }}}Verwenden Sie den Namen Ihres ersten Unterfelds und jede zusammengeklappte Zeile zeigt ihren eigenen Wert.
Einwickelnd #
Das Widget Builder Repeater-Feld macht aus einem festen Layout ein lebendiges: Definieren Sie die Unterfelder und drucken Sie sie in einem aus {% for %} Schleife, und jede Content-Entscheidung danach passiert im Elementor-Panel: Karte hinzufügen, an Ort und Stelle ziehen, nächste Saison löschen Koppeln Sie es mit dem Typografiefeld Für editorgesteuerte Schriftarten und die Grenzfeld Für Kartenstyling, und ein einzelnes Widget deckt einen ganzen Abschnitt der Seite ab Entdecken Sie den Rest der Master Addons Widgets und Erweiterungen, und sehen Sie sich die an Preisseite Für das, was jeder Plan beinhaltet.


