

Key Takeaways
- Free Elementor has no countdown widget at all, so an Elementor countdown timer needs either Elementor Pro or an addon such as Master Addons that adds its own widget.
- The Master Addons Countdown Timer widget counts down to one Countdown Date & Time, with four layouts (Block, Inline, Block Table, Inline Table), a Seperator field for the inline layouts and ten style presets.
- Default and Card come with the Countdown Timer widget; the Flip, Circle, Gradient, Neon, Glassmorphism, Minimal, Outline and Neumorphic presets need Master Addons Pro, and without Pro the widget falls back to Default.
- Every unit from years to seconds has its own Show switch and label field in the Countdown Timer widget, and Repeat countdown (Pro) restarts the timer on a fixed interval that is the same for every visitor.
- The Elementor Pro Countdown widget has a Due Date or Evergreen Timer type and three Actions After Expire (Redirect, Hide, Show Message), while the Master Addons widget stops at zero and stays visible.
An Elementor countdown timer needs a widget that free Elementor does not have. Search the free Elementor panel for “countdown” and nothing comes up. Elementor Pro ships a Countdown widget, and the Master Addons Countdown Timer widget adds one with no Elementor Pro needed. This guide takes the second route.
The steps below use Master Addons 3.2.6 on Elementor 4.3: adding the widget, setting the end date, picking a layout and a style preset, switching units on and off, styling the boxes, and setting up a daily deal that repeats. The Elementor Pro widget gets its own short section and a comparison table, so you can pick the plan that fits.
Table of Contents
What Elementor can and cannot do without Pro
The free Elementor plugin has no countdown widget. Its Counter widget counts up to a number once when it scrolls into view, and that is what people searching for “elementor countdown free” usually find first. Nothing in free Elementor ticks in real time toward a deadline.
Elementor Pro adds a Countdown widget. It is in every Pro plan from Essential upward, listed at $60 a year when we checked on 29 Oct 2026. If you already pay for Pro, that widget is the shortest route, and it has one thing the Master Addons widget lacks: an action when the timer hits zero. We go through its controls further down.
If you run free Elementor and would rather not buy a Pro license for one timer, an addon fills the gap. The Master Addons Countdown Timer widget installs alongside free Elementor and shows up in the panel like any other widget. The widget, two of its presets and all four layouts come with the Master Addons plugin; eight presets and the Repeat countdown switch are in Master Addons Pro, and each one is labeled below.
How to add a countdown timer with Master Addons
The setup is one widget with two Content sections, Timer and Countdown Settings, and a Style tab. Install Master Addons from Plugins > Add New, open the page in Elementor and follow the five steps.
Step 1: Add the Countdown Timer widget
Type Countdown in the widget search box, find the Master Addons Countdown Timer with the MA badge and drag it into a container. In the lab page used for the screenshots it sits in a dark container under a heading that reads “The sale ends in”, with a button underneath.
Step 2: Set the Countdown Date & Time
Open the Timer section. There is one timing control, Countdown Date & Time, and it takes a date and a time such as 2026-12-25 18:00. Pick the moment the sale or the launch window ends. The Repeat countdown switch under it stays off for a one-off deadline; it gets its own section later.
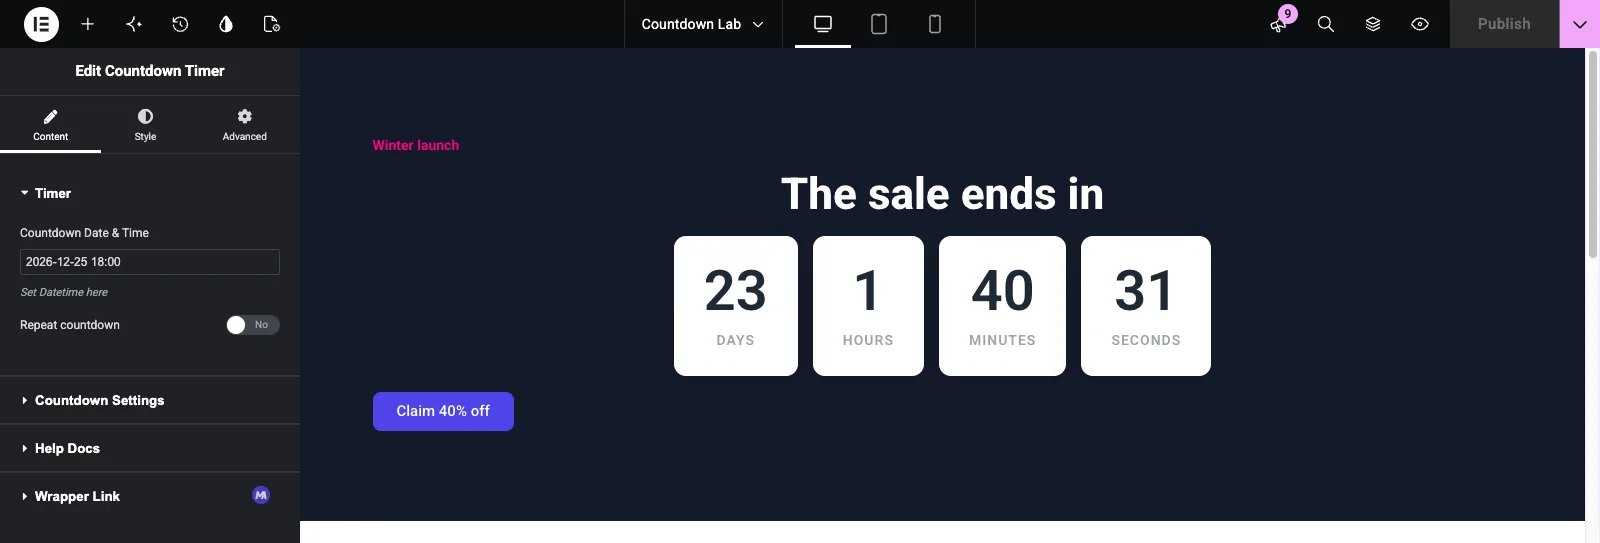
The widget builds the end time in each visitor’s browser, so 18:00 ends at 18:00 on each visitor’s own clock. That suits a store with customers in one country. If the sale has to close at the same moment everywhere, keep this in mind.
Step 3: Pick a Layout, a Style Preset and a Seperator
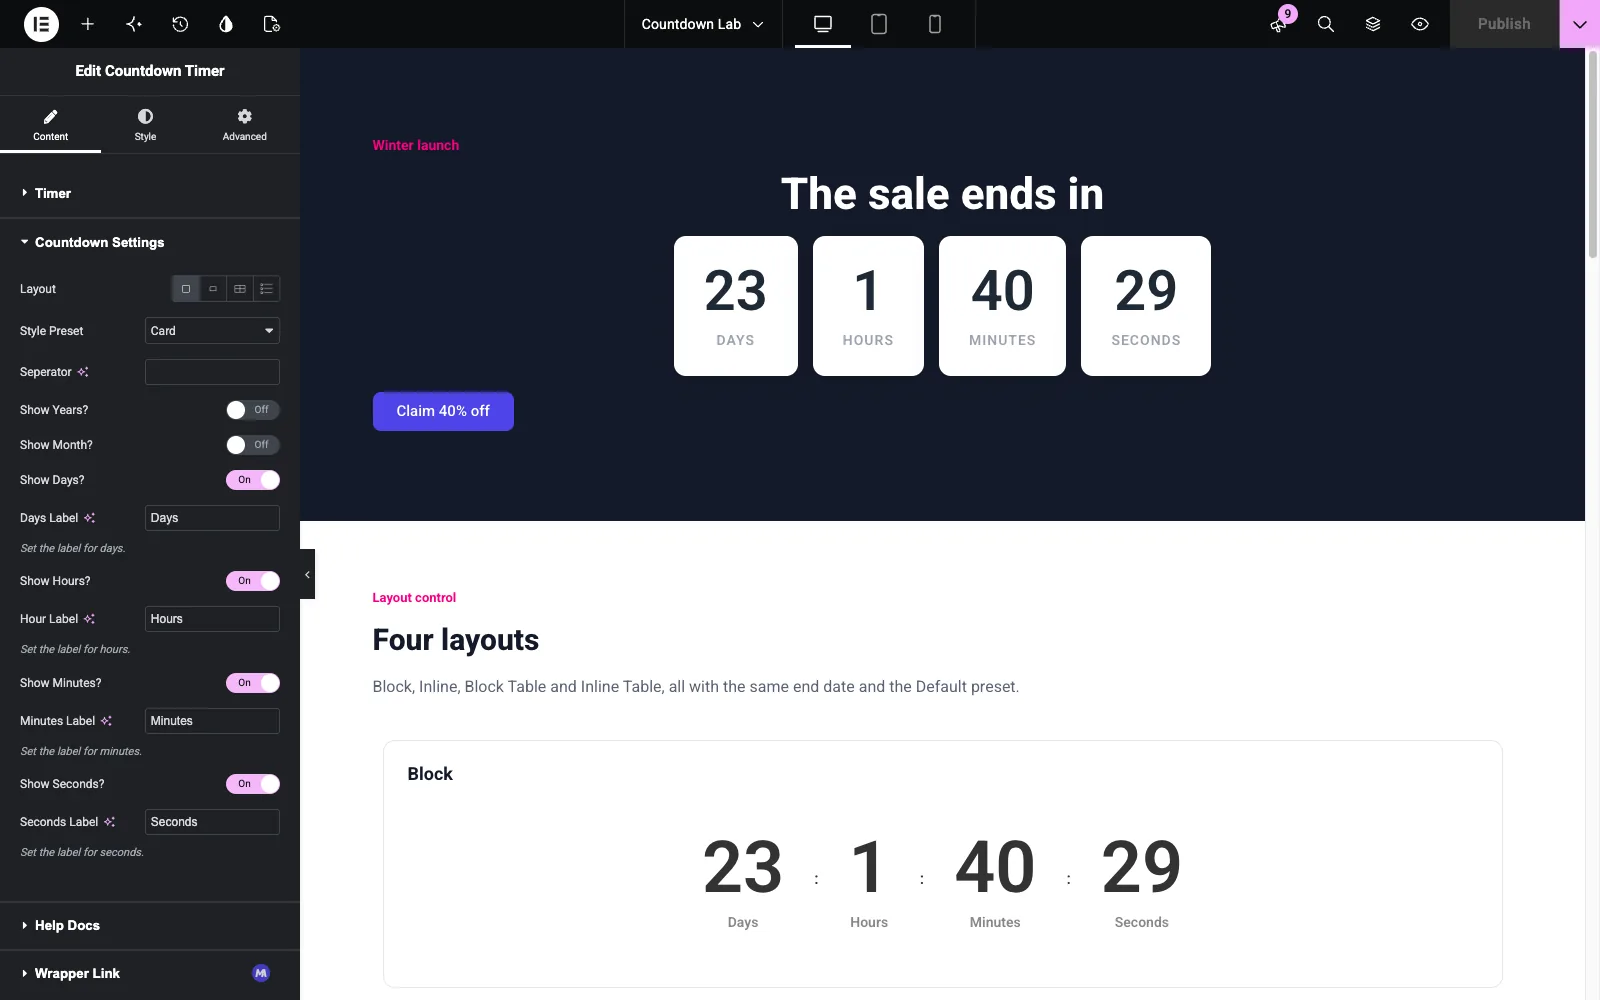
Open Countdown Settings. The first three controls shape the timer:
- Layout has four icons: Block, Inline, Block Table and Inline Table. Block stacks each number above its label and is the usual pick for a hero section.
- Style Preset is a dropdown with ten entries. Card, used in the screenshots, puts each unit in a white box with a soft shadow.
- Seperator (spelled that way in the panel) takes any character and shows it between units in the inline layouts. A colon gives 23 : 2 : 55 : 11; a slash or a dot works the same way.
Step 4: Switch units on and off and name the labels
Each unit under the same section has a Show switch and a label field. A sale a few weeks away works with Days, Hours, Minutes and Seconds on and Years and Months off, as in the screenshot. The label fields are plain text, so “Hours” can become “Hrs” or “HOURS”. The units section further down shows all six on at once.
Step 5: Style the boxes, numbers and labels
The Style tab has five sections. Common Style handles the whole widget: width, height, alignment, background, box shadow, border radius, margin and padding. Counter Style sets a background per unit (Day Background, Hour Background and so on), then the number color with Normal and Hover states, a text shadow and typography. Seperator styles the character between units, Box Style covers the box background, shadow, border and radius, and Label covers the label text. A preset fills most of this in, so the usual edit is a brand color on the numbers and a font change.
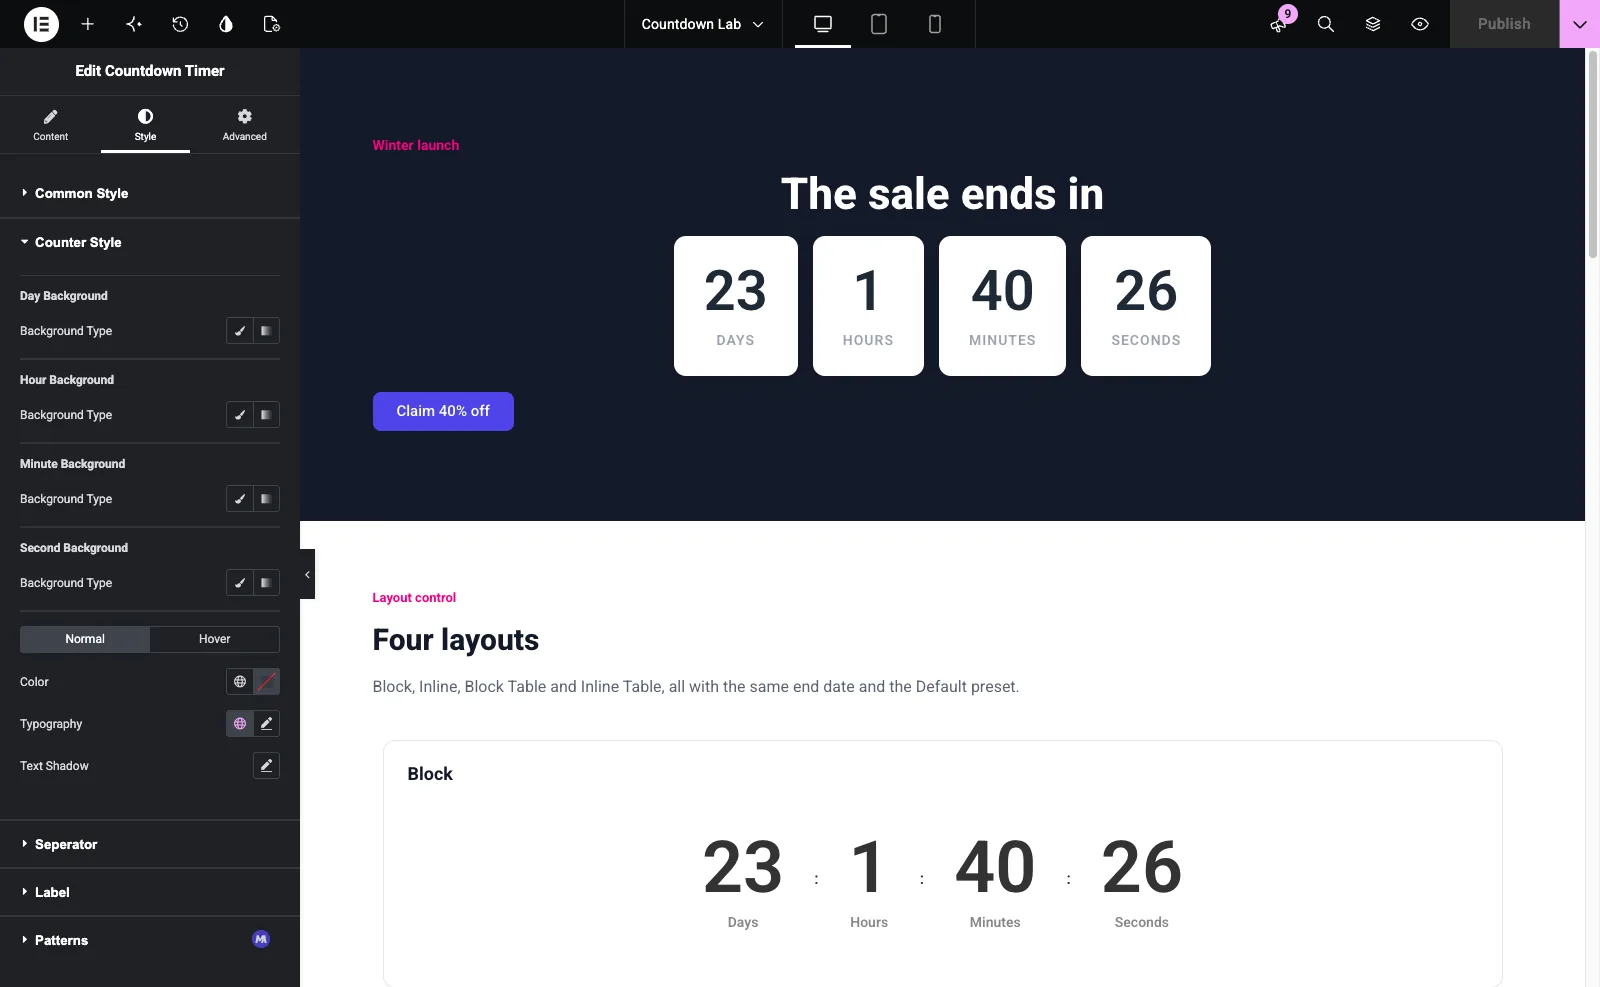
Publish, and the front end ticks down to your date. The screenshot below is the finished lab section with the Card preset.
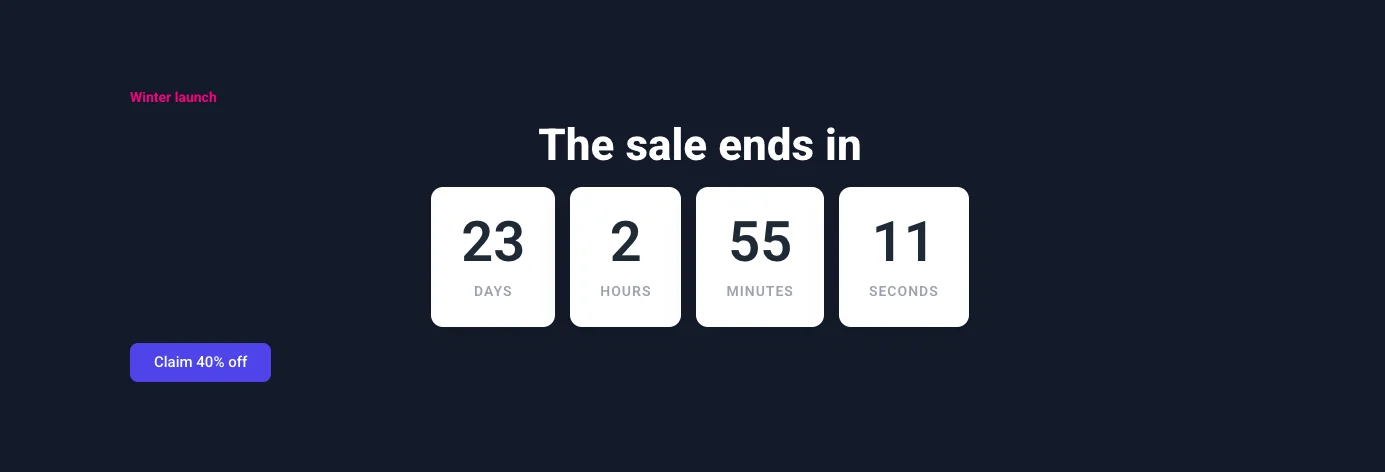
If you would rather watch the steps, the walkthrough below covers the same widget in the editor.
Want to see the ten presets ticking before you install anything? The Countdown Timer widget page has a live demo of each one plus the full control list.
Layouts and style presets
The Layout control changes how numbers and labels sit next to each other; the Style Preset changes how the boxes look. The two combine, so an Inline layout with the Neon preset is one combination and a Block Table layout with Minimal is another.
The four layouts
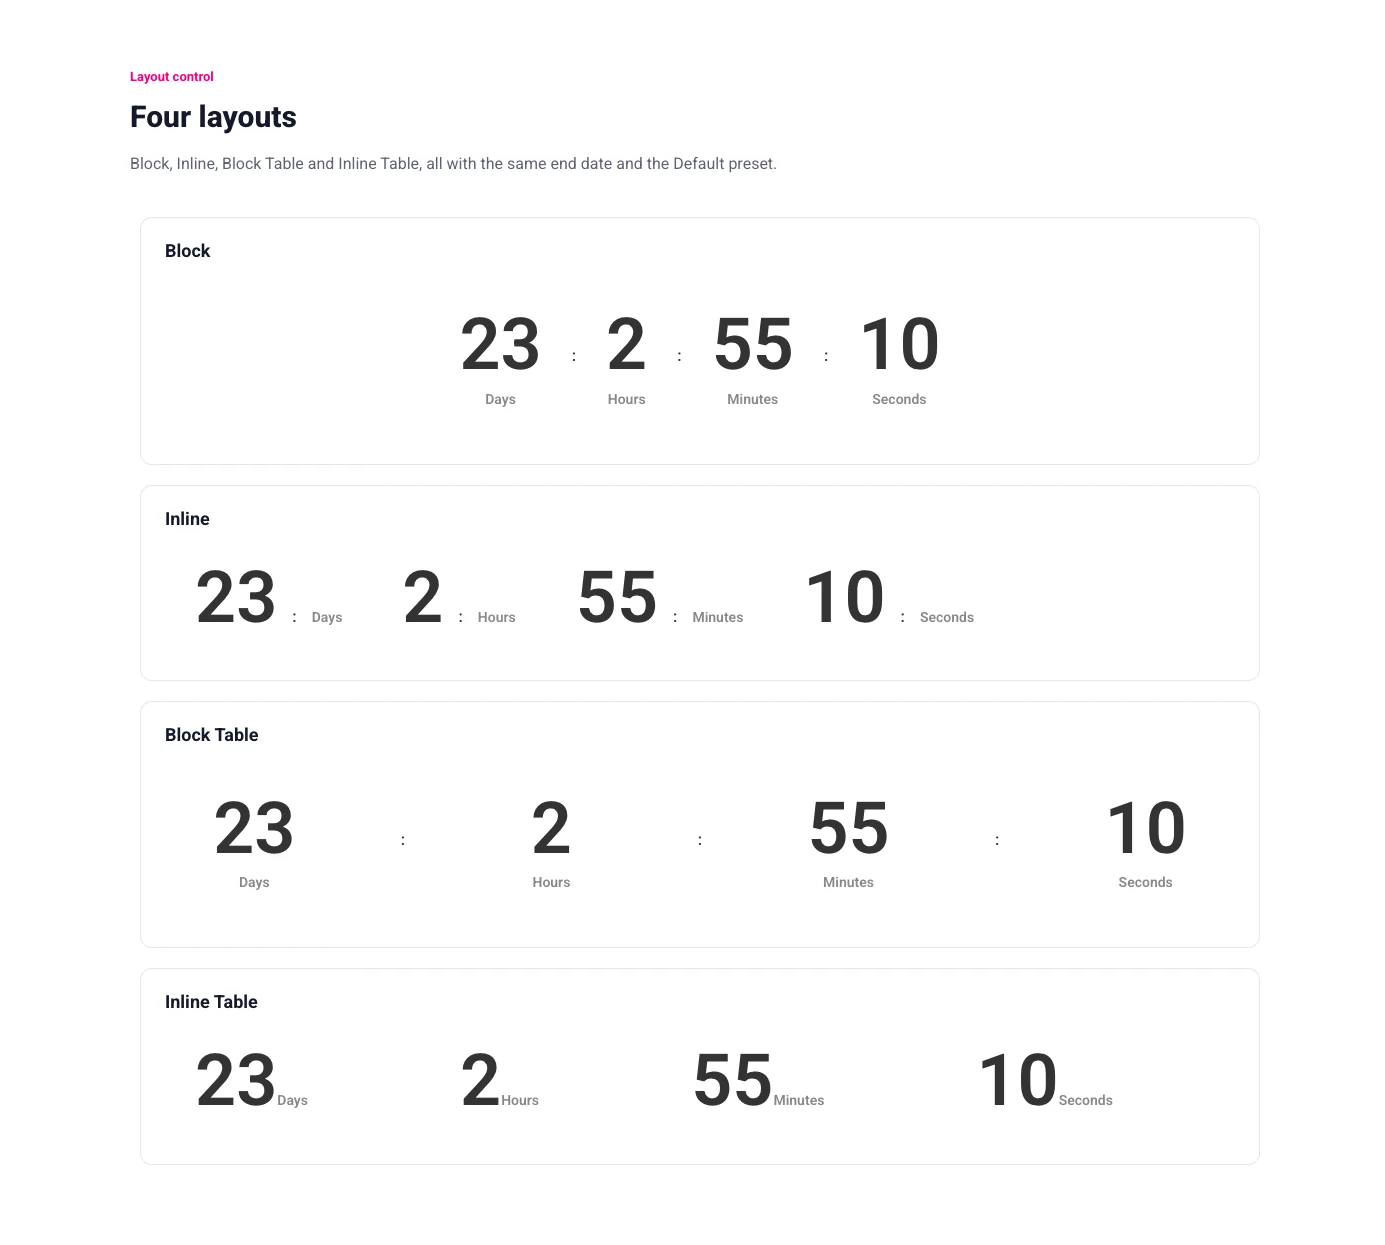
Block puts each number above its label and spaces the units evenly. Inline puts number and label side by side, so “23 Days 2 Hours” reads like a sentence. Block Table spreads the units across the full width of the container like table cells, which suits a wide banner, and Inline Table does the same with the label tucked beside the number. The screenshot shows all four on the Default preset with the same date.
The ten style presets
Default and Card come with the widget. The other eight are labeled (Pro) in the dropdown and need Master Addons Pro: Flip (Pro), Circle (Pro), Gradient (Pro), Neon (Pro), Glassmorphism (Pro), Minimal (Pro), Outline (Pro) and Neumorphic (Pro). If a Pro preset is selected on a site without Pro, the widget renders the Default preset instead. Each preset is a full look, with box backgrounds, number colors and label styles already set, and the Style tab edits sit on top of it.
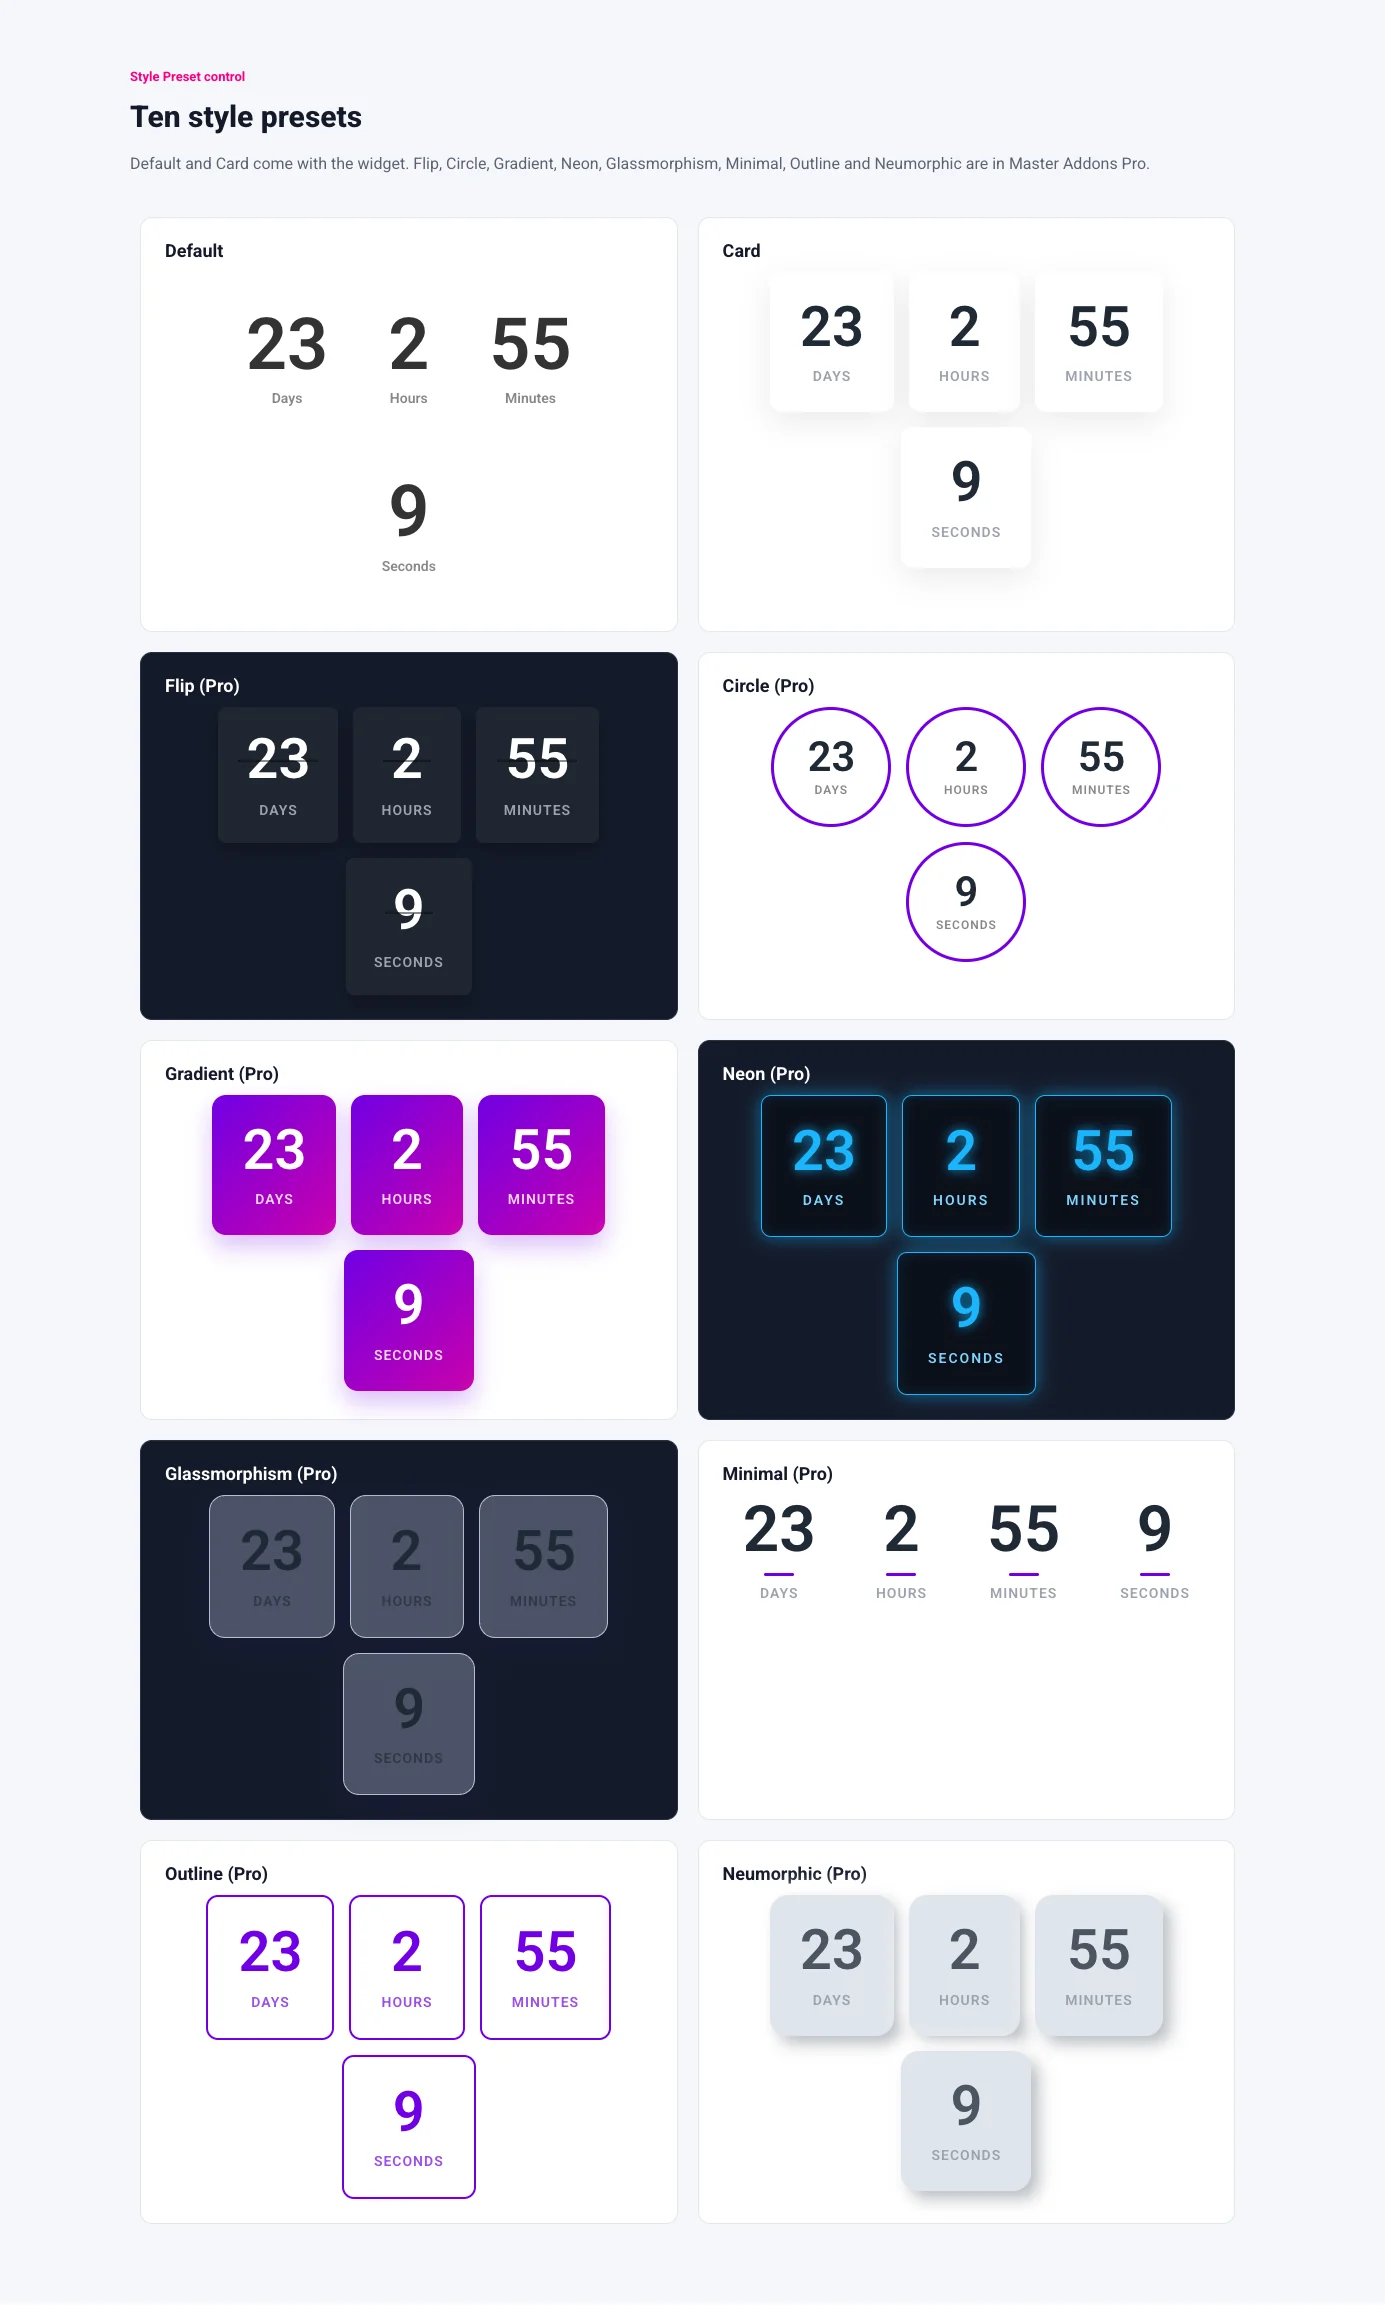
Card and Neumorphic suit light pages; Flip, Neon and Glassmorphism are built for dark backgrounds; Minimal and Outline stay quiet next to a large headline; Circle and Gradient carry a section on their own. Our guide to countdown timer designs goes through each one with a page around it.
Units and labels
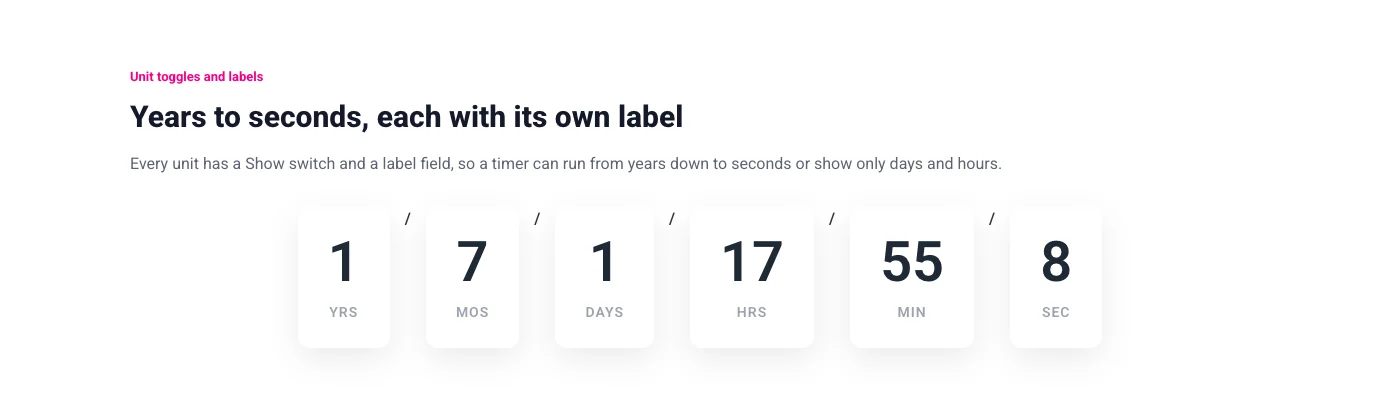
The widget can count years, months, days, hours, minutes and seconds, and each unit is its own switch. For a product that ships next summer, turn Years and Months on so the number stays readable instead of showing 240 days. For a flash sale ending tonight, turn Days off and let Hours, Minutes and Seconds carry it. Switching a unit off does not change the math; the remaining units absorb the time, so a timer with Days off and 2 days left shows 48 hours.
Each label is a text field. Short labels such as Yrs, Mos, Days, Hrs, Min and Sec fit the Card and Circle presets better than the full words, and the labels can be in any language, since the field is plain text. The screenshot has all six units on with those short labels and a slash as the separator.
A daily deal with Repeat countdown (Pro)
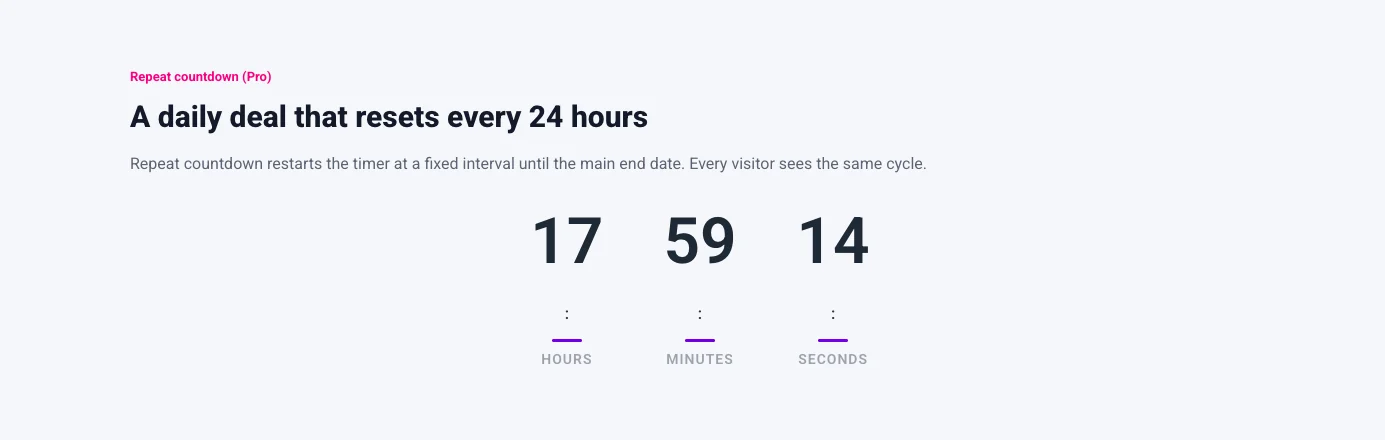
A deal that restarts every day at the same time, or every Monday, is the second most common countdown after a fixed sale. The Repeat countdown switch in the Timer section handles it and needs Master Addons Pro. Turn it on and set a reset interval in years, months, days, hours or minutes. With a one-day interval the timer runs down to zero and starts the next 24 hours straight away, and it keeps doing that until the main Countdown Date & Time arrives, which is the point the deal stops for good.
The cycle is worked out on the server and stored, so every visitor sees the same remaining time and a refresh does not restart it. That works well for a public daily deal with a real cutoff. It can’t give each visitor a timer that starts when they land on the page, because the widget has no such mode. The Countdown Timer documentation lists the interval fields.
What happens at zero
Check two limits before you build around the widget. It has no evergreen per-visitor mode, so it cannot give each visitor their own 15 minutes from the moment they arrive. It also has no after-expire action. When a fixed countdown reaches zero, the numbers stop at 0 and stay on the page, and the widget won’t hide itself, redirect anyone or swap in a message.
If the timer has to disappear when the sale ends, put the section that holds it under a date rule. The Display Conditions extension (Pro) can show a widget or section only inside a date range, so the timer and its button leave at the deadline with the rest of the offer. The other route is to run the whole offer as a popup in the Popup Builder, which has its own display rules, so the timer leaves when the popup does.
Put the timer in a popup or a coming soon page
Two places get more out of a countdown than an ordinary page section. In a popup it gives people a reason to open the offer now, and on a coming soon page the timer is the whole message.
For the popup, build it in the Master Addons Popup Builder, drop the Countdown Timer widget into the popup content next to the headline and the button, and set the display rules in the popup’s admin dialog. The guide to adding a popup in Elementor walks through the builder step by step, including the templates and the trigger choices.
For a launch page, the Elementor coming soon page tutorial puts the Countdown Timer in the middle of a pre-launch layout with a signup form under it. Set the Countdown Date & Time to the launch moment, pick Block layout with the Card or Neon preset, and keep Days, Hours and Minutes on. Because the timer stops at zero and does not redirect, swap the coming soon page for the live site yourself on launch day, or put the coming soon page under a date rule so it expires on its own.
The Elementor Pro Countdown widget
If you have Elementor Pro, its Countdown widget is in the panel already. Per Elementor’s Countdown widget help article, the Type control has Due Date, which counts to a fixed date and time, or Evergreen Timer, which takes a number of hours and minutes and, in the article’s words, means “every single visitor gets the same countdown time frame you set”. View is Block or Inline. Days, Hours, Minutes and Seconds each have a Show switch, and a Custom Labels field changes the text.
Its Actions After Expire control is where it differs most from the Master Addons widget: Redirect to a URL, Hide the countdown, or Show Message with a text field. The Style tab styles Boxes, Digits, Label and the Expire Message. The help article does not mention a time zone setting and the widget has no recurring option, so a daily deal needs a different tool. Elementor’s own hello bar countdown popup tutorial shows the widget inside a top-bar popup with the Evergreen type set to 23 hours 59 minutes.
Elementor Pro Countdown vs Master Addons Countdown Timer
Both widgets count to a fixed date in Block or Inline form with unit switches and custom labels. They differ on what happens at zero, on repeating, and on design presets.
| Factor | Elementor Pro Countdown | Master Addons Countdown Timer |
|---|---|---|
| Plan needed | Elementor Pro (Essential plan or higher) | Master Addons, with or without Elementor Pro; eight presets and Repeat countdown need Master Addons Pro |
| Timer types | Due Date, Evergreen Timer (same time frame for every visitor) | Countdown Date & Time; Repeat countdown (Pro) on a fixed interval, same for every visitor |
| Recurring daily or weekly | No | Yes, with Repeat countdown (Pro), until the main end date |
| Per-visitor evergreen | Evergreen Timer gives every visitor the same time frame; the help doc does not say how it behaves across visits | No |
| When it hits zero | Redirect, Hide or Show Message | Stops at 0 and stays visible; use Display Conditions (Pro) or a popup to remove it |
| Layouts | Block, Inline | Block, Inline, Block Table, Inline Table, plus a Seperator character |
| Units | Days, Hours, Minutes, Seconds | Years, Months, Days, Hours, Minutes, Seconds |
| Style presets | None; style Boxes, Digits and Label by hand | Default and Card included; Flip, Circle, Gradient, Neon, Glassmorphism, Minimal, Outline and Neumorphic in Pro |
| Time zone | Not mentioned in the help article | Deadline follows each visitor’s local clock |
Pick the Elementor Pro widget when you already own Pro and need the timer to hide, redirect or show a message by itself. Pick the Countdown Timer from Master Addons when you are on free Elementor, when the deal repeats on a schedule, or when you want a preset to do the styling. The two coexist, so a site with both plugins can use the Pro widget for a one-off launch and the Master Addons widget for the daily deal bar.
Frequently asked questions
Does Elementor have a countdown timer?
Elementor Pro does; free Elementor does not. The Elementor Pro Countdown widget is in every Pro plan from Essential upward and has a Due Date or an Evergreen Timer type with Redirect, Hide and Show Message actions. On free Elementor you add a countdown through an addon such as the Master Addons Countdown Timer widget.
How do I add a countdown timer in Elementor without Pro?
Install Master Addons, open the page in Elementor and drag in the Countdown Timer widget. Set Countdown Date & Time in the Timer section, choose a Layout and Style Preset under Countdown Settings, switch on the units you want with their labels, and publish. The widget runs on free Elementor, with eight of the ten presets and Repeat countdown in Master Addons Pro.
Why is my countdown timer not working?
Check four things first: the Countdown Date & Time is in the future and in the format the field expects; the WordPress time zone under Settings > General is set, since an unset time zone falls back to UTC; the page cache and Elementor’s Element Cache are cleared after a date change; and the browser console shows no JavaScript error from another plugin or the theme. Digits that show in the editor and not on the live page usually mean a script conflict or a cache.
Can the timer repeat every day?
Yes, with the Repeat countdown switch in the Timer section, which needs Master Addons Pro. Set an interval such as one day, and the timer restarts on that cycle until the main Countdown Date & Time. The cycle is calculated on the server, so every visitor sees the same remaining time and a refresh does not reset it.
What happens when the Master Addons countdown reaches zero?
The numbers stop at 0 and stay on the page. The widget has no after-expire action, so it will not hide, redirect or show a message. To remove it at the deadline, apply a date range through the Display Conditions extension (Pro) to the widget or its section, or run the offer as a Popup Builder popup with its own display rules.
Final thoughts
Free Elementor has no countdown widget, so an Elementor countdown timer comes from Elementor Pro or from an addon. The Master Addons Countdown Timer widget runs on free Elementor with one Countdown Date & Time control, four layouts, a Seperator character, a Show switch and a label for each of six units, and the Default and Card presets; Master Addons Pro adds the other eight presets and Repeat countdown for a daily deal that resets on the server for every visitor. It stops at zero and stays visible, so a timer that has to disappear needs a Display Conditions date range or a popup around it. Go with the Elementor Pro widget when the after-expire action matters more to you than presets or repeating. The countdown timer element page has each preset running live if you want to compare them before you build.
Related reading
