How to Add a Popup in Elementor for Free (No Elementor Pro Required)

Adding a popup in Elementor for free without Pro

You can add popups in Elementor without paying for Elementor Pro. The free version of Elementor doesn’t ship with a popup builder, but Pro isn’t the only way to get one. The free Master Addons for Elementor plugin includes a full popup builder, 100+ ready-made templates, and five trigger types. All of it sits in the free plugin.

Below is how to build, trigger, and target a popup inside Elementor for free, plus answers to the questions that come up most: does Elementor free have a popup builder, what does the elementor/popup/show event do, and how do you fire a popup on a button click without writing JavaScript.

Do You Need Elementor Pro to Create Popups?

Short answer: no. Elementor Pro’s Popup Builder is a paid feature, but it isn’t the only way to add popups inside Elementor.

Here’s what each option actually gives you:

PluginCostPopup builder included?
Elementor (free)FreeNo
Elementor ProPaid annual licenseYes (Pro feature)
Master Addons (free)FreeYes, fully included

So if popups are the only reason you were considering Elementor Pro, you can keep free Elementor, install Master Addons, and get the same drag-and-drop popup experience at no cost. If you already own Pro, Master Addons runs alongside it fine. Nothing conflicts.

What Is Master Addons Popup Builder?

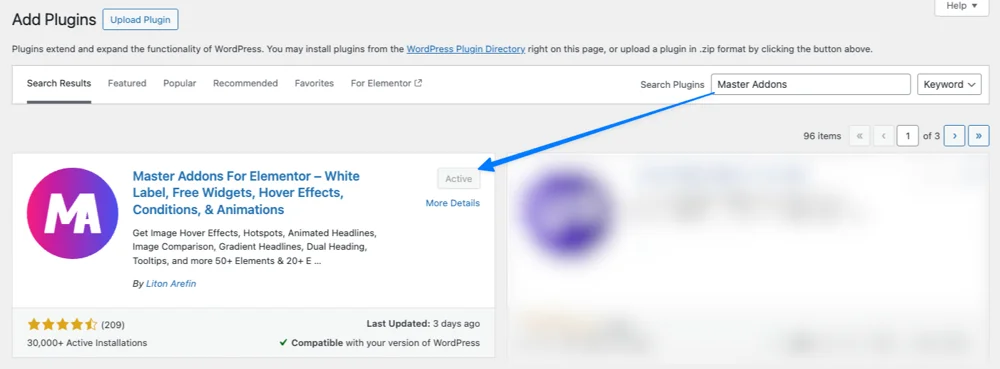
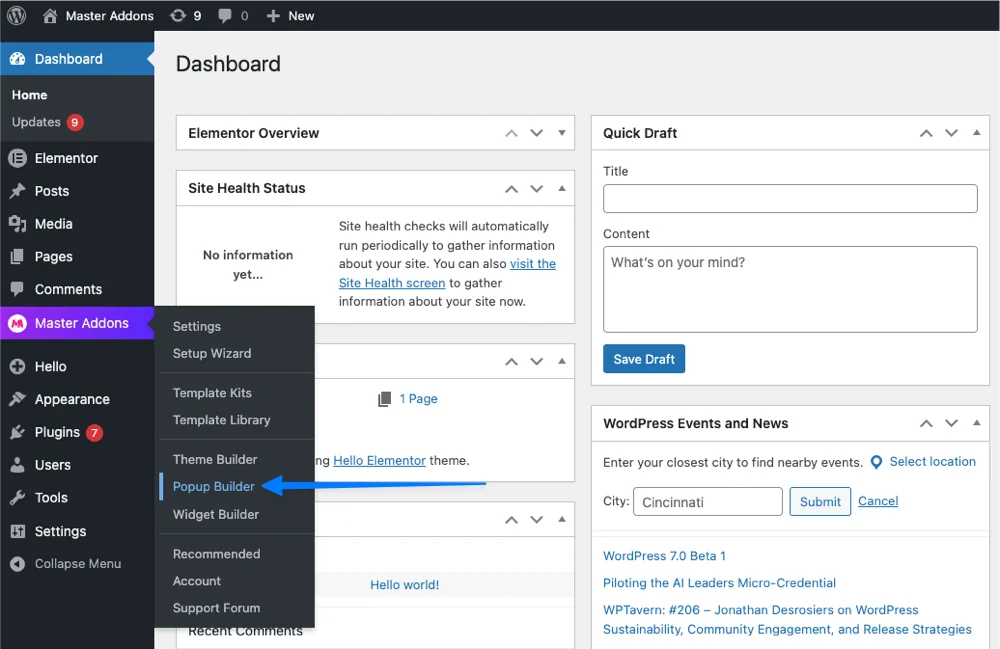
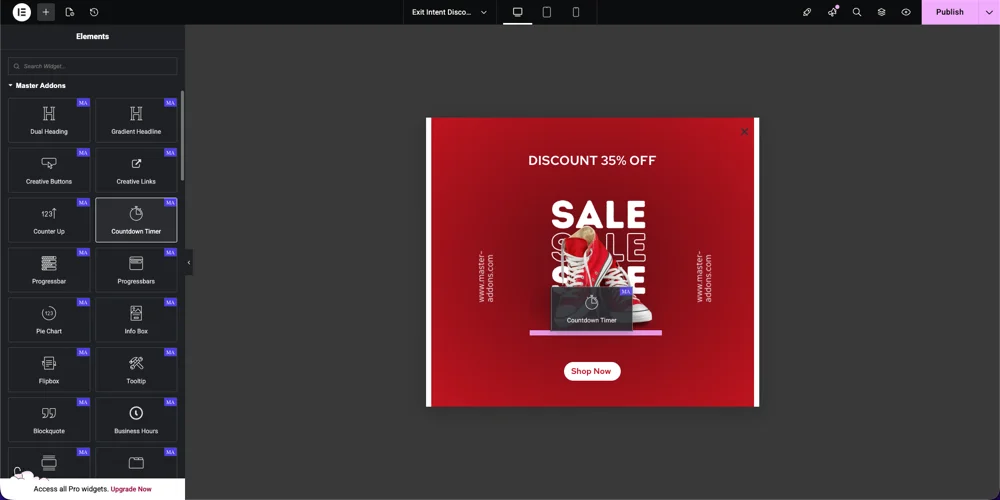
Master Addons is an all-in-one Elementor plugin used by 40,000+ active sites. It ships with 80+ widgets, a Theme Builder, a Template Library, a Widget Builder, and a free Popup Builder. The Popup Builder isn’t a separate purchase. Install the plugin and it’s there.

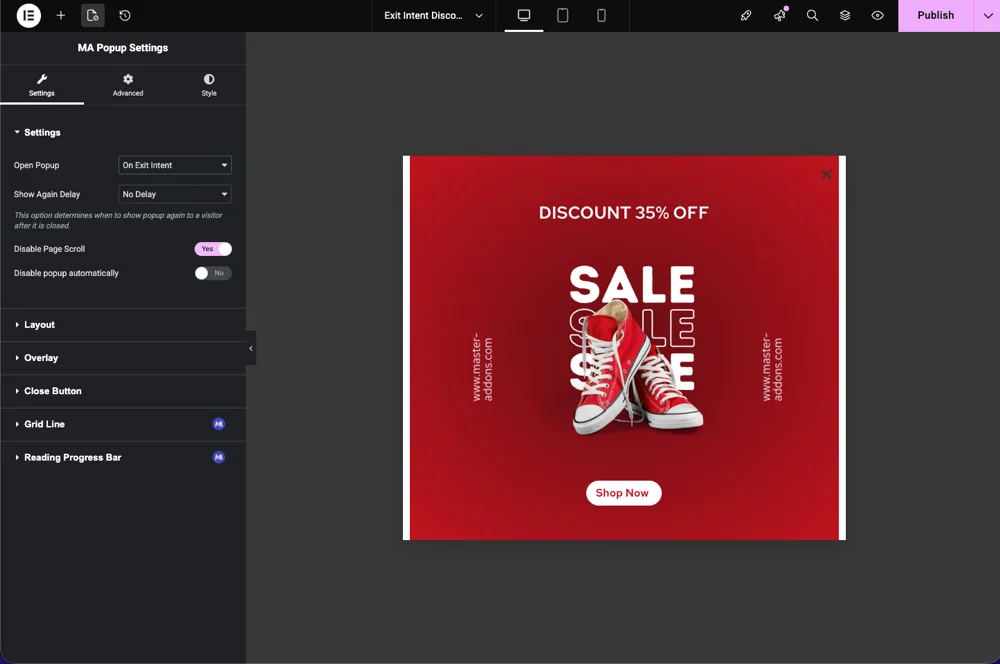
You design popups visually inside the Elementor editor, then control when they appear (triggers) and where they appear (display conditions). No code, no extra plugin, no Pro license.

Why People Pick the Free Master Addons Popup Builder

  • Free Popup Builder bundled in the plugin. No upgrade required.
  • Same drag-and-drop design experience you already know from Elementor.
  • 100+ prebuilt popup templates ready to import in one click.
  • Five trigger types: On Click, Page Load, Exit Intent, On Scroll, After Inactivity.
  • Display conditions for any post, page, category, or custom post type.
  • Works on free Elementor, free WordPress hosting, and the latest Elementor versions.

What Types of Popups Can You Build?

  • Lead generation and email opt-in popups
  • WooCommerce promotions, sale banners, and cart abandonment offers
  • Video lightbox popups (YouTube, Vimeo, self-hosted)
  • Image gallery lightboxes
  • Announcement bars and top banners
  • Login and registration form popups
  • Cookie consent and GDPR notices
  • Feedback, NPS, and survey popups
  • Modal popups for terms, pricing details, or product info

The 5 Popup Triggers in Master Addons

1. On Scroll Trigger

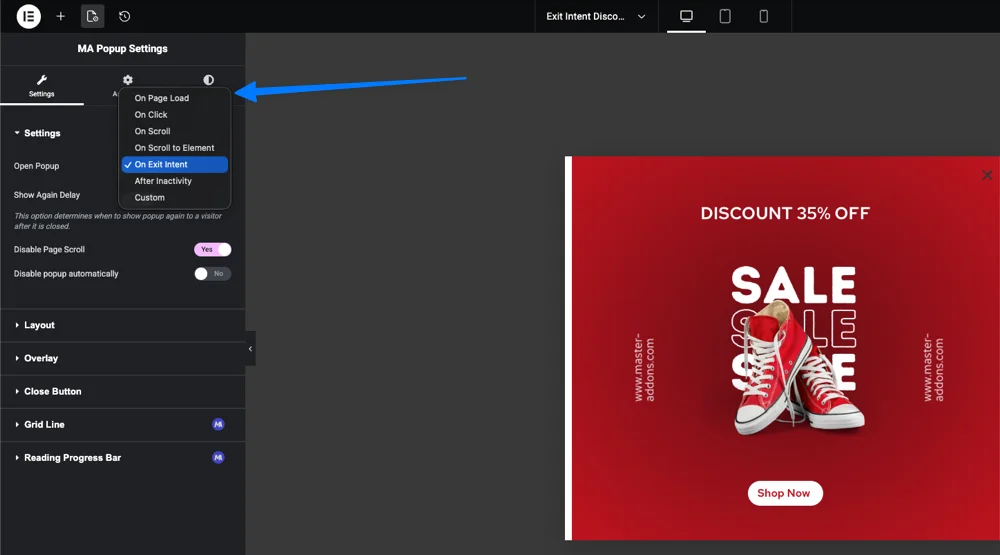
The popup fires after the visitor scrolls a set percentage of the page. Good when you want a content upgrade or email opt-in to appear after the reader has actually read something, not on page load when they haven’t decided whether to stay.

2. Page Load Trigger

The popup appears after a delay you set, measured in seconds. Suits welcome messages, time-limited offers, and anything everyone should see. Watch the delay value. Anything under 2 seconds tends to annoy people on slow connections.

3. Exit Intent Trigger

The popup detects when the cursor moves toward the browser tab or close button and fires a final message. This is what people are searching for as “elementor exit intent popup”, and it’s in the free Master Addons plugin.

4. On Click Trigger

The popup opens only when a visitor clicks a specific button, image, or link. It’s the easiest way to build a click-to-open modal without touching code, and it’s the free replacement for the elementor/popup/show JavaScript event covered in the next section.

5. After Inactivity Trigger

The popup re-engages a visitor who has stopped scrolling or moving the cursor for a set duration. Good for recovering attention without firing on first view, which is the fastest way to lose a reader.

How to Use the elementor/popup/show Event (and the Free Alternative)

Elementor Pro exposes a JavaScript event called elementor/popup/show. Developers use it to trigger a popup from code: fire a popup after a custom form submission, an AJAX response, or a button that lives outside the Elementor editor.

The basic pattern in Elementor Pro looks like this:

jQuery( document ).on( 'elementor/popup/show', ( event, id, instance ) => {
    // your code runs when popup with this ID is shown
    console.log( 'Popup opened:', id );
} );

// To open a popup programmatically in Elementor Pro:
elementorProFrontend.modules.popup.showPopup( { id: 1234 } );

If you’re on free Elementor, you don’t have access to elementorProFrontend.modules.popup.showPopup. You also don’t need it for most use cases. The Master Addons On Click trigger handles the common ones natively:

  • Click a button anywhere on the page, popup opens. Set the trigger selector to a CSS class or ID and any matching element opens the popup.
  • Click an image, icon, or text link, popup opens. The same selector logic applies to any element.
  • Open a popup after a form submission. Combine the form’s redirect or thank-you action with a hidden button that has the popup selector.

If you want to listen for popup-show events from your own code (analytics, custom logic), bind to the global event the popup fires when it opens. The exact event name is in the Master Addons documentation for the version you’re running.

How to Trigger an Elementor Popup on a Button Click (Free)

One of the most common requests, so here’s the exact setup:

  1. Create the popup in Master Addons, Popup Builder, and design it.
  2. In the popup’s settings, switch the trigger to On Click.
  3. Enter a CSS selector in the trigger field, for example .open-signup-popup.
  4. Go to the page or template with the button. Edit the button widget’s Advanced, CSS Classes field and add open-signup-popup (no dot, just the class name).
  5. Save both. Every button with that class now opens the popup, anywhere on the site.

The same selector works on a row, a column, a heading, an icon, or any element you can give a class to. That’s how you get behavior identical to elementor/popup/show without writing a line of JavaScript. One thing to watch: if you use an ID selector like #open-popup, make sure no other element on the page shares the ID, otherwise clicks fire from the wrong element.

Free Elementor Popup Templates: 100+ Designs Ready to Import

The plugin ships with a popup template library covering newsletter opt-ins, sale banners, WooCommerce promos, exit-intent offers, video lightboxes, cookie notices, and login forms. Each template imports in one click and is fully editable inside Elementor. If you’d rather start from a design close to your final goal, this is faster than building from scratch.

The full library lives inside the editor and is part of the broader Master Addons Template Library alongside page and section templates.

Step-by-Step: How to Add a Popup in Elementor Using Master Addons

Step 1: Install and Activate Master Addons

  1. Open WordPress Dashboard, Plugins, Add New.
  2. Search for “Master Addons for Elementor”.
  3. Click Install Now, then Activate.
  4. A new Master Addons item appears in the WordPress sidebar.
Install and activate Master Addons plugin from WordPress dashboard

If the sidebar item doesn’t show up right away, hard-refresh the admin (Ctrl+Shift+R / Cmd+Shift+R). Some caching plugins hang on to the old admin menu for a minute.

Step 2: Open the Popup Builder

  1. Go to Master Addons, Popup Builder.
  2. Click Add New Popup.
  3. Give the popup a descriptive name (for example, Newsletter, Blog Posts).
  4. Click Edit with Elementor.
Navigate to Popup Builder inside Master Addons admin menu
Add new popup screen with name field and conditions options

Step 3: Pick a Template or Start from Scratch

  1. Click the Master Addons Template Library icon in the Elementor editor.
  2. Browse the popup category and preview designs.
  3. Click Insert on any template to import it into the canvas.
  4. Or skip the library and drag widgets onto a blank canvas.
Browse Master Addons popup template library and import prebuilt popups

Step 4: Design the Popup Content

  1. Drag in Elementor widgets: Heading, Text Editor, Button, Image, Form.
  2. For email capture, use a Form widget and connect it to your email service.
  3. Add a countdown timer, icon, or video using either core Elementor or Master Addons widgets.
  4. Adjust fonts, colors, padding, and spacing in the Style and Advanced tabs.
  5. Preview on mobile and tablet view to confirm the layout still works.
Drag and drop Elementor widgets to design popup content

Step 5: Configure the Popup Trigger

  1. Click the gear icon at the bottom-left of the editor to open Settings.
  2. Open the Trigger tab.
  3. Pick one of the five triggers: On Click, Page Load, Exit Intent, On Scroll, After Inactivity.
  4. Fill in the trigger-specific settings: scroll percentage, delay seconds, click selector, or inactivity duration.
Select popup trigger type in Master Addons popup settings

Step 6: Set Display Conditions (Where the Popup Shows)

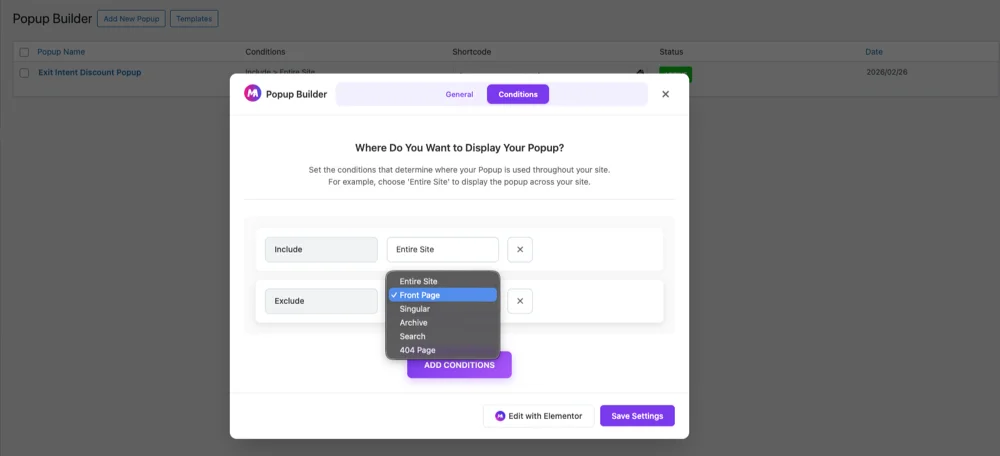
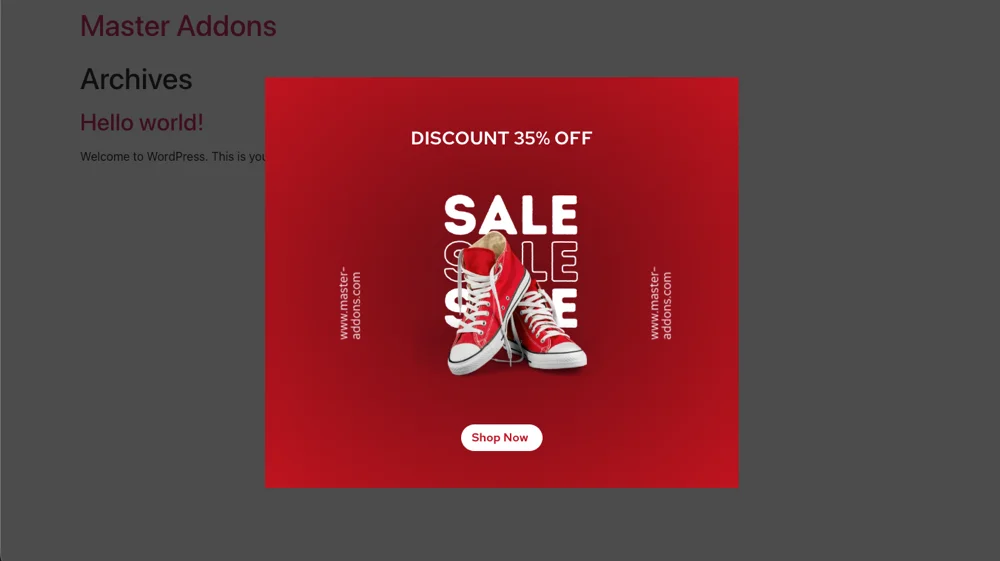
Display conditions decide which pages on the site actually show the popup. Most popup mistakes happen here. A popup with no display rule never appears at all, which is the first thing to check if the popup looks fine in the editor but won’t show on the front end.

  1. Open the Display Conditions tab in popup settings.
  2. Choose an Include rule: Entire Site, Specific Pages, Specific Posts, Categories, Tags, or a Custom Post Type.
  3. Add an Exclude rule for anything you want to skip (for example, exclude the checkout page from a sitewide popup, otherwise it nags people who already converted).
  4. Save the conditions before publishing.

To edit display conditions later, reopen the popup, click the gear icon, go to Display Conditions, change the rules, and update. The design and trigger stay the same. Only the targeting changes.

Step 7: Publish and Test

  1. Click Publish or Update in the bottom-left of the editor.
  2. Open the page that should show the popup in a normal browser window (not the editor preview).
  3. Trigger the popup the way you configured it: click the button, scroll, wait, or move toward the close tab.
  4. Check responsive behavior on a real phone. The editor preview is close but not exact.
  5. Monitor form submissions and conversion rates for the first week.
Popup preview on the website front end after publishing

Master Addons vs. Elementor Pro Popup Builder

FeatureElementor Pro PopupsMaster Addons Popup Builder
CostPaid (Pro license)Free
Visual drag-and-drop editorYesYes
Prebuilt popup templatesLimited100+ templates
On Click triggerYes (JS event)Yes (visual selector)
Exit Intent triggerYesYes
On Scroll triggerYesYes
Page Load triggerYesYes
Inactivity triggerLimitedYes
Works with free ElementorNoYes
Bundled with widget libraryNoYes (80+ widgets, Theme Builder, Widget Builder)

Who This Setup Works Best For

  • Freelancers and web developers who don’t want to buy Pro just for popups.
  • WooCommerce store owners running sale banners and cart-recovery offers.
  • Bloggers and content creators capturing email subscribers.
  • Agencies managing many client sites on tight budgets.
  • Startups and small businesses validating offers before paying for premium tools.

Frequently Asked Questions

Does Elementor free have a popup builder?

No. Free Elementor doesn’t include a built-in popup builder. To add popups on free Elementor, either upgrade to Elementor Pro or install a free third-party popup builder. Master Addons includes a full Popup Builder in its free plugin, so you can stay on free Elementor and still build popups visually.

Do I need Elementor Pro to use Master Addons Popup Builder?

No. The Master Addons Popup Builder works on the free version of Elementor. There’s no Pro requirement and no upsell to use the builder, templates, or any of the five triggers.

How do I add a popup in WordPress with Elementor without buying a popup plugin?

Install the free Master Addons for Elementor plugin from the WordPress plugin directory. Go to Master Addons, Popup Builder, click Add New, design the popup with Elementor, set a trigger and display conditions, and publish. The whole flow takes under ten minutes.

Can I use the elementor/popup/show event with the free version?

The elementor/popup/show JavaScript event is part of Elementor Pro and only fires on Pro popups. With Master Addons on free Elementor, you replicate the same behavior using the On Click trigger and a CSS selector, no JavaScript needed. To listen for popup-show events from your own scripts, Master Addons fires its own event you can hook into. The exact name is in the plugin documentation.

How do I trigger an Elementor popup on a button click for free?

Set the popup’s trigger to On Click in Master Addons and enter a CSS class such as .open-popup. Then add that class to the button widget’s Advanced, CSS Classes field. Clicking the button opens the popup. The same approach works for images, icons, or any element you give the class to.

Can I make an exit-intent popup in Elementor for free?

Yes. Master Addons includes an Exit Intent trigger in the free plugin. Pick Exit Intent in the popup’s trigger settings and the popup fires when the visitor moves the cursor toward the browser tab or the close button.

How do I edit display conditions on a popup later?

Open Master Addons, Popup Builder, edit the popup, click the gear icon to open Settings, go to Display Conditions, change the include or exclude rules, and update. The popup keeps its design and trigger. Only the targeting changes.

Are the 100+ popup templates really free?

Yes. Every template in the Master Addons popup library is included in the free plugin. No separate template pack, no trial limit, no watermark.

Where is the Master Addons popup builder documentation?

Full documentation, settings reference, and troubleshooting steps are at master-addons.com/docs/. The WordPress.org support forum is also active for free-plugin users.