

Table of Contents
Designing a blog in Elementor usually means two jobs: the page that lists your posts, and the layout every single post uses. This collection covers both. There are 10 Elementor blog templates for the post listing and 5 single post templates for the articles themselves, and every one comes as a JSON file you can download, a live demo you can click through, and a short guide to setting it up.
Everything here is free to download. The blog page layouts drop into any Elementor page. The single post layouts need a theme builder to apply them to your posts, and the single post section below shows how to do that, including with a theme builder you already use. If you want complete pages for the rest of your site too, the Elementor page template library has more than 200 of them in the same format.
What you get in each free download
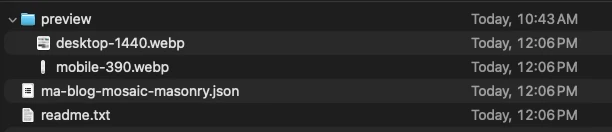
Every template downloads as a small zip file. Unzip it first: Elementor needs the .json file inside it. You will find three things:
- a
previewfolder with two screenshots of the design,desktop-1440.webpandmobile-390.webp, so you can check it before importing anything, - the template itself, a
.jsonfile named after the design (ma-blog-mosaic-masonry.jsonin the example above), which is the file you import into your Elementor template library, - a
readme.txtthat lists what the template needs and walks through a basic import, plus any settings to change afterwards.
All of the styling for a template lives in one HTML widget at the top of the design, scoped to that template. There are no theme colours or global fonts to carry over and no images baked into the file, so the design looks the same on your site as it does in the demo. Your own posts, featured images and categories fill in the content.
What you need before you import
| Template type | What it needs | Where you use it |
|---|---|---|
| Blog page templates (10) | WordPress, Elementor and Master Addons | Any Elementor page, for example a page called Blog |
| Single post templates (5) | WordPress, Elementor, Master Addons with theme builder or any other theme builder | A Single post template in your theme builder, applied to your posts |
The blog page layouts are built on the Master Addons Blog Posts widget, which is what pulls your latest posts onto the page. The single post layouts use the Master Addons Dynamic Tags extension to fill the headline, featured image, content, author and date from whichever post a visitor is reading.
You also need somewhere to run WordPress. If you are setting up a new blog and do not have hosting yet, Hostinger is what we point people to for a first WordPress site.
10 free Elementor blog page templates to download
These are layouts for the page that lists your posts. Each one uses a different Blog Posts layout and a different page structure, from a one-column reading list to a masonry photo wall.
1. Signal: magazine grid with a featured post
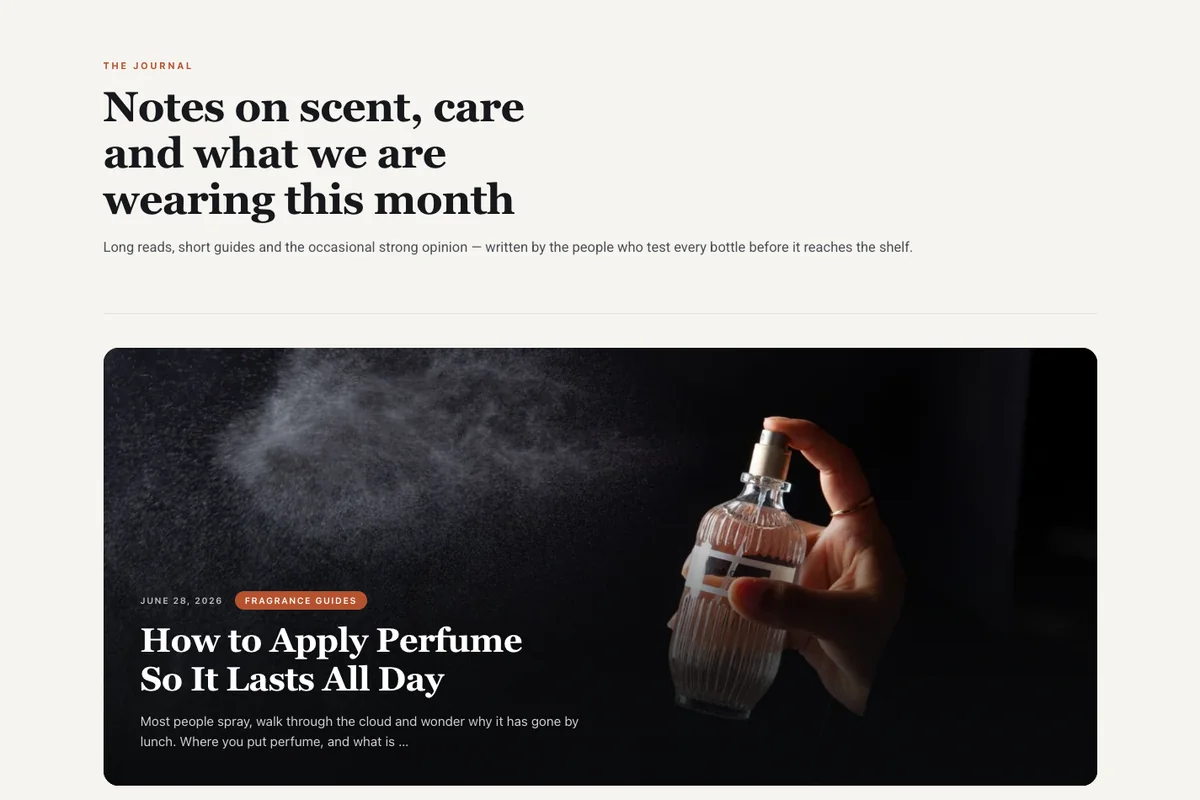
A magazine front page. Your newest post runs as a full-width banner with the headline set over the photo, and the next six sit in a three-column card grid below it. It suits news sites, magazines and any blog that publishes often.
The grid skips the first post, so the featured story never shows up twice. If you change how many posts the banner shows, change the grid’s offset to match.
2. Column: editorial one-column list
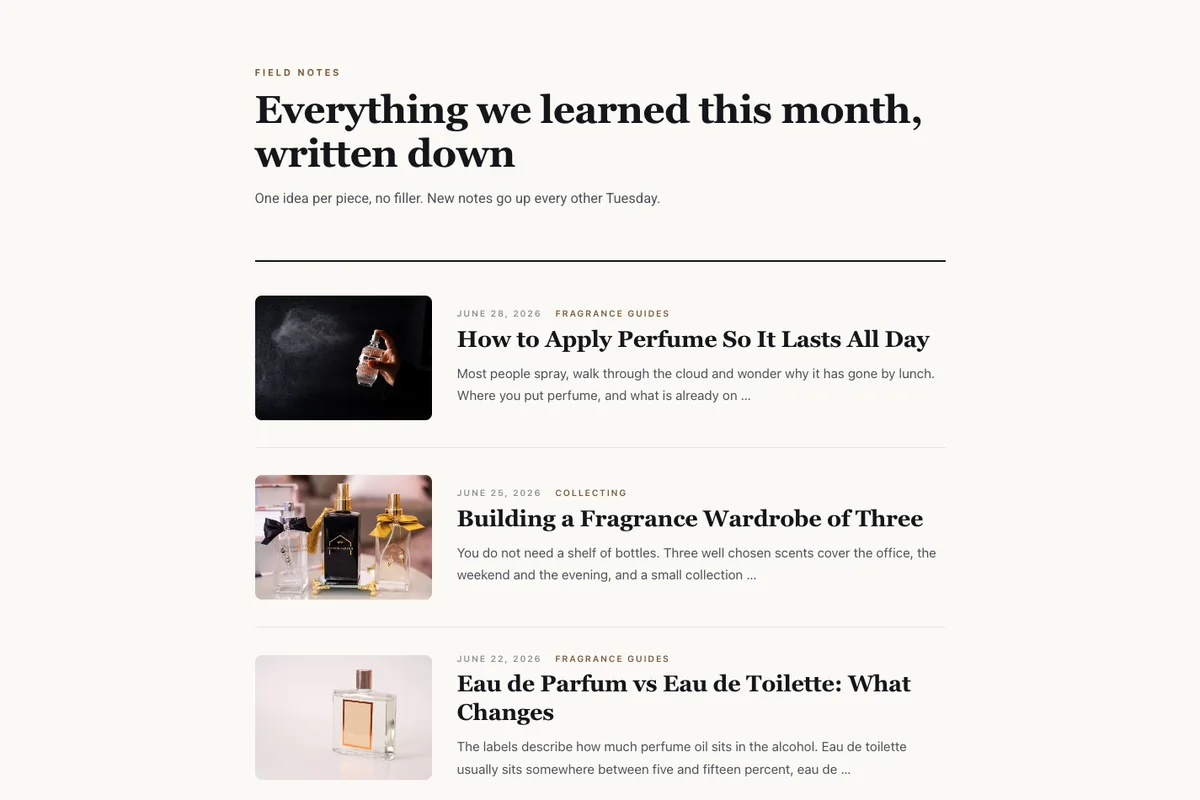
A reading list for writers. Each post gets a small thumbnail on the left, the date and category above a large serif headline, and a two-line standfirst. The page is 820px wide, which keeps lines at a comfortable length. It works well for newsletters, essays and personal blogs.
3. Mosaic: masonry photo wall
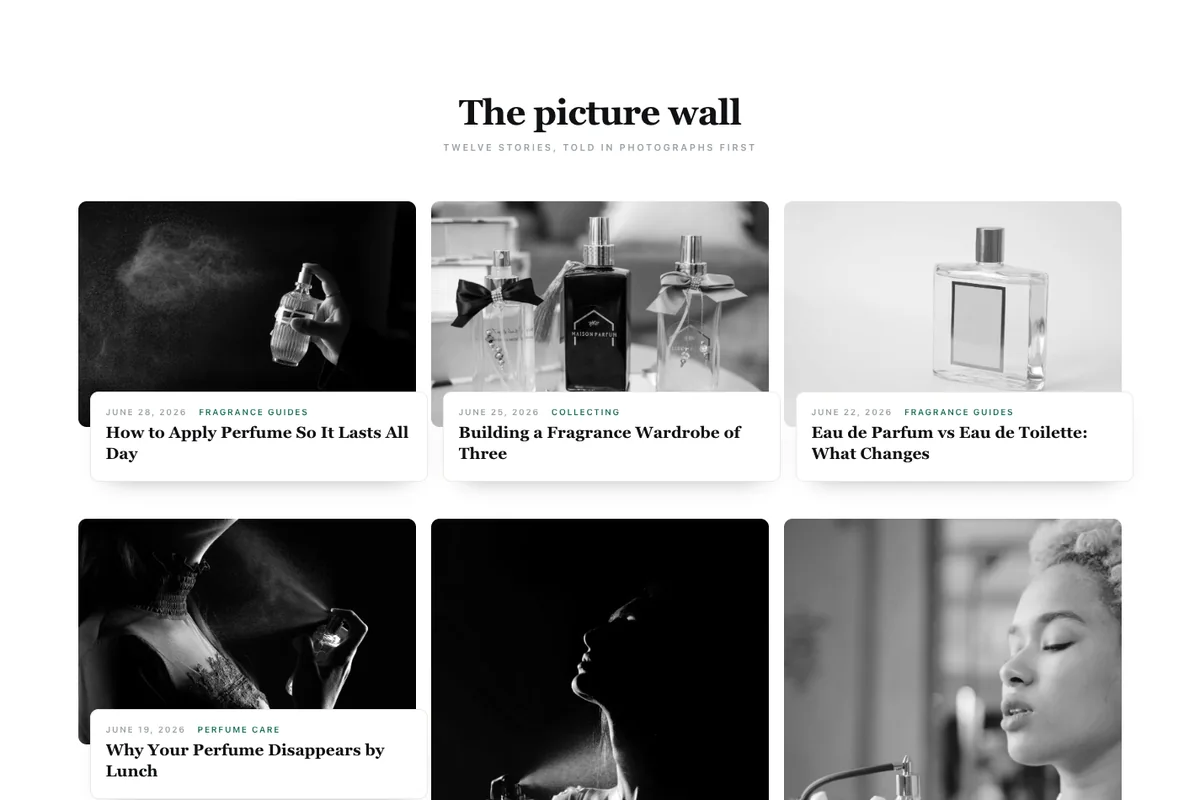
A three-column masonry wall for image-led blogs. Photos stay greyscale until you hover, and each headline sits in a small white card that overlaps the image. Food, travel and photography blogs get the most out of it.
Masonry only staggers when your featured images come in different shapes. If every photo is the same crop, the wall looks like a regular grid.
4. Kiosk: category hub with filter tabs
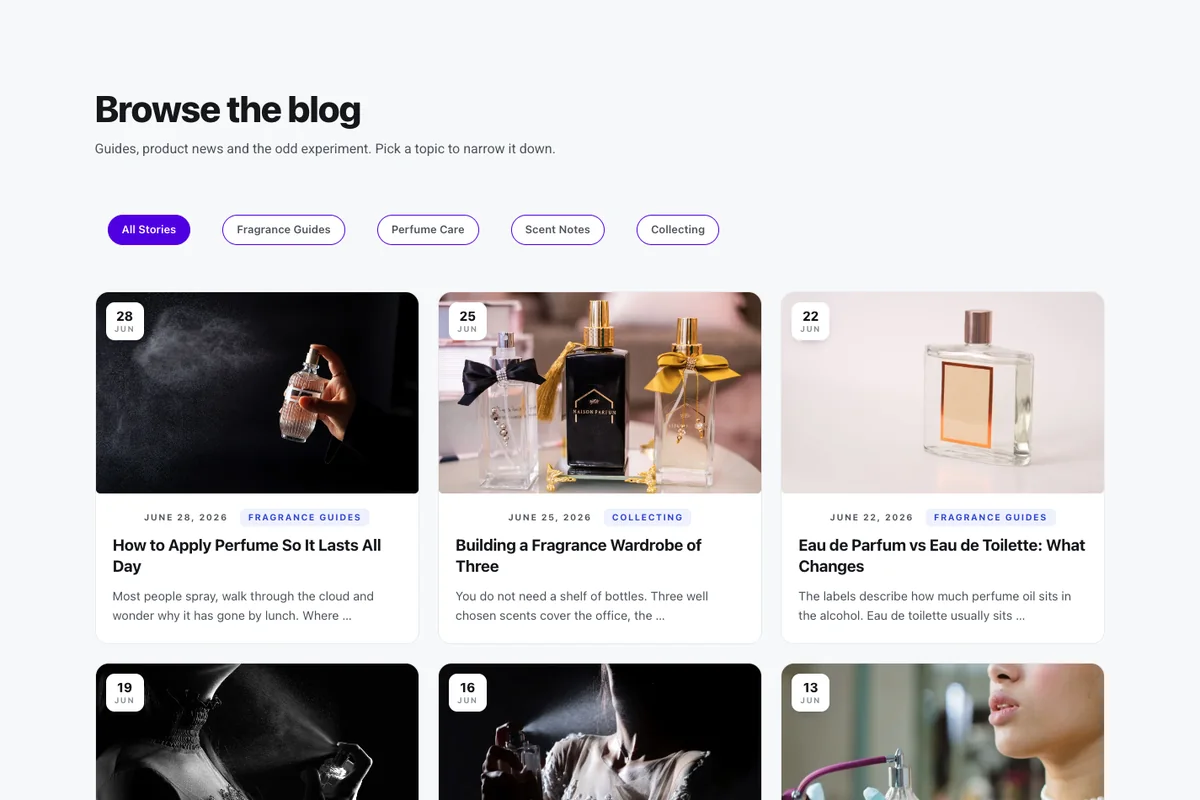
A card grid with category tabs across the top, so readers can narrow the page to one topic without leaving it. Every card carries a date badge on the photo and a category label below it. Pick it if you publish across several subjects.
The tabs come from the widget’s Filter By Category setting, not from the categories your posts happen to use. After importing, open the Blog Posts widget, go to Advanced Settings and choose your own categories there. If you leave it empty, you get a single “All” tab.
5. Marquee: featured carousel
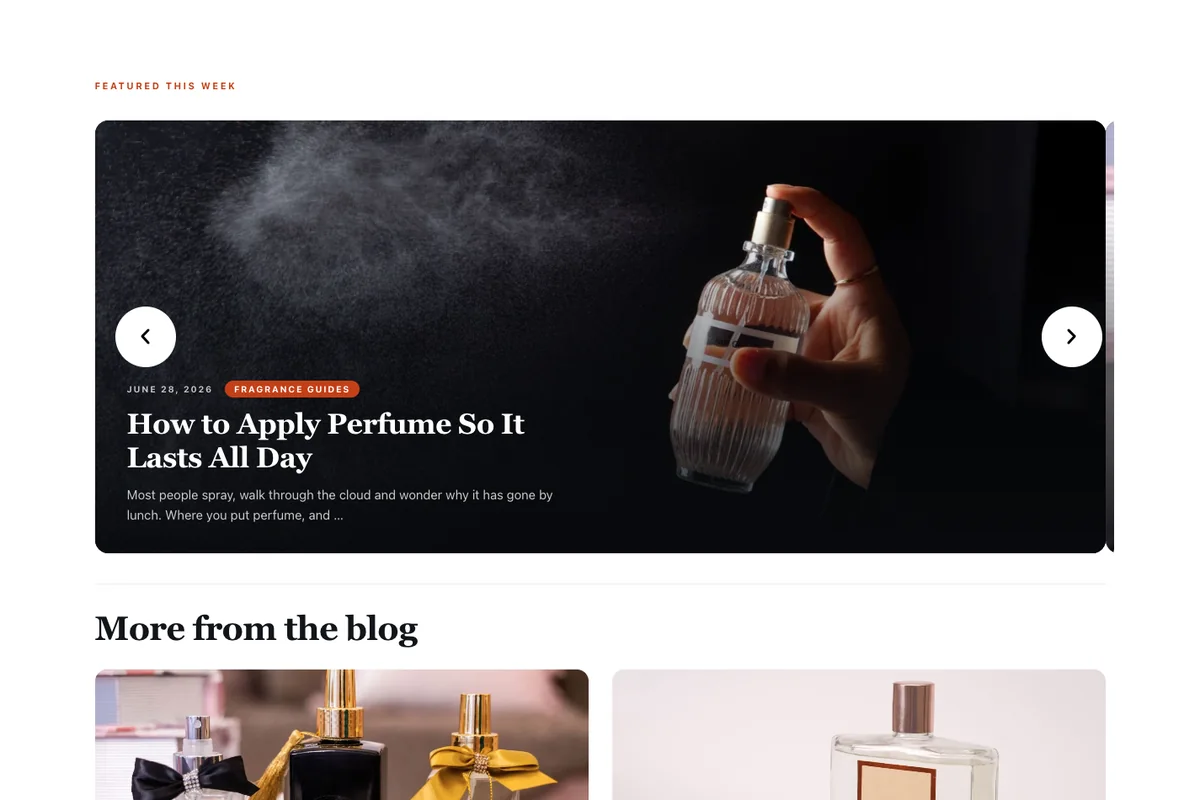
A rotating banner of four featured posts at the top, with autoplay and arrows, then two columns of cards whose text lifts over the image. It works as a blog page or as the posts section of a homepage.
There is a second, one-line HTML widget directly above the carousel. It keeps the rest of the page inside its container, so leave it in place.
6. Broadsheet: classic blog with a sidebar
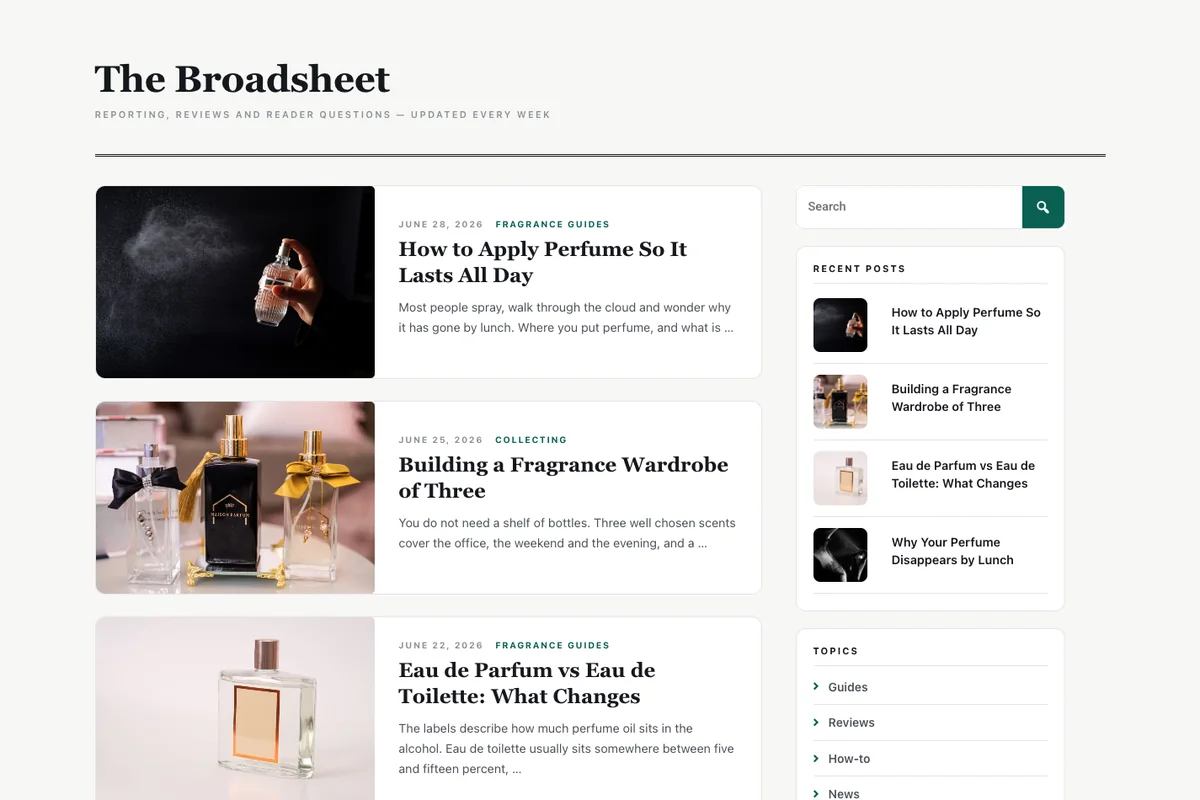
The layout most people picture when they say “blog page”. A feed of horizontal posts runs down the left, and a sticky sidebar on the right holds a search box, recent posts, topic links and a subscribe card. The search box is the Master Addons Search widget.
The topic links are placeholders. Point each one at one of your category pages, and point the subscribe button at your signup form.
7. Midnight: dark card blog

A dark, two-column card layout with glass-style cards, a soft glow behind the header and a mint accent colour. It was made for product, developer and agency blogs, and for changelogs that want to look like part of the product.
The page sets its own dark background, so it works even on a light theme. If your theme adds a light header and footer around it, set the page layout to Elementor Canvas.
8. Ledger: knowledge base list
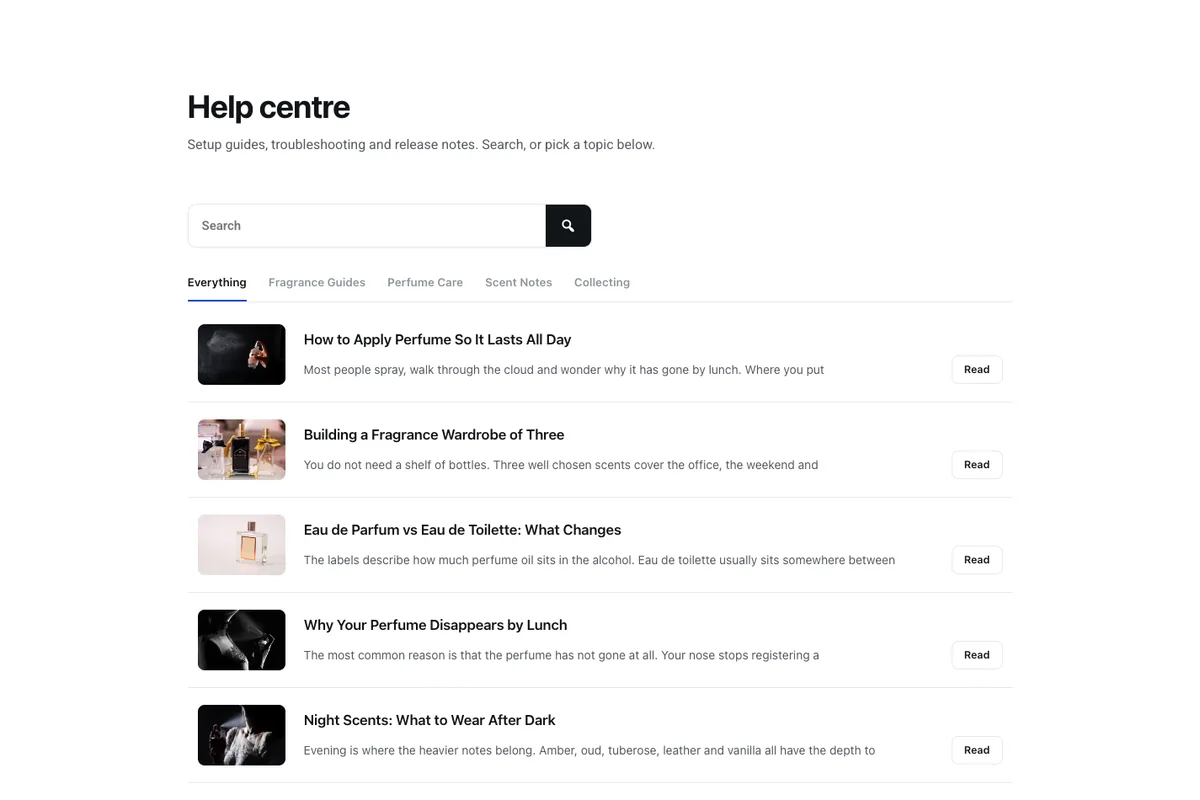
A compact help-centre layout: a search bar, underlined topic tabs, then one short row per article with a Read button on the right. Use it for documentation, release notes or a resource library, where readers scan a list of titles to find the one they need.
Like Kiosk, the tabs come from Filter By Category, so choose your own categories after importing.
9. Frost: full-width feature rows
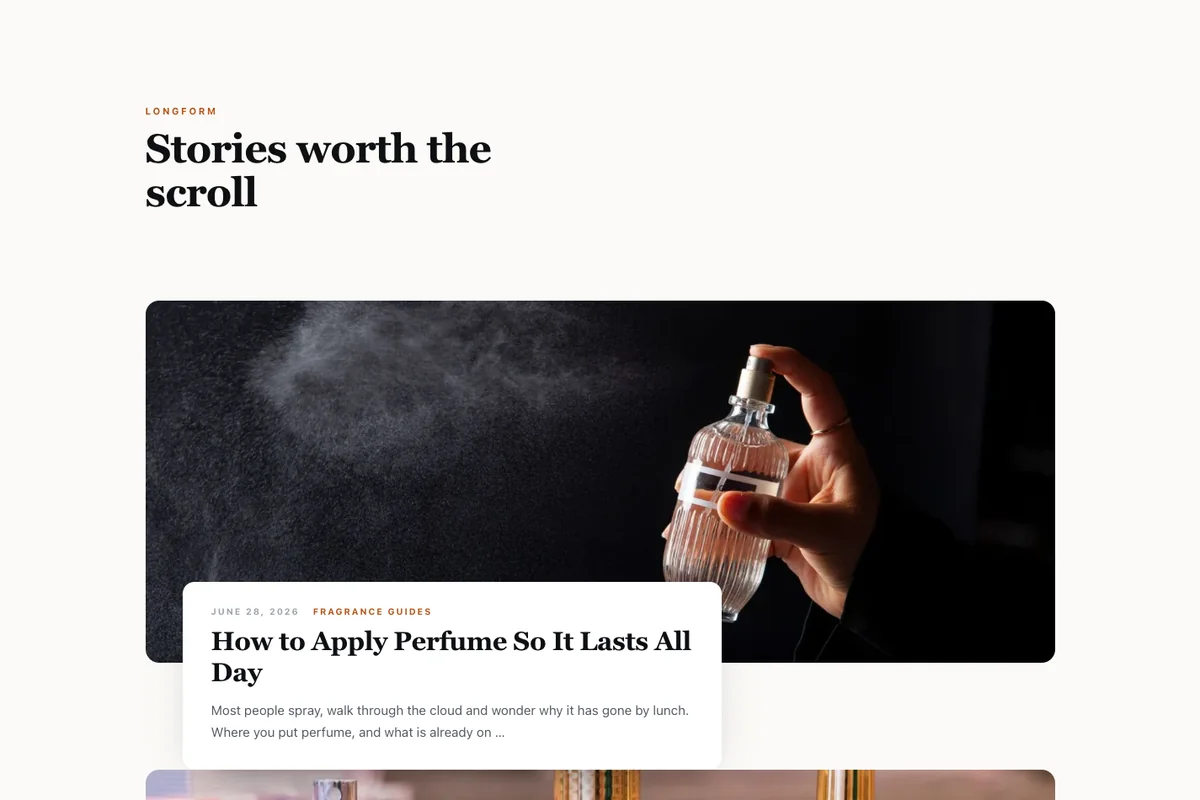
One post per row. Each gets a wide 430px image with a white caption card lifted over its bottom-left corner. It gives every story a full-width slot, which suits studios, portfolios and long-form writing, where you publish less often and each piece deserves the space.
10. Plain: minimal two-column
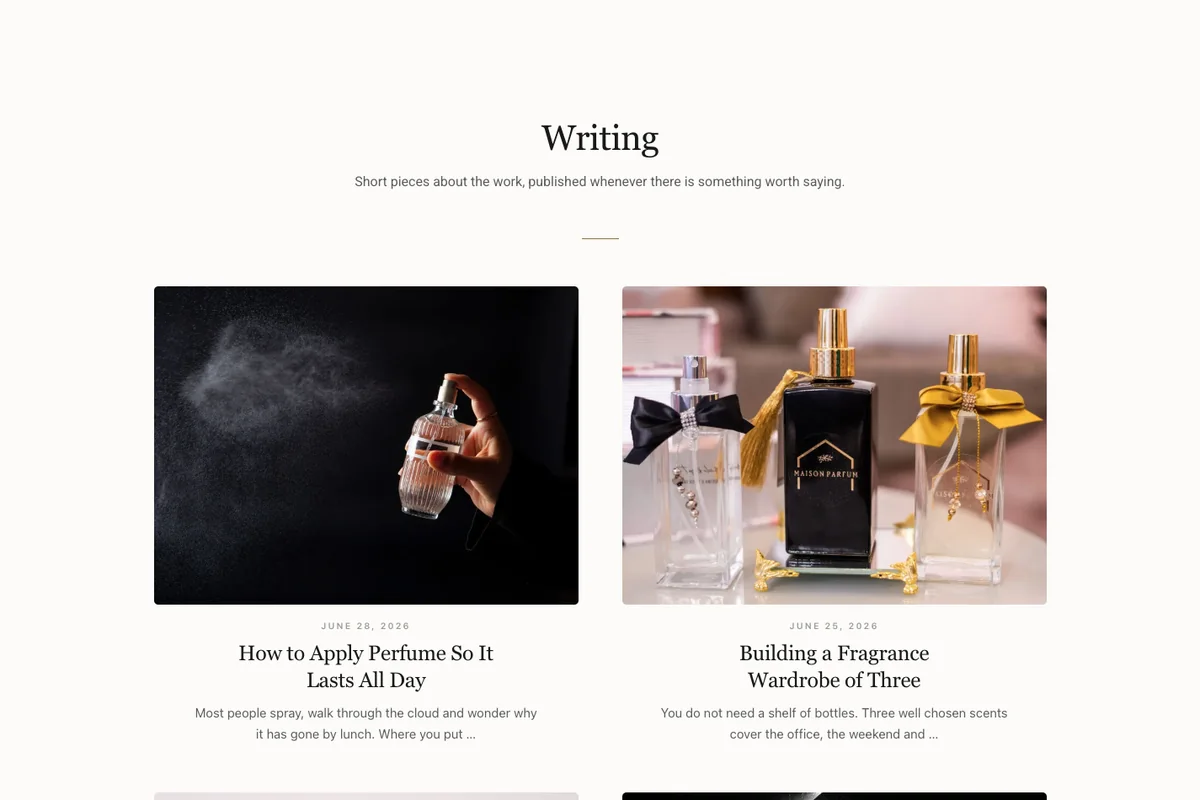
A quiet, centred two-column index on a soft paper background. Each card shows a 4:3 photo, a date and a serif headline, with no borders, buttons or category labels. It is the one to pick when your theme is already minimal and the blog should match it.
How to create a blog page with an Elementor template
The blog page templates work on any Elementor page. The steps are the same for all ten.
- Download the zip and unzip it on your computer. Elementor imports the
.jsonfile; a.ziponly imports when the Enable Unfiltered File Uploads option is switched on under Elementor > Settings > Advanced. - In your dashboard, go to Templates > Saved Templates and click Import Templates.
- Choose the
.jsonfile and click Import Now. The template appears in your saved templates list. - Create a new page, call it Blog (or whatever you like), and open it with Elementor.
- Click the folder icon, open the My Templates tab and click Insert next to the template.
- Publish the page and add it to your menu.
If you have not imported an Elementor template before, the guide to importing Elementor templates walks through each of these screens. Once you have made the design yours, you can save the page as a template and export it as JSON to reuse it on another site.
Do not set it as the WordPress “Posts page”
WordPress has a Posts page option under Settings > Reading. Leave it empty for the page you just built. When a page is set as the Posts page, WordPress replaces it with your theme’s own archive, and your Elementor design never shows. Publish the template as a normal page and link to it from your menu instead. Our tutorial on how to create a blog page with Elementor explains why in more detail.
Settings worth checking after you import
- Posts per page and order live in the Blog Posts widget’s Display Options. Each template ships with between 4 and 10 posts per widget.
- Kiosk and Ledger need your own categories in Filter By Category before their tabs make sense.
- Number of Columns should stay at 1 Column on the list layouts (Column, Broadsheet, Ledger and Frost), or the list turns into a grid.
Turning on pagination
You will not see page numbers under the posts in our live demos. We switched pagination off there on purpose, to keep each demo to one screen of posts. On your own site you can turn it on in a few clicks, and style it to match the template you picked.
- Click the Blog Posts widget and stay on the Content tab.
- In Display Options, switch Pagination to Yes. Posts Per Page then sets how many posts appear on each page.
- Change the Next Page Text and Previous Page Text if you want different labels, and pick an alignment.
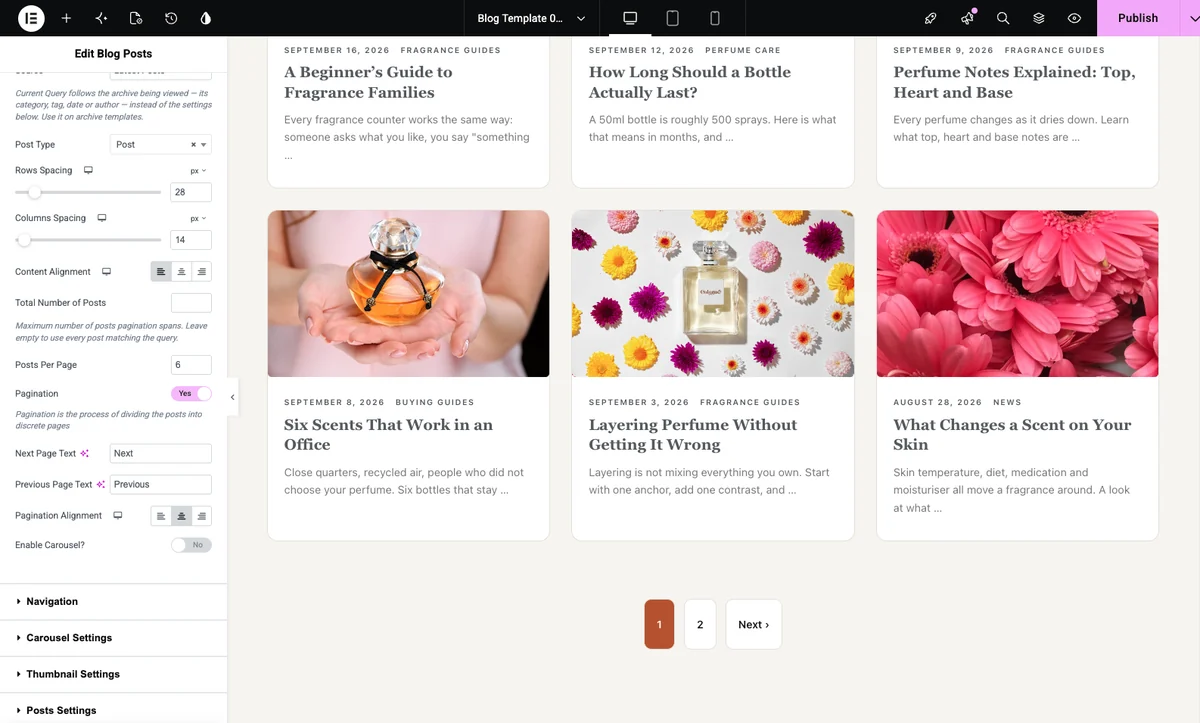
To change how the page numbers look, open the Style tab and expand the Pagination section. You get typography, separate colours for the normal, hover and active page, plus border, radius, padding and spacing. In the screenshot below, the active page uses Signal’s rust accent and the others are white with a thin border, so the numbers blend in with the cards.
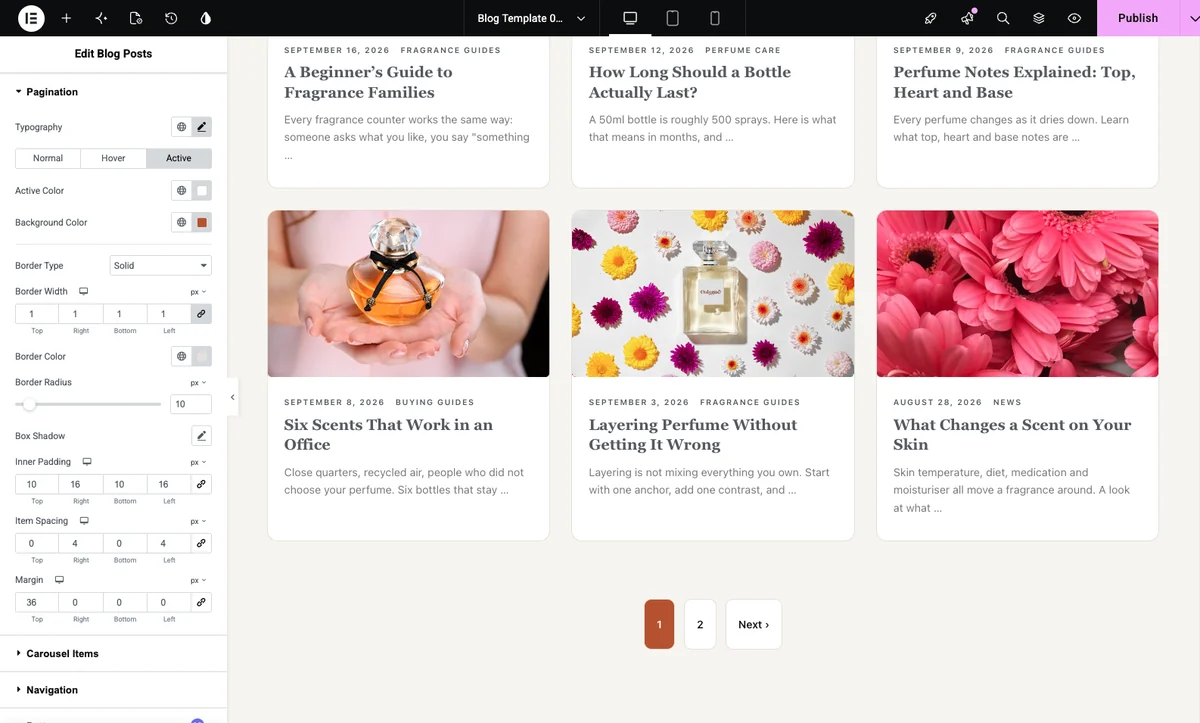
On Signal and Marquee, turn pagination on for the second Blog Posts widget only, the grid under the featured posts. The featured banner and the carousel at the top are meant to stay the same on every page, so leave pagination off for them.
Making your category pages match
A blog page template styles the page it sits on. Your category, tag and author archives are separate pages, and they keep your theme’s archive design unless you replace it. To give them the same look, build an archive template in a theme builder, insert the same design, and set the Blog Posts widget’s Source to Current Query so it follows whichever category is being viewed. The archive template guide covers the Master Addons Theme Builder side of that.
5 free Elementor single post templates
These control what a reader sees when they open one of your posts. Every field is filled with Dynamic Tags, so one template styles every article on the site. The live demos below are filled with a sample article so you can see them with real content; the download contains the dynamic version that pulls in your own posts.
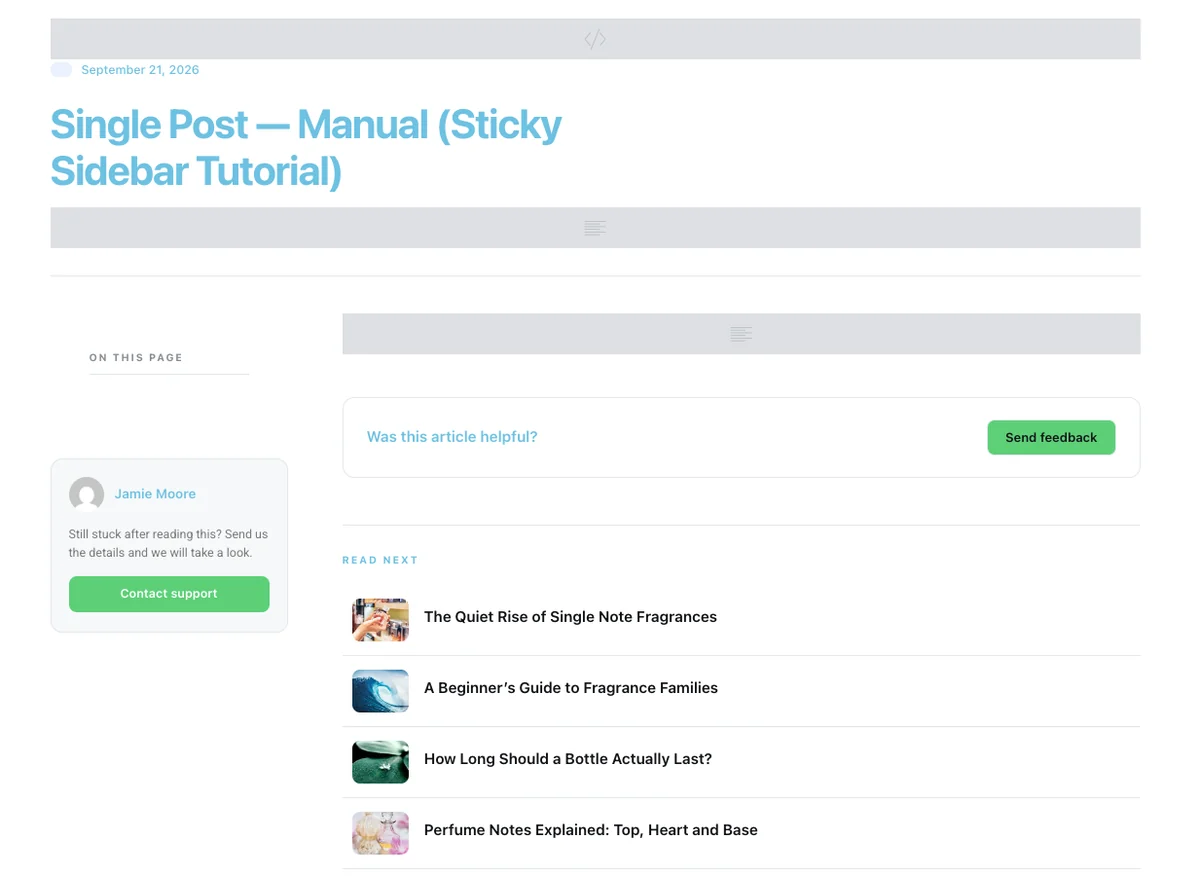
Because the fields are Dynamic Tags, which come with the free Master Addons plugin, importing a template takes about a minute. Don’t worry if it looks half empty straight after the import, with grey boxes where the headline, image and article should be (like the screenshot above). The template shows nothing until it has a real post to read from, so you need at least one published post with a title, a featured image and some content. Once you apply it in your theme builder, every single post on your blog switches to the new design automatically. The steps are in How to create a single post template in Elementor, right after the five designs.
11. Folio: classic editorial

The dependable magazine article. A category line, a serif headline, a standfirst and a byline with the author’s photo sit above a wide featured image. Below it come an “In this article” contents box, the post in a 748px reading column, an author card and three related posts. The contents box is the Master Addons Table of Contents widget.
12. Immersive: full-bleed hero

The featured image fills most of the screen with the headline, category and byline over it. The article then sits on a white panel lifted over the photo, with share buttons that stay beside the text as you scroll. A dark subscribe band and two related posts close the page. Use it for features and stories with strong photography.
The share buttons build their X, Facebook and LinkedIn links from the page address when it loads, and the fourth button copies the link. No third-party script is involved.
13. Manual: sticky sidebar tutorial
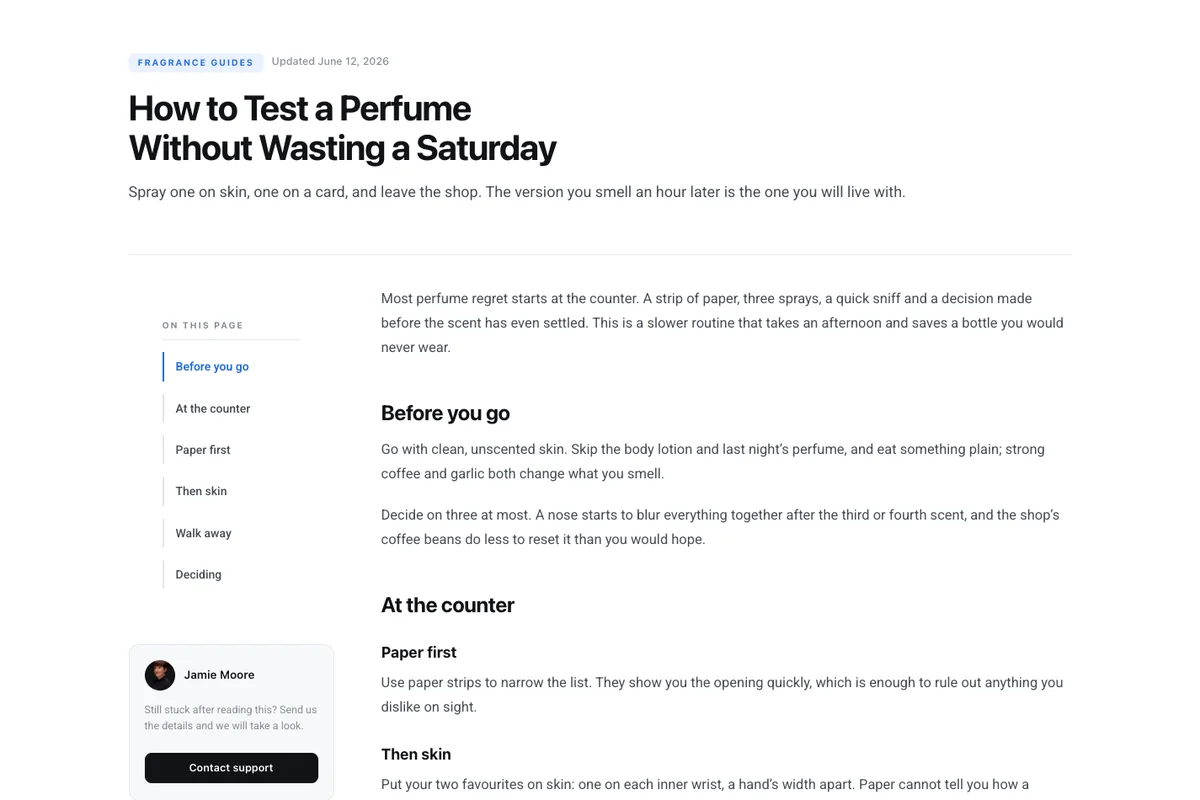
A documentation layout with no featured image. A category badge and an “updated” date sit above a clean headline, and a sticky contents rail on the left highlights the section you are reading. Code blocks, inline code and callout boxes are styled for technical writing. The page ends with a “Was this article helpful?” row and a short list of what to read next.
14. Quiet: text-first essay
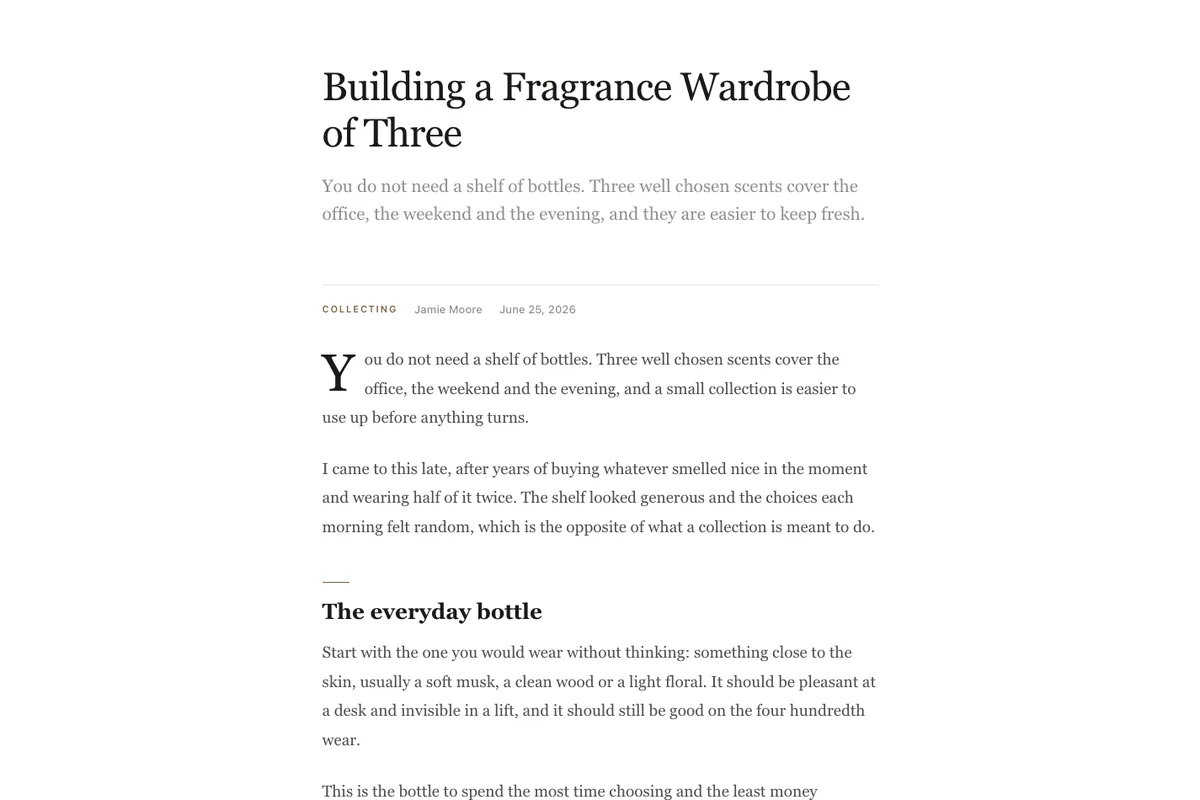
No images at all: a serif headline, a grey standfirst, a drop cap and a 660px column set in a serif face. Pull quotes are centred and italic. After the article there is a small author sign-off, a subscribe card and a text-only list of further reading. It suits essays, opinion pieces and newsletters that live on the web.
15. Casefile: visual case study
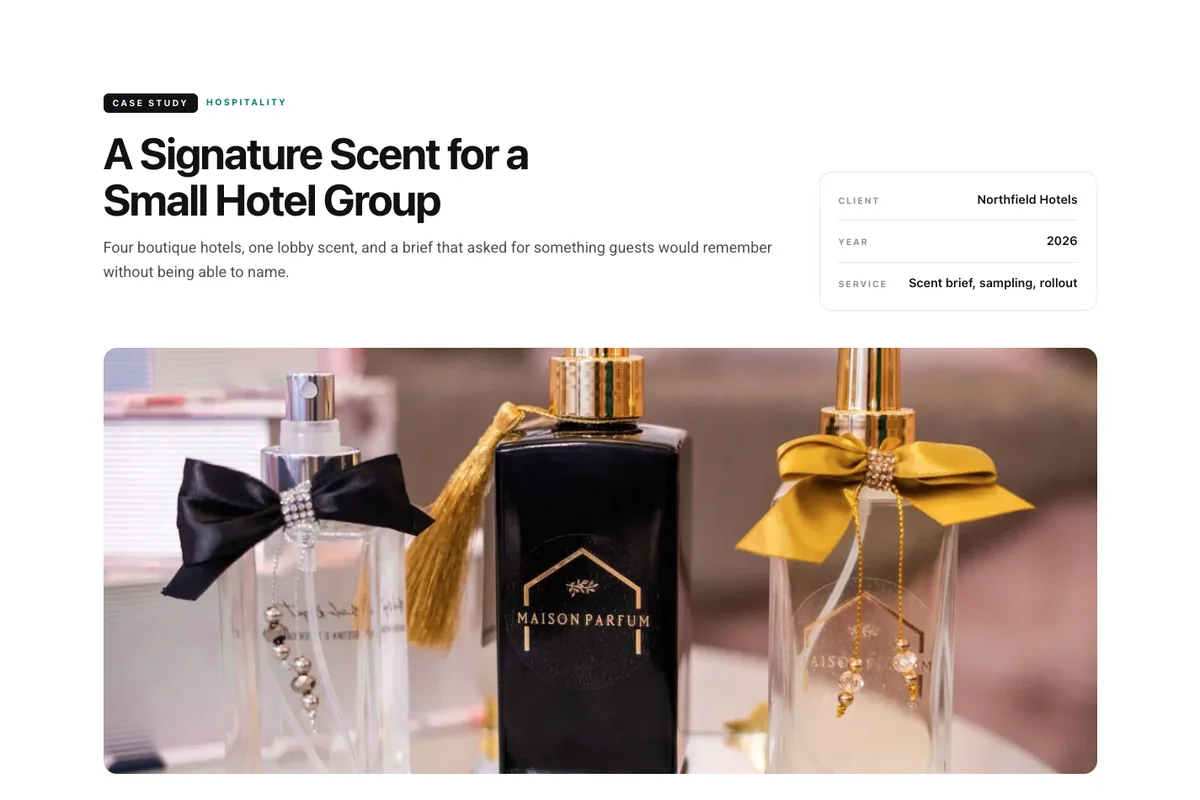
Built for agencies and studios that publish their work as posts. The headline sits on the left and a project facts card on the right, followed by a wide cover image, the write-up, a three-column gallery, a call to action and two more case studies.
The facts card reads three custom fields on each post: client, year and service. The gallery shows the images attached to the post, which means the ones uploaded from inside that post’s editor. The readme explains both.
How to create a single post template in Elementor
A single post template only makes sense inside a theme builder. Dropped onto an ordinary page, the Dynamic Tags would show the page’s own title and an empty image, because a page is not a post. A theme builder is what tells WordPress to use your design whenever a visitor opens a post.
With the Master Addons Theme Builder
This is how the five templates were built and tested. The Single template type in the Master Addons Theme Builder is part of Master Addons Pro.
- Import the
.jsonfile under Templates > Saved Templates, the same way as a blog page template. - Go to Master Addons > Theme Builder, click Add New and choose Single as the template type.
- Edit the new template with Elementor, open the folder icon, go to My Templates and insert the design.
- Set the display condition to Include > Singular > Post. To use a layout for one kind of content only, such as case studies, pick those posts in the condition instead of all posts.
- Save, then open any post on your site to check it.
The single template documentation shows each of these screens, and the Elementor theme builder guide explains how the other template types (header, footer, archive and more) fit together.
With Elementor Pro or another theme builder
If you already use Elementor Pro’s Theme Builder, or another theme builder that lets you design the single post layout in Elementor, you can use these templates there too. Create a new Single Post template in your builder, insert the design from My Templates, and set it to apply to your posts.
Keep Master Addons installed and active. The headline, image, content and author fields come from the Master Addons Dynamic Tags, and the contents box and related posts come from Master Addons widgets. Without the plugin, those parts would be empty. We tested the templates in the Master Addons Theme Builder; if something looks off in another builder, the readme notes are the first place to check.
Two details to leave in place
- The article body widget in Folio, Immersive, Manual, Quiet and Casefile carries a CSS class called
entry-content. The Table of Contents widget looks for headings inside that element, so removing the class empties the contents box. - The HTML widget at the top of each template holds the stylesheet, and in Folio and Manual a short script that fills the contents list if the widget has not done it already. Edit the styles there, but do not delete the widget.
Customising colours and fonts
Every template keeps its colours in a handful of CSS variables at the top of its stylesheet: ink for headings, body for paragraph text, muted for dates, and accent for links and labels. Open the HTML widget, change those values, and the whole design follows. Fonts are set in the same stylesheet, so swapping Georgia for your brand serif is a one-line change.
If you would rather work section by section, the same approach runs through our free Elementor section templates, which pair well with these blog layouts when you are building the rest of the site.
Troubleshooting
“Invalid Content In File” when importing
You are uploading the zip itself, or a file that is not an Elementor export. Unzip the download and import the .json file.
The blog page is empty
The Blog Posts widget needs published posts with featured images. On Kiosk and Ledger, an empty grid usually means Filter By Category still points at categories that do not exist on your site. Open the widget and choose your own.
The design looks different from the demo
Your theme may be adding its own header, footer or page width around the template. Set the page layout to Elementor Canvas or Elementor Full Width in the page settings.
The single post template is not showing on my posts
Check three things in your theme builder. The template type must be Single, the display condition must include your posts, and only one Single template should match the same posts. In the Master Addons Theme Builder, when two active templates match, the newest one wins. Clearing your cache plugin after saving also helps.
The carousel collapses inside tabs or an accordion
Swipers measure their width when the page loads. If you move Marquee’s carousel into a hidden tab or accordion panel, set Observer to Yes in its Carousel Settings.
Frequently asked questions
Are these Elementor blog templates free?
Yes, all 15 are free to download. You need Elementor and Master Addons to use them. The blog page layouts work on any page; the single post layouts also need a theme builder to apply them to your posts.
Can I create a single post template with the free version of Elementor?
Not with Elementor alone. Free Elementor has no theme builder, so it cannot replace your theme’s post layout. You need one: Elementor Pro’s Theme Builder, or the Master Addons Theme Builder, whose Single template type is part of Master Addons Pro. We built and tested these templates in the Master Addons Theme Builder.
Can I use different single post templates for different posts?
Yes. Create one Single template per layout and give each its own display condition. In the Master Addons Theme Builder you can pick the specific posts a template applies to, which is how you would keep Casefile for case studies and Folio for everything else.
Will my existing posts show up in the templates?
They will. Nothing in the templates is hard-coded content. The blog page layouts list your published posts, and the single post layouts pull the title, featured image, text, author and date from the post being viewed.
Can I use a blog page template on my homepage?
You can. Insert it into your homepage the same way as any other page. Marquee and Signal were designed with that in mind, since both open with featured posts.
Where can I find more Elementor templates?
For single pages such as home, about, contact and pricing, the Master Addons template library has more than 200 designs in the same JSON format. For a whole site at once, browse the Elementor template kits.
Pick a layout and build your blog
Start with the Elementor blog template that matches how you publish: Signal or Marquee if you post often and want a front page, Column or Quiet if the words matter most, Mosaic or Frost if the photos do, and Ledger or Manual for documentation. Download the JSON, import it, and point it at your own posts.
When the blog is done, the same import steps work for every other page on your site, from the homepage to the contact form.
The “Get hosting” links in this post are referral links. If you buy hosting through one, we may earn a commission at no extra cost to you.
