


Table of Contents
Free Elementor cannot list your posts. The Posts widget, Archive Posts, Post Title and the rest of the post widgets are all Elementor Pro. On a free install they show in the widget panel with a padlock and nothing else. To build a blog page without paying for Pro, install the free Master Addons plugin and use its Blog Posts widget, which lists posts in grid, list or masonry and works inside the normal Elementor editor.
This guide builds one start to finish, with screenshots from Elementor 4.2.4 and Master Addons 3.2 on a free install. It covers the layout choices, the query filters, the category filter tabs most tutorials miss, and the two settings that decide whether your grid looks tidy or ragged. If you would rather import a finished layout, start with these Elementor blog templates.
Does Elementor free have a blog or posts widget?
No. Search the widget panel for “post” on a free install and this is what comes back.
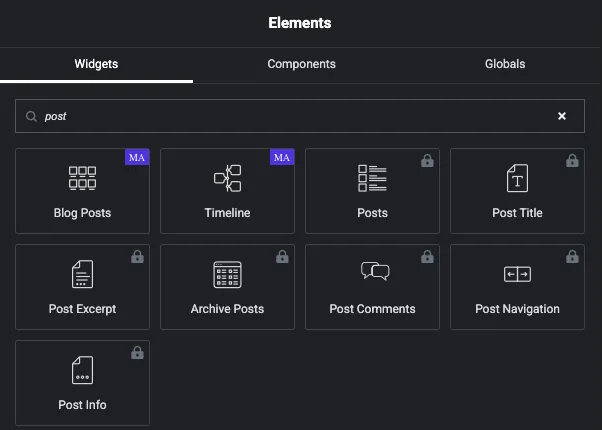
Blog Posts and Timeline carry the purple Master Addons badge and are ready to drag. Posts, Post Title, Post Excerpt, Archive Posts, Post Comments, Post Navigation and Post Info all carry a padlock, which is Elementor advertising Pro from inside the free plugin.
So you have four options:
| Option | Lists posts? | Cost | Layouts |
|---|---|---|---|
| Elementor (free) on its own | No | Free | n/a |
| Elementor Pro Posts widget | Yes | Paid, yearly | Classic, Cards, Full Content |
| Master Addons Blog Posts (free) | Yes | Free | Grid, List, Masonry, plus 14 card and list styles |
| Your theme’s default blog | Yes | Free | Whatever the theme ships |
The rest of this guide uses the free Master Addons widget. Every control shown below is in the free plugin. Nothing in the Blog Posts widget is locked.
What you need before you start
- WordPress with Elementor installed. The free version is fine.
- The free Master Addons plugin. Install notes are here if you want them.
- A few published posts. Six or more makes the layout easier to judge.
- A featured image on every post. A post without one leaves a gap in the grid, and no layout setting fixes that.
How to create an Elementor blog page for free, step by step
Step 1: Create the page
Go to Pages → Add New Page, title it Blog, then click Edit with Elementor. Leave the WordPress content area empty. Everything happens in the Elementor canvas.
Do not set this page as the WordPress Posts page under Settings → Reading. That hands the URL to your theme and discards the Elementor design. There is a section on the right way to do it further down.
Step 2: Add the Blog Posts widget
Search the widget panel for blog and drag Blog Posts onto the canvas. It renders your latest posts straight away, so you can see what you are changing as you change it.
Step 3: Pick a layout
Open Display Options. The controls here set the shape of the page.
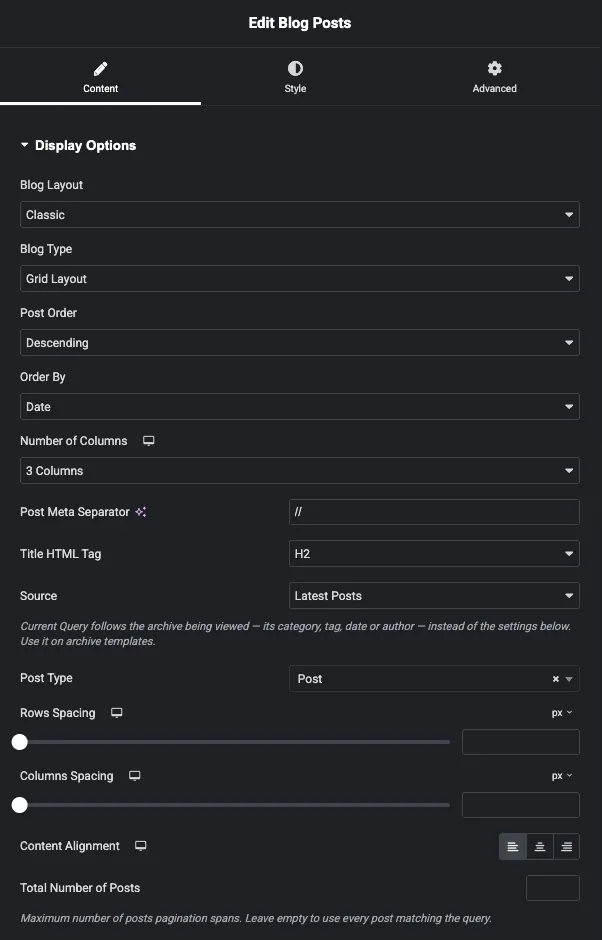
The two controls that matter most sit at the top:
- Blog Layout: Classic or Cards. Classic puts the text on the page background. Cards wraps each post in its own panel.
- Blog Type: Grid Layout, List Layout or Masonry Layout.
Below those, set Number of Columns. It is a responsive control, so you can give desktop three columns and mobile one by switching device at the top of the editor. Three is the safe default for a blog with images.
Two more worth setting now. Title HTML Tag defaults to H2, which is right for a blog index, since the page heading is the H1 and each post title sits below it. And Source chooses between Latest Posts and Current Query. Leave it on Latest Posts for a normal blog page; Current Query is for archive templates, where the widget should follow the category or author being viewed instead of its own settings.
Step 4: Choose a card or list style
Set Blog Layout to Cards and a Cards Layout control appears with seven designs.
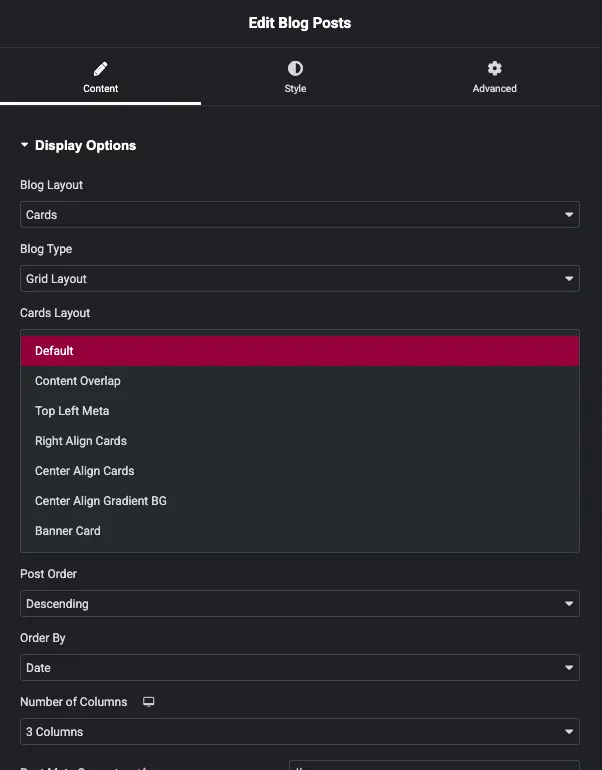
Default, Content Overlap, Top Left Meta, Right Align Cards, Center Align Cards, Center Align Gradient BG and Banner Card. Content Overlap and Banner Card put the text over the image, so they need photos with room in them. Default and Right Align Cards are the safer picks for a mixed set of featured images.
Switch Blog Type to List and the card control is replaced by List Layout Type, with seven more.
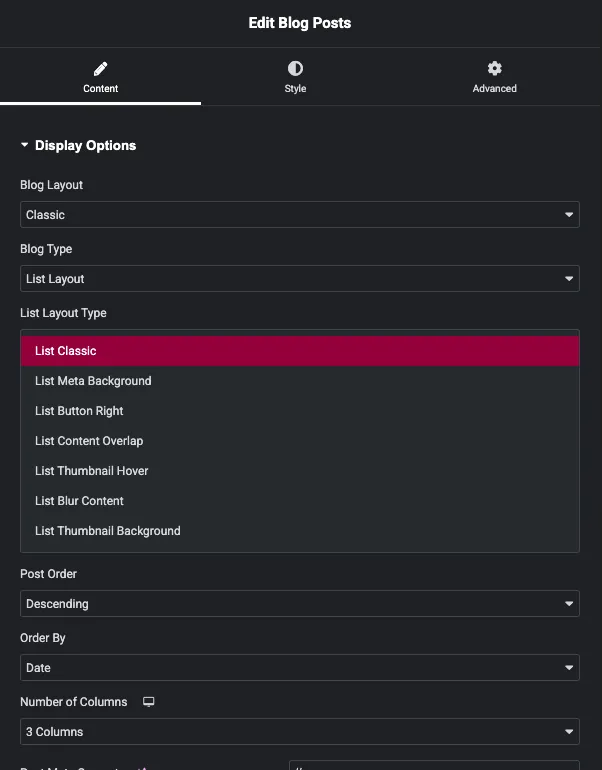
That is 14 ready-made designs in total, seven for grids and seven for lists, on top of the three layout types, so you rarely have to style a card from scratch.
Step 5: Set the thumbnail size and hover effect
Open Thumbnail Settings. A ragged blog page usually gets fixed here.
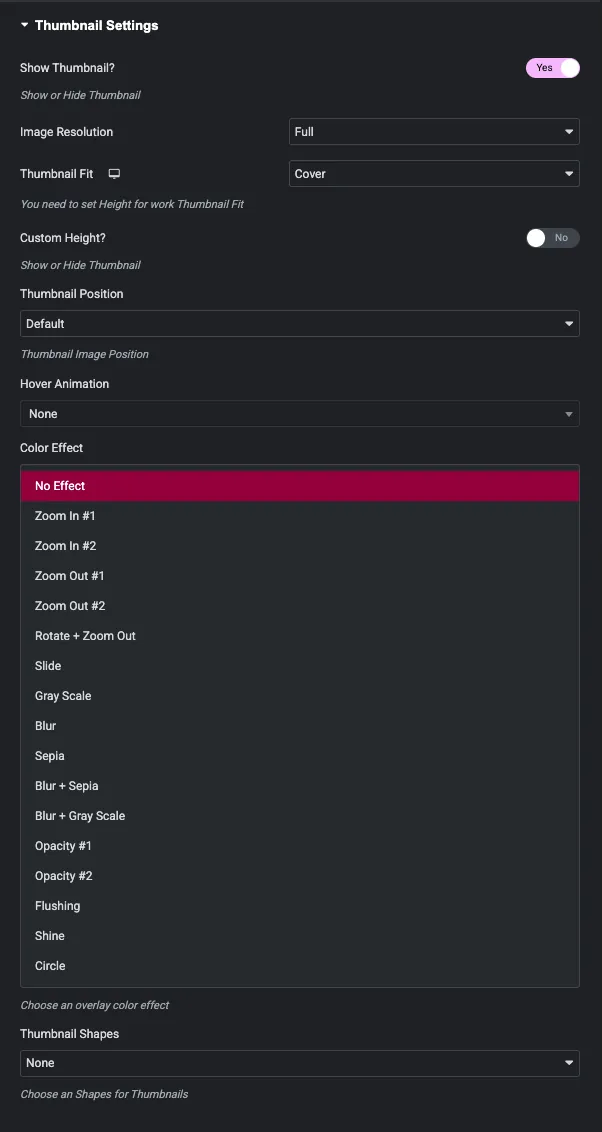
By default the widget keeps each featured image at its own ratio, so one portrait photo in a row of landscapes pushes that card down the page. Turn Custom Height on and set the min and max to the same value, around 200 to 240px, and every thumbnail crops to the same box. Thumbnail Fit set to Cover keeps the crop from squashing anything.
Under that, Hover Animation uses Elementor’s own animations, and Color Effect adds one of sixteen overlay effects: zoom in and out, rotate and zoom, slide, gray scale, blur, sepia, the two blur combinations, two opacity fades, flushing, shine and circle. Thumbnail Shapes adds five frames on top: Framed, Diagonal, Bordered, Gradient Bordered and Squares.
Pick one effect and use it everywhere. Three different ones across a page read as noise.
These settings only affect post thumbnails in the Blog widget. For a hover effect on a single image elsewhere on the page, use the Image Hover Effects widget.
Step 6: Choose which meta to show
Open Posts Settings and switch off anything the reader does not need.
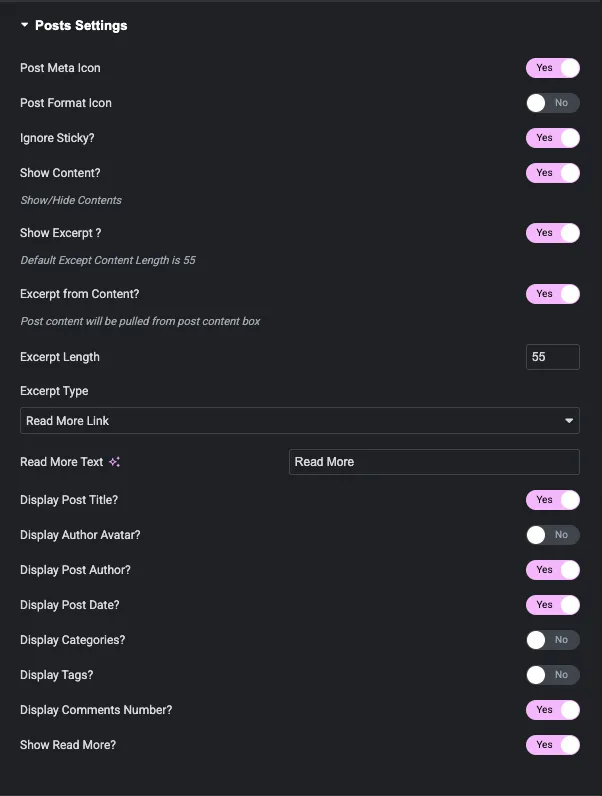
Excerpt Length defaults to 55 words, which is long for a card. Drop it to 15 to 25 so the grid stays scannable and the click goes to the post rather than the summary. Read More Text is free text, so “Read the guide” works as well as “Read More”.
The toggles below control post title, author avatar, author name, date, categories, tags and comment count independently. Turning Display Categories? on is usually worth it, since it gives readers a second way into related posts.
Step 7: Filter which posts appear
Open Advanced Settings. This is the query section.
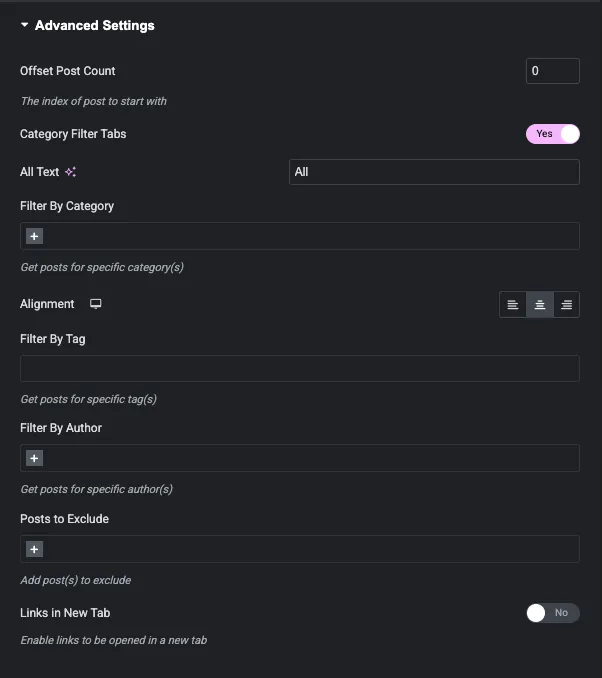
- Filter By Category, Filter By Tag and Filter By Author narrow the query. Each accepts several values.
- Posts to Exclude drops specific posts by name, which is how you keep a pinned announcement out of the main grid.
- Offset Post Count skips the first N posts. Set a featured widget above the grid to show the latest three, then offset the grid by three, and no post appears twice.
- Links in New Tab does what it says.
Step 8: Publish and check the result
Hit Publish and open the page in a normal browser tab. Here is the finished grid: three columns, cards, uniform thumbnails, category tabs across the top.
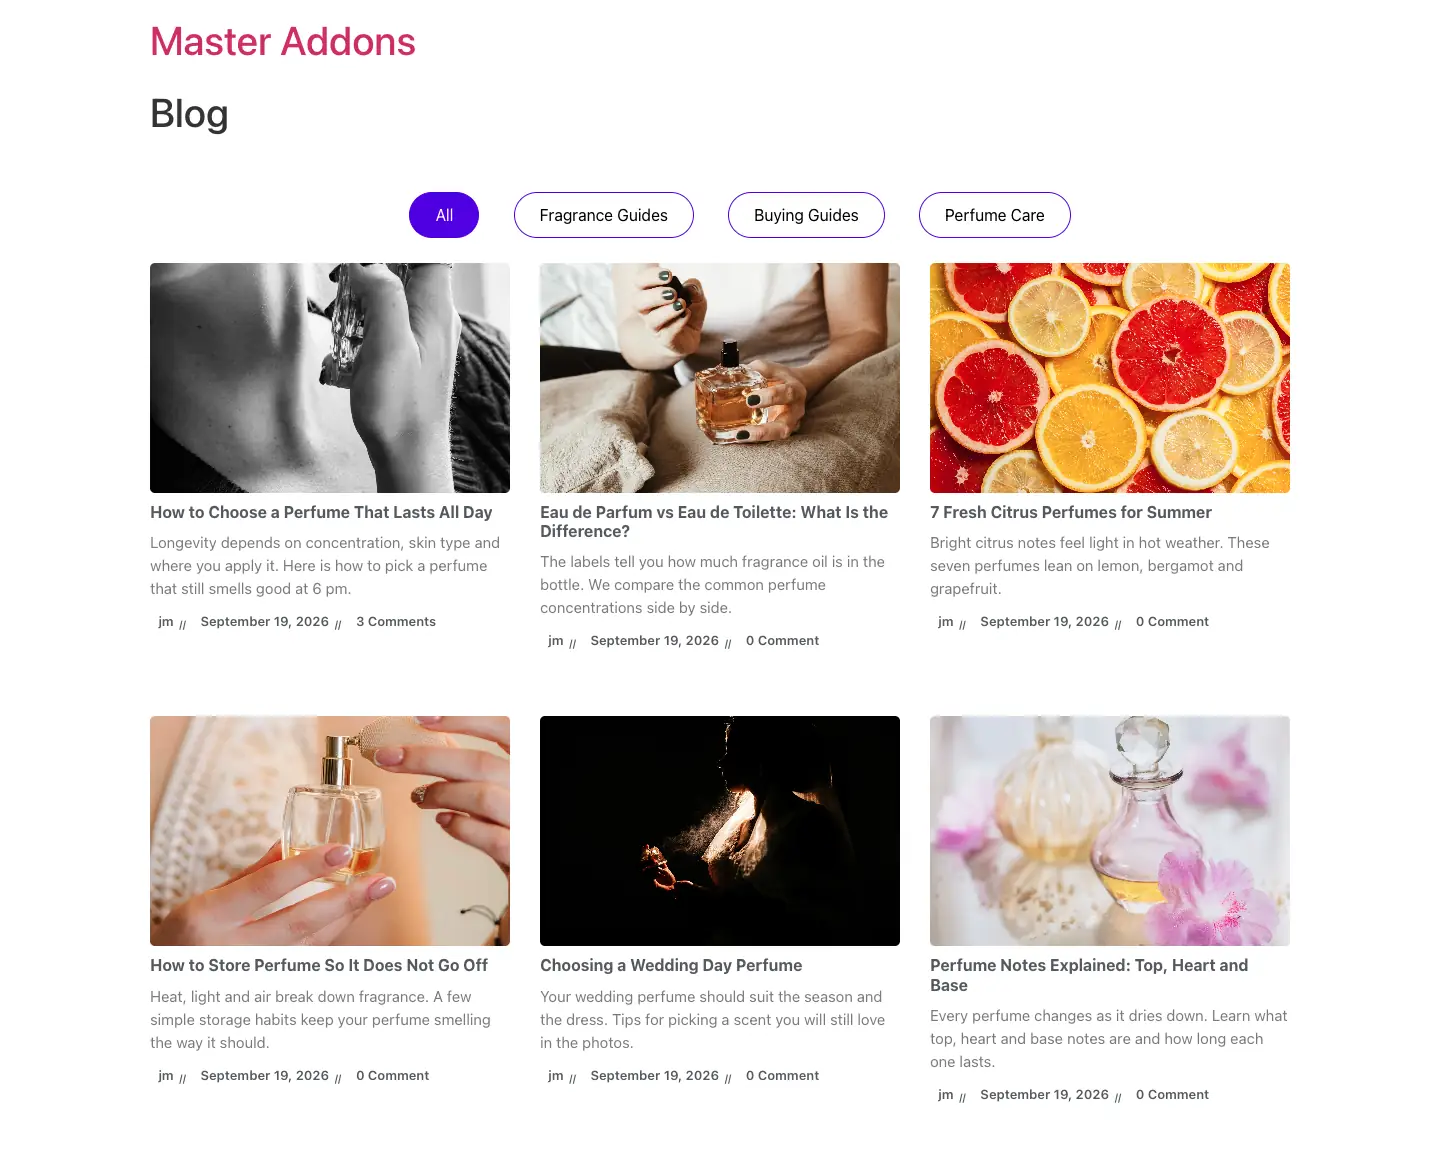
Total time, once you know where the controls are, is under ten minutes.
Add category filter tabs to the blog page
The filter tabs across the top of that screenshot are free, and they are the part people miss. Readers can narrow the grid by category without leaving the page.
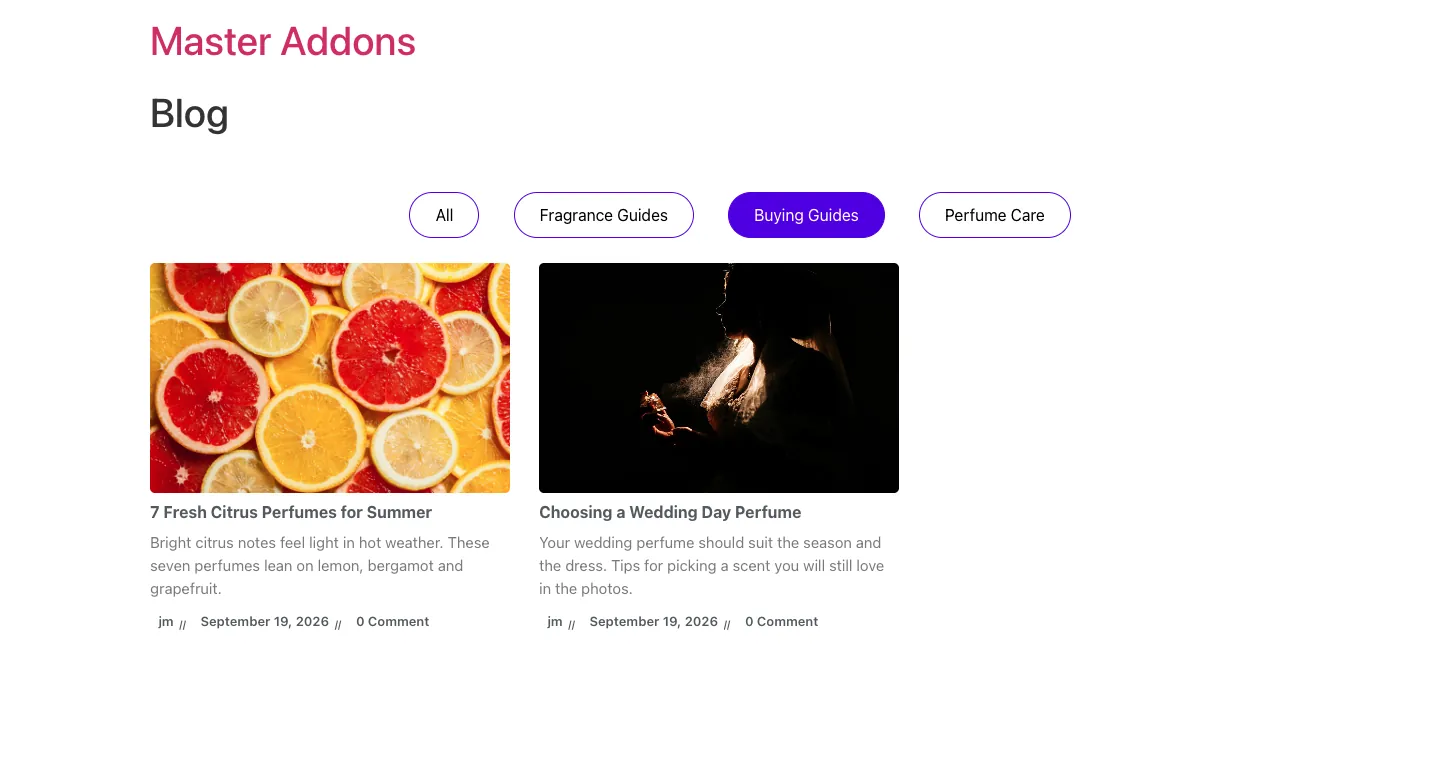
Turn on Category Filter Tabs in Advanced Settings. Then pick the categories you want as tabs in the Filter By Category field. The tabs are built from that selection, not from the categories of the posts on the page. Leave the field empty and you get a single All tab and nothing else, which looks broken but is working as designed.
All Text renames the first tab, and Alignment moves the row left, centre or right. Filter tabs and the carousel are mutually exclusive, so if you enable the carousel the tabs stop rendering.
Grid, list or masonry: which layout to use
Grid is the default and suits most blogs. Equal cards, three across, scannable. Use it with a custom thumbnail height so the rows line up.
List puts one post per row with the thumbnail beside the text. Set Number of Columns to 1 Column when you switch to List, or you get three list items crammed side by side.
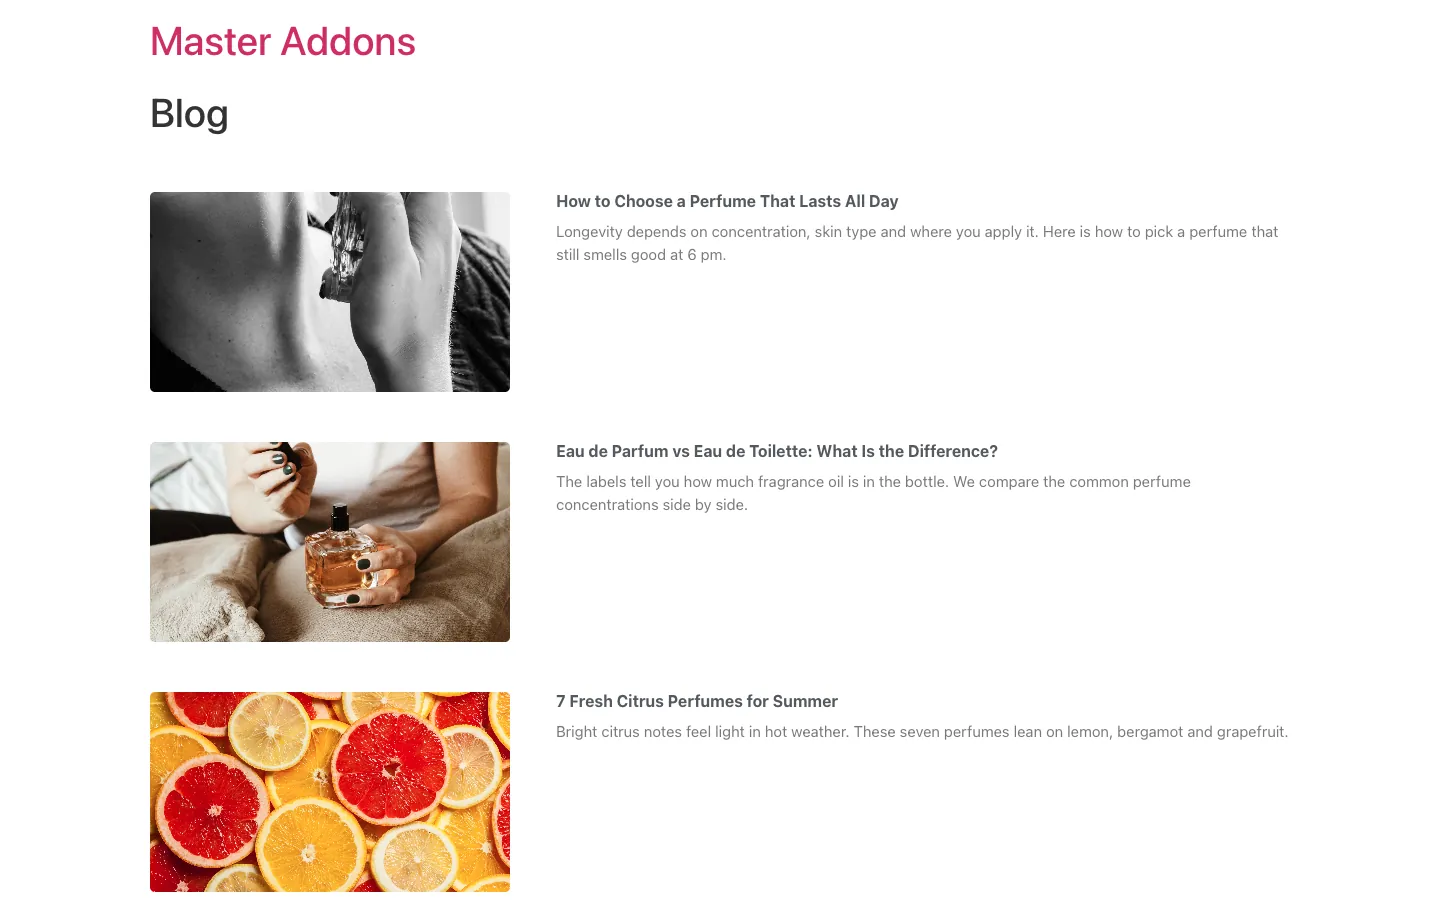
List gives the excerpt room to breathe, so it works for essay-style blogs where the summary is doing the selling.
Masonry keeps the columns but drops the fixed row height, so cards stack by content and the gaps close up.
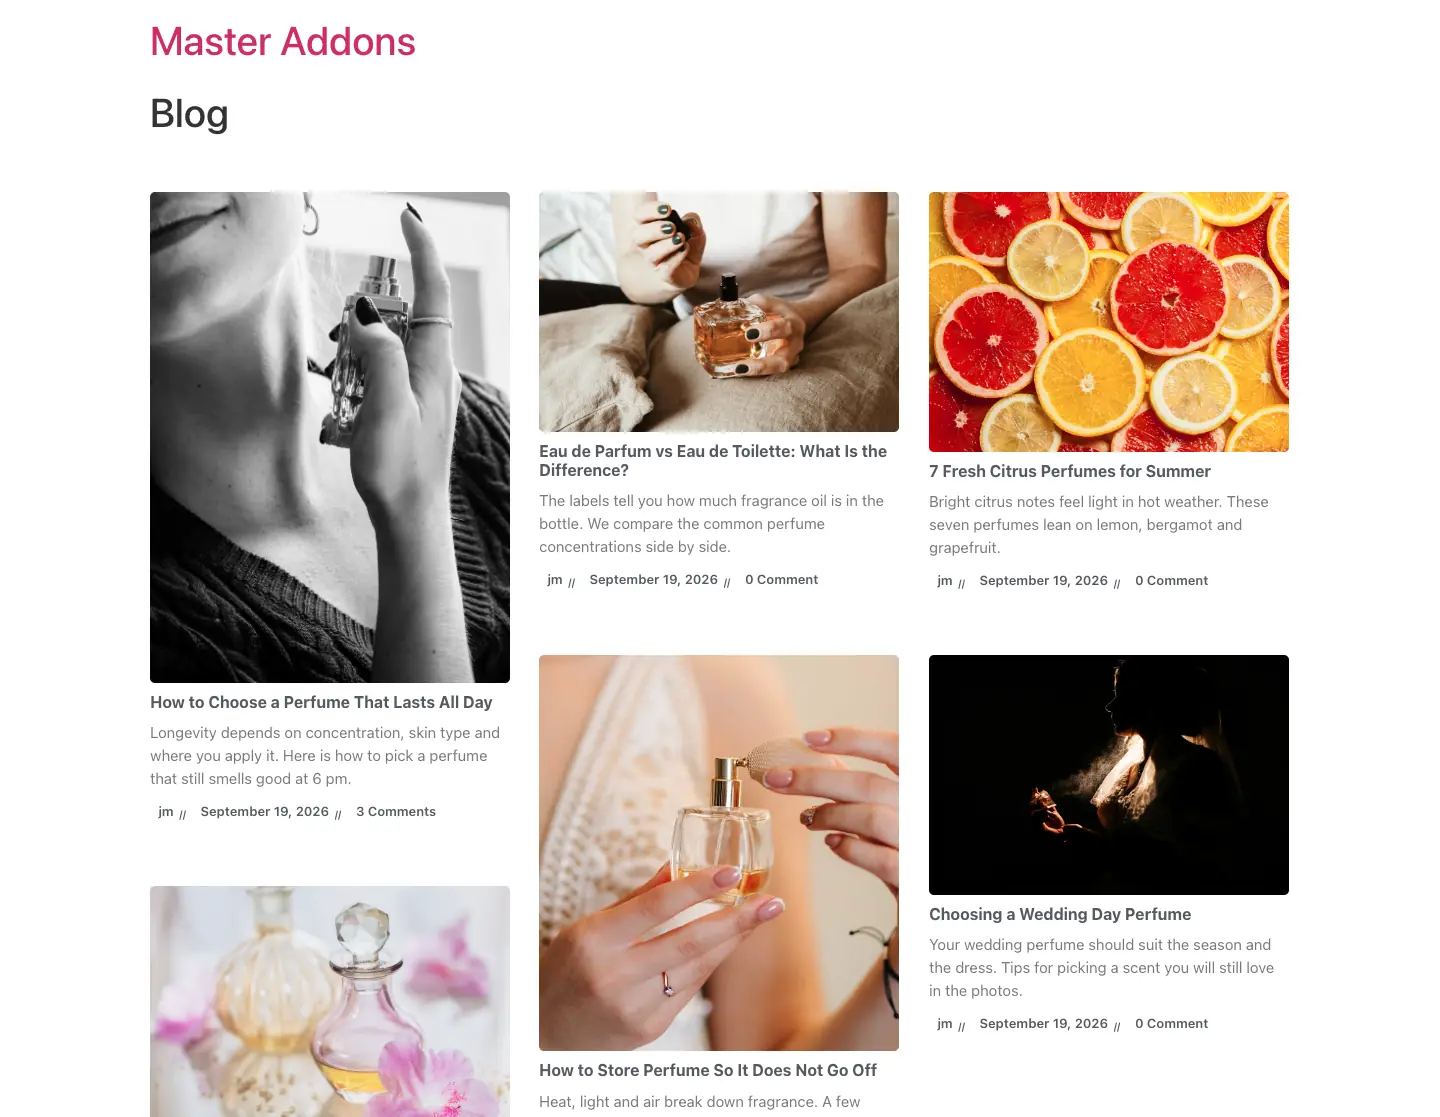
Masonry is the one case where you should leave Custom Height off, since the uneven heights are what make it work. It suits photo-led blogs and falls apart when every featured image is the same shape.
There is a fourth option when the dates matter more than the thumbnails. The Timeline widget has a Post Timeline type that puts your posts on a vertical line in date order. It uses the same query filters as Blog Posts, and it needs Master Addons Pro.
Turn the blog grid into a carousel
The same widget doubles as a post carousel, which is what you want on a home page rather than on the blog page itself.
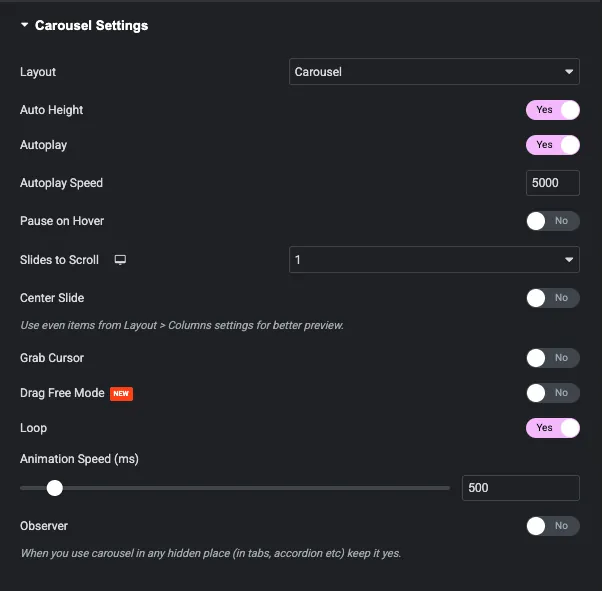
Switch Enable Carousel? on and the Carousel Settings section opens: autoplay and autoplay speed, pause on hover, slides to scroll per device, centre slide, grab cursor, drag free mode, loop, and animation speed. The Layout control also offers a coverflow effect with its own rotate, stretch, modifier and depth settings.
Observer should be Yes if the carousel sits inside a tab, an accordion or anything else hidden on page load, otherwise it measures itself at zero width and renders as a stack.
Showing the modified date instead of the published date
The Blog Posts widget can sort by modified date: set Order By to Last Modified in Display Options and recently updated posts rise to the top. That alone is often what people actually want, because it keeps refreshed content visible.
Displaying the modified date as the visible text is different. The widget prints the published date in the card, while the underlying <time datetime> attribute carries the modified date. Search engines read the attribute, so your updated dates are being published even when the card says otherwise, but a reader sees the original date.
To show the modified date as text you need Elementor Pro’s dynamic tags, where the Post Date tag has a Modified option, used inside a Pro Posts or Loop Grid widget. There is no free Elementor equivalent, because dynamic tags are a Pro feature in the first place. The alternative on free is a small snippet that filters get_the_time for your blog template.
Blog page or posts page? Set it correctly
WordPress has its own posts page, set under Settings → Reading. The page you just built is a regular page, and the two behave differently.
If you assign your Elementor page as the Posts page in Settings → Reading, WordPress hands the URL to the theme’s archive template and your Elementor design is ignored. That is the single most common reason a finished blog page shows the theme’s default list instead.
Two ways to do it properly:
- Keep it a normal page. Leave Settings → Reading alone and add your Blog page to the menu under Appearance → Menus. The page renders your Elementor design, which is what you want.
- Build the real archive. If you want the WordPress archive URL itself to use your design, build an Archive template in the Master Addons Theme Builder and set the Blog Posts widget’s Source to Current Query, so it follows whatever archive is being viewed.
Master Addons Blog Posts vs the Elementor Pro Posts widget
| Feature | Elementor Pro Posts | Master Addons Blog Posts (free) |
|---|---|---|
| Price | Requires Elementor Pro | Free |
| Works on free Elementor | No | Yes |
| Layout types | Grid, masonry | Grid, list, masonry |
| Ready-made styles | 3 skins | 7 card styles, 7 list styles |
| Thumbnail hover effects | CSS filters | Elementor animations plus 16 colour effects |
| Thumbnail shapes | Border radius | 5 shapes |
| Meta options | Author, date, time, comments, avatar | Avatar, author, date, categories, tags, comments |
| Query filters | Post type, include and exclude terms | Category, tag, author, exclude, offset |
| Category filter tabs | No | Yes |
| Carousel | Separate Loop Carousel widget | Built in, with coverflow |
| Pagination | Numbers, prev/next, load more, infinite scroll | Numbers with custom prev/next labels |
| Dynamic tags (modified date and similar) | Yes | No, Pro Elementor feature |
| Custom post types | Yes | Yes |
Elementor Pro wins on dynamic tags, load-more and infinite scroll. The free Master Addons widget wins on layout variety, hover effects, filter tabs and the built-in carousel. If popups, forms and theme building are already pulling you toward Pro, buy Pro. If the blog page is the only reason you were considering it, this covers it for nothing, and the Master Addons licence is worth a look only if you want the Pro widgets elsewhere.
Seven fixes for a blog layout that looks wrong
- Ragged card heights. Turn on Custom Height in Thumbnail Settings and set min and max to the same value. This is the fix nine times out of ten.
- A blank rectangle in the grid. That post has no featured image. Add one, even a plain branded graphic.
- Excerpts swallowing the card. Drop Excerpt Length from 55 to about 20 words.
- Three list items side by side. List layout needs Number of Columns set to 1 Column.
- Filter tabs showing only All. Pick the categories in Filter By Category. The tabs come from that field.
- Everything stacked on mobile in one long column. That is usually correct. Check it with the device switcher and set mobile columns deliberately rather than leaving it to chance. Our guide to Elementor breakpoints covers the rest.
- Slow blog page. Check the size of your featured images before blaming the widget. Compress them first; see our image optimizer roundup and the notes on speeding up Elementor sites.
Frequently asked questions
Can I create a blog page with the free version of Elementor?
Not with Elementor alone, since the Posts widget is Pro. Add the free Master Addons plugin and its Blog Posts widget gives you grid, list and masonry layouts, 14 card and list styles, category filter tabs, query filters and a carousel at no cost.
Does Elementor free have a Posts widget?
No. On a free install, Posts, Archive Posts, Post Title, Post Excerpt, Post Comments, Post Navigation and Post Info all appear in the widget panel with a padlock. Each one is locked and only advertises Elementor Pro.
How do I add my Elementor blog page to the site menu?
Publish the page, then go to Appearance → Menus, add it to your main menu and save. Keep it as a normal page rather than assigning it as the Posts page under Settings → Reading, or WordPress will hand the URL to your theme instead.
How many blog posts should I show per page?
Six to twelve. Fewer than six looks thin on a three-column grid, and more than twelve slows the page down because every card loads a featured image. Turn pagination on and let readers go deeper.
Can I show posts from one category only?
Yes. In Advanced Settings, pick the category in Filter By Category. You can build several pages this way, one per category, or turn on Category Filter Tabs and let readers switch between categories on a single page.
What is the best Elementor blog layout for SEO?
A grid with featured images, post titles set to H2, excerpts around 20 words, categories shown in the meta and pagination enabled. Set the Title HTML Tag control to H2 so the page keeps one H1 and a clean heading order.
Can the Master Addons blog widget show the modified date?
It can sort by it: set Order By to Last Modified. The visible date on each card is the published date, although the time element’s datetime attribute carries the modified date. Showing the modified date as text needs Elementor Pro’s dynamic tags.
Does the blog widget work with custom post types?
Yes. The Post Type control in Display Options lists every registered public post type, so the same widget builds a portfolio, case study or product index.
Why does my blog page show the theme layout instead of my design?
The page is probably assigned as the Posts page under Settings → Reading. WordPress routes that URL to the theme’s archive template and ignores the Elementor content. Unassign it, or build an Archive template in the Theme Builder instead.
Related reading
- Blog Posts widget, the feature page with every setting listed
- Blog element documentation
- How to create a sticky header in Elementor
- How to edit the footer in WordPress using Elementor
- Elementor page templates, if you would rather import a ready-made page
- Master Addons on WordPress.org
