Table of Contents
Elementor’s free plugin does not include Display Conditions at all. The feature sits entirely inside Elementor Pro. Master Addons, the free Elementor add-on, does not unlock the full Display Conditions extension either, but its Theme Builder and Popup Builder do include a basic, one-rule form of targeting at no cost.
This page lays out exactly which piece is free, which needs Pro, and where the free tier stops, then shows how to set up the Display Conditions extension in Master Addons Pro. The gap between “free” and “Pro” here is easy to misread, so every claim below is checked against the plugin’s own source code and Elementor’s published documentation.
What Are Display Conditions in Elementor?
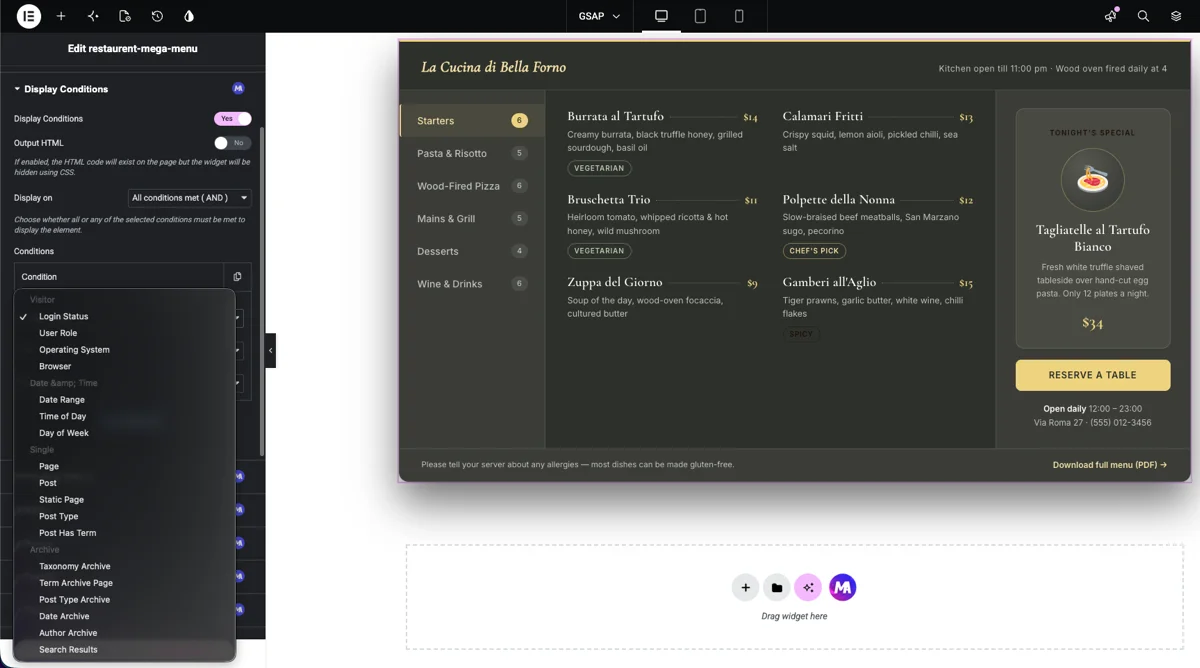
A display condition is a rule attached to an element, template, or popup that decides whether it renders for a given visitor. Instead of building separate pages for every audience, you build one page and let the rule decide what each visitor sees.
One distinction matters before anything else. This is conditional display, not conditional loading. Hidden elements are kept out of view, not removed from the page as a security boundary. For genuinely private material, use proper access control such as Restrict Content in User Based mode or a membership plugin, not a display rule.
Elementor Free vs Elementor Pro
Elementor’s own Display Conditions documentation covers the Pro feature only. The free version of Elementor, sometimes called Elementor Core, does not ship any element-level display conditions. Elementor’s Pro vs Free comparison also confirms that the Header & Footer builder and the Popup Builder both require a paid plan; Popup Builder specifically needs the Advanced tier, not just the entry-level Essential plan.
The Real Master Addons Free vs Pro Split
This is the table that matters. It is built from the plugin’s own config file and the render logic that runs on the front end, not from marketing copy. Where Master Addons Free silently overrides a setting rather than hiding it, that is noted directly in the row.
| Capability | Elementor Free | Elementor Pro | Master Addons Free | Master Addons Pro |
|---|---|---|---|---|
| Show/hide by login status | No | Yes | No | Yes |
| Show/hide by user role | No | Yes | No | Yes |
| Date, time, or day-of-week rules | No | Yes | No | Yes |
| Browser or OS targeting | No | Not offered | No | Yes |
| Referrer / URL source rules | No | Yes | No | No |
| Works on individual widgets | No | Yes | No | Yes |
| Works on flexbox containers | No | Yes | No | No (widgets and legacy sections only) |
| Assign a template to header or footer | No | Yes | Yes (entire site only) | Yes |
| Assign a template to single post, archive, search, or 404 | No | Yes | No | Yes |
| More than one display rule per template (beyond “Entire Site”) | No | Yes | No | Yes |
| Build and publish a popup | No | Yes (Advanced plan and up) | Yes | Yes |
| Popup trigger: Page Load | No | Yes | Yes | Yes |
| Popup trigger: exit intent, scroll, click, or inactivity | No | Yes | No (forced back to Page Load) | Yes |
| Popup targeting beyond “Entire Site” | No | Yes | No | Yes |
| Cost | Free | Paid annual license | Free | Paid annual license |
Two rows deserve a second look. Master Addons Free lets you pick any popup trigger in the editor, including exit intent and on-scroll, but the front end quietly forces it back to Page Load unless Master Addons Pro is active. The trigger you configured is not the trigger visitors get. The same pattern applies to popup and template targeting: the editor shows every rule, but only Include plus Entire Site actually saves in the free version.
What Free Actually Covers
Two things in Master Addons Free are genuinely useful for targeting, and both are free with no trial or time limit:
- A header, footer, or comment-form template built in the free Theme Builder and assigned to your entire site.
- A popup built in the free Popup Builder, published, and shown on page load across your entire site.
Neither requires touching the Display Conditions extension, because neither is the Display Conditions extension. They are built-in, single-rule targeting inside two separate free tools.
Where the Free Tier Stops
The standalone Display Conditions extension, the one that hides or shows a single widget or a legacy section by role, browser, login state, or date, ships no code at all in the free plugin. Its class lives under a Pro-only module path that simply is not included in the Master Addons Free download. Enabling it in the free settings panel does nothing, because there is nothing to enable.
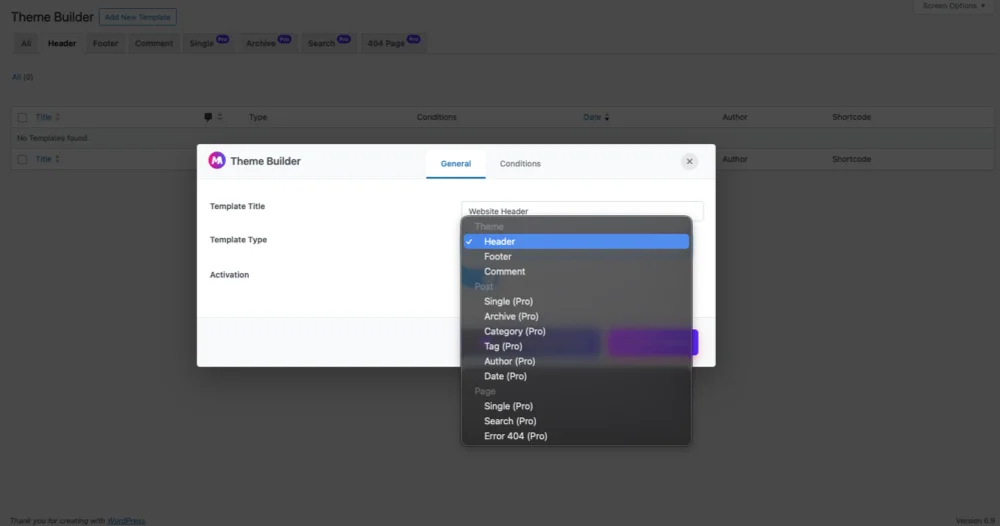
Theme Builder follows the same pattern for template types. Header, Footer, and Comment templates are free. Single, Archive, Category, Tag, Author, Date, Page Single, Search, 404, and the WooCommerce templates are all labelled Pro in the template-type dropdown itself. The free “Add Condition” button for narrowing a template to specific pages is also locked; without Pro you get exactly one rule, Entire Site.
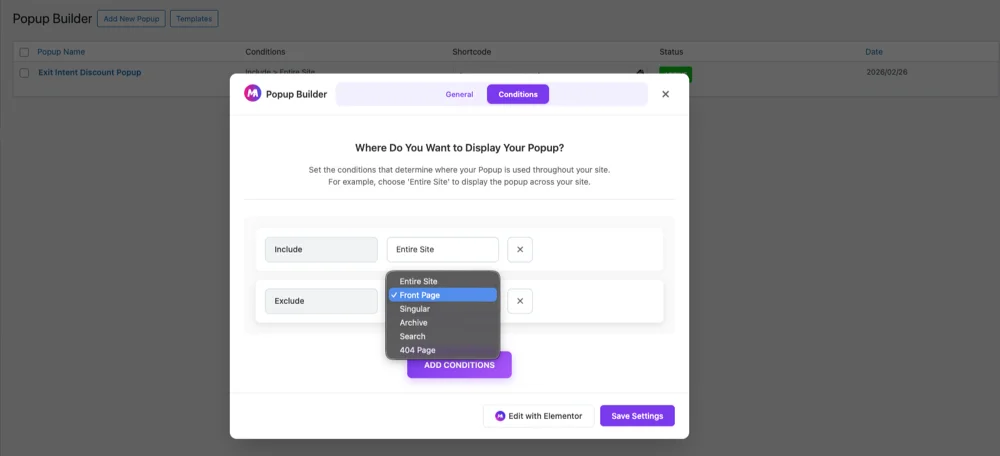
Popup Builder mirrors it again. The free editor lets you choose Exclude as a condition type and pick rules like Front Page, Singular, Archive, Search, or 404, but saving silently strips anything that is not Include plus Entire Site. On the front end, the trigger is hard-coded to Page Load and the automatic-close and extended snooze options are disabled, regardless of what the editor shows.
Other Master Addons Features: Free vs Pro at a Glance
These come up in the same searches as Display Conditions, so here is where each one actually lands, based on the plugin’s own configuration file:
| Feature | Status in Master Addons |
|---|---|
| Mega Menu builder | Free |
| Widget Builder (custom HTML/CSS/JS widgets) | Free |
| Image Comparison widget | Free |
| Popup Trigger widget | Free |
| Custom Breakpoints | Free |
| Entrance Animation (extended library) | Pro |
| Comparison Table widget | Pro |
| Tooltips (global, any element) | Pro |
| Display Conditions extension | Pro |
One nuance on Entrance Animation: Elementor Core itself already ships a basic entrance-animation control on every widget, free. Master Addons Pro’s Entrance Animation extension adds a larger animation library with extra duration, delay, and repeat controls on top of that, it does not gate the base feature Elementor already gives you for free.
When Free Is Enough (and When It Is Not)
Free is enough when a header or footer needs to show sitewide, or when a single popup needs to appear on page load for every visitor. That covers a genuinely large share of small-site use cases at zero cost.
If you outgrow that, our comparison of WordPress popup plugins covers what the paid tools add on top, and roughly what each one costs.
Free is not enough the moment you need more than one rule. A banner that should hide for logged-in members, a popup that should fire on exit intent, or a template that should only apply to your Products archive: all three need either Master Addons Pro or Elementor Pro. There is no free path to per-role, per-device, or per-page conditional logic in Master Addons today, despite what some of the plugin’s own marketing copy implies.
How to Set Up What You Can With the Free Tools
- Install and activate Master Addons Free from the WordPress plugin directory.
- Go to Master Addons → Theme Builder and create a Header or Footer template with Elementor.
- In the template modal, leave the Template Type on Header or Footer. Do not pick a Post or Page type; those are Pro-only and will not save as a working condition on the free plugin.
- On the Conditions tab, leave the default Entire Site rule in place. The Add Condition button is Pro-gated, so a second rule will not save.
- For a popup instead, go to Master Addons → Popup Builder, build your popup, and set Activation to on.
- Leave the trigger dropdown alone. Whatever you pick, the free plugin renders it as Page Load on the live site.
- Publish, then check the result in a logged-out private browser window, since Elementor’s editor preview does not reflect display or popup conditions.
- No Display Conditions panel. The extension isn’t enabled. Master Addons > Settings > Extensions.
- No panel on a container. The extension works on widgets and legacy sections, not flexbox containers. Put the rule on the widgets inside the container.
- The element shows to everyone. Display on is set to “Any condition met” when you meant “All conditions met.”
- It works for you but not for visitors. You’re logged in as an admin. Test in a private window, every time.
- Hidden content turns up in the page source. Output HTML is on for that widget, or the element is a section, which is always hidden with CSS. Switch Output HTML off, or move the rule onto the widgets inside the section.
- Time rules fire at the wrong hour. Site timezone, not visitor timezone. Settings > General.
- Changes don’t show on the live site. A page cache is serving a stored copy. Most caching plugins can’t vary a cached page per user, so aggressive full-page caching and login-based conditions work against each other. Exclude those pages from the cache, or clear it and test again.
- My popup trigger is not firing on exit intent. This is expected on Master Addons Free. The free plugin always renders Page Load on the front end regardless of the editor setting; Pro is required for the other four triggers.
- My template only shows on the entire site, never on the page I picked. Also expected. Free Theme Builder saves one condition, Entire Site, and strips anything more specific.
- The Display Conditions panel is missing from Elementor’s Advanced tab. That panel belongs to Elementor Pro. Master Addons Free does not add it, and the standalone Master Addons Display Conditions extension will not appear as functional without Master Addons Pro either.
- Elementor Pro shows Display Conditions but the rule never applies. Page caching commonly serves one visitor’s cached version to another. Exclude conditional pages from full-page cache, and confirm you are testing in a logged-out private window rather than inside the editor.
How to Use the Master Addons Display Conditions Extension (Pro)
With Master Addons Pro active, go to Master Addons, Settings, Extensions, switch on Display Conditions and save. A Display Conditions panel then appears in the Advanced tab of every widget and legacy section. It does not appear on flexbox containers, so put rules on the widgets inside a container. See the Display Conditions extension page for the full list of conditions.
Each rule reads like a sentence in three parts: what to check, an operator (Is or Is not), and a value. “Login Status is Logged in.” “Browser is not Safari.” Everything below is a variation on that.
The Display On setting: all conditions vs any condition
Enable Display Conditions on an element and you get a Display on dropdown with two choices. Picking the wrong one is the most common reason a rule “doesn’t work.”
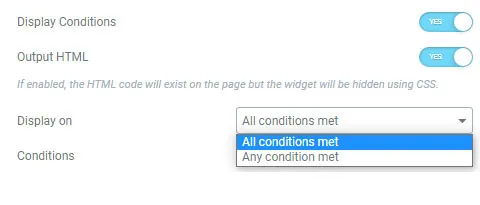
All conditions met is AND logic, so every rule has to pass. Any condition met is OR logic, so one passing rule is enough.
Here’s what that means in practice. Say you set two conditions: “Browser is Chrome” and “User Role is Administrator.”
On All conditions met, only an admin who happens to be browsing in Chrome sees the element. That same admin on Firefox sees nothing.
On Any condition met, every Chrome visitor sees it, and so does every admin on any browser. That’s a much bigger audience than most people have in mind when they add a second rule.
So if an element is showing to people it shouldn’t, check this dropdown before you touch anything else.
The Output HTML toggle (read this before you hide anything sensitive)
Sitting right under the main toggle is Output HTML, and its own label spells out what it does: “If enabled, the HTML code will exist on the page but the widget will be hidden using CSS.”
That matters a lot more than its quiet placement suggests.
Leave it off, which is the default, and a hidden widget’s content is not rendered into the page. Sections have no Output HTML switch, so a hidden section stays in the page source and is hidden with CSS. Someone who fails the condition can’t view-source and read it, and Google won’t index it.
Turn it on and the element gets rendered into the HTML, then hidden with CSS. Anyone can open dev tools, delete one line, and read the whole thing.
So keep Output HTML off for anything you actually want kept private: a members-only price, a hidden download link, an internal note. The reason the setting exists at all is that some scripts need the markup present in the DOM to work, which comes up with sliders, tab systems, and counters that measure elements on page load. That’s the case to turn it on for, and not much else.
While we’re here, the blunt version: conditional display is a presentation tool, not an access-control system. With Output HTML off it’s perfectly solid for everyday use. But content that has to be locked down, like a paid course or a gated file, belongs behind real protection. The Restrict Content widget in User Based mode exists for that, and a proper WordPress membership setup is the right answer for anything you charge money for.
Every condition you can use
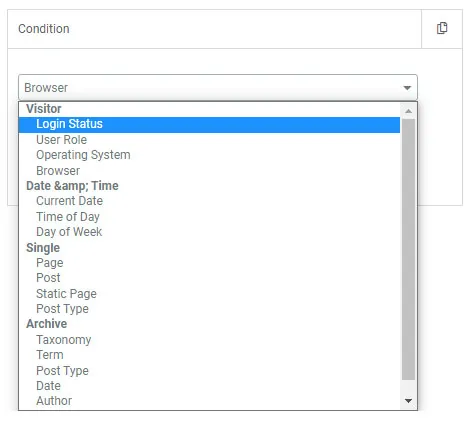
Open the Condition dropdown and you get four groups.
| Group | Conditions | Typical use |
|---|---|---|
| Visitor | Login Status, User Role, Operating System, Browser | Member pricing, admin-only notes, “Download for Mac” buttons |
| Date & Time | Date Range, Time of Day, Day of Week | Sales that expire, opening hours, weekend offers |
| Single | Page, Post, Static Page, Post Type, Post Has Term | Header CTA that changes on certain pages |
| Archive | Taxonomy Archive, Term Archive, Post Type Archive, Date Archive, Author Archive, Search Results | Category-specific banners, a message on empty search results |
Every one of them pairs with Is or Is not, which quietly doubles what a single rule can do.
Show content to logged-in users only
Select the element, open Advanced > Display Conditions, switch it on. The default condition is already Login Status set to Is, meaning logged-in visitors see it and nobody else does. You don’t have to change anything.
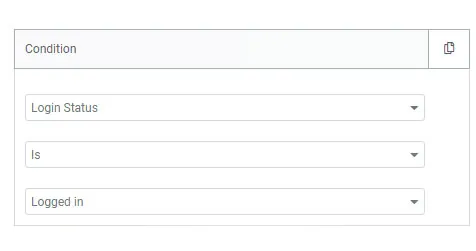
Now build the opposite version for logged-out visitors. Select that second element, enable Display Conditions, and flip the operator to Is not.
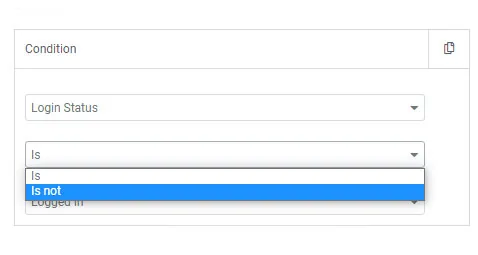
Stack those two on one page and you’ve got a header that greets members by name and pitches a signup to everyone else, with no duplicate page to keep in sync.
Target a specific user role
Same flow, different condition. Choose User Role from the dropdown and pick the role you’re after: Administrator, Editor, Subscriber, Customer, whatever your site has. WooCommerce and membership plugins add their own roles to this list.
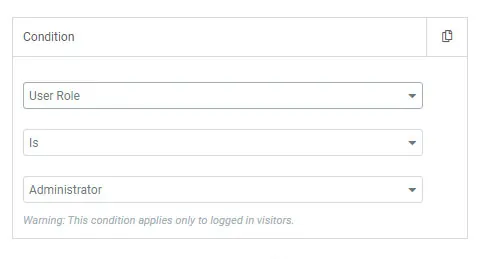
Flip it to Is not Administrator and everyone except admins sees the element. That’s handy for a “here’s how to edit this section” note your client sees on the page, without you having to look at it every time you open the site.
One catch: a user role only exists for someone who’s logged in. A logged-out visitor has no role at all, so a User Role rule will never match them, no matter what you set. If you need to catch logged-out people, that’s a Login Status rule.
Show content by date, time, or day of the week
Three time-based conditions, and they save more work than anything else in the list.
Date Range takes a start and an end date. Build the Black Friday banner in October, set the range, forget about it. It shows up and disappears on its own.
Time of Day takes a time window, which is the open-versus-closed swap from the top of this article.
Day of Week takes one or more days, added as tags.
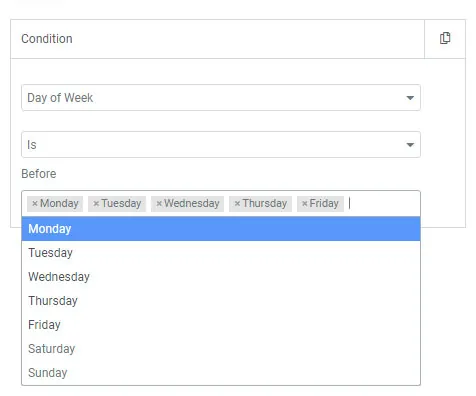
Set it to Monday through Friday for a “chat with support now” widget and let a “leave us a message” block cover the weekend. Combine Day of Week with Time of Day on All conditions met and you’ve described real opening hours in two rules.
Careful with the clock, though. Time conditions run on your WordPress site timezone (Settings > General), not the visitor’s. If your sale is supposed to end at midnight for the customer, and your server sits on UTC while your customers are in New York, it ends five hours early for them. Check that setting before you schedule anything that costs money.
Show content by browser or operating system
Pick Browser or Operating System and target Chrome, Firefox, Safari, Edge, Windows, macOS, Linux, and so on.
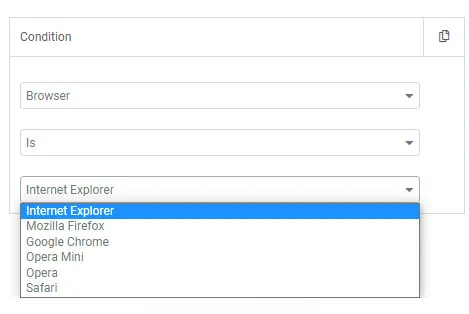
The real use for OS targeting is app downloads. Show the Mac button to Mac visitors and the Windows button to Windows visitors, instead of a row of four buttons where three of them are wrong for whoever is looking.
Browser targeting is narrower than people expect. It’s for the occasional “this feature behaves differently in Safari” notice, not for shipping different designs per browser. If a section only works in Chrome, fix the CSS. Don’t hide it from your Firefox visitors and call it done.
Also worth saying plainly: this is not device targeting. Elementor’s responsive controls already hide elements per screen size, and that’s the right tool for phone versus desktop. Operating System is about the platform, not the size of the screen.
Where this gets genuinely useful
A few setups worth stealing.
Run two headers from one template: in your Theme Builder header, put a “Log in” button on Login Status Is not, and a “My Account” button on Login Status Is. One header, both audiences. The same trick works in the footer.
Let sales run themselves with a promo bar on a Date Range condition, scheduled weeks ahead, so there’s no 6am launch-day scramble. Leave client instructions on the page with an admin-only note set to User Role Is Administrator, sitting exactly where it’s needed instead of buried in an email.
You can also put conditions on the elements inside a popup, so a single popup serves logged-in and logged-out visitors differently, and use Taxonomy Archive conditions to run a different offer on each product category archive.
For deeper personalization, pair conditions with Dynamic Tags (custom fields included) so the version that survives the rules pulls live data instead of static text.
Display conditions make the choice for the visitor. When the visitor should choose, as with monthly and yearly prices, use a content toggle. Toggle Content (Pro) puts a switch on the page and swaps the block under it when someone clicks.
Things that catch people out
Troubleshooting
Frequently Asked Questions
What are the display conditions in Elementor?
A display condition is a rule attached to an element, template, or popup that decides whether it renders for a given visitor. Elementor’s own version, found only in Elementor Pro, covers login status, user role, registration date, dates, day of week, post or page authorship, categories, tags, archive type, and the URL a visitor arrived from. It does not cover browser or OS targeting.
How to set display conditions with Elementor?
Free Elementor does not have this option; the feature sits entirely inside Elementor Pro. In Elementor Pro, select an element, open Settings, click the Display Conditions icon, add a rule, choose a condition and value, then save and publish the page. With Master Addons Free, the closest option is assigning a header or footer template to the entire site through the Theme Builder. Granular per-page rules need Master Addons Pro.
Is Elementor pop-up free?
No. Elementor’s native Popup Builder requires an Advanced-tier Pro plan and is not included in Elementor Core or the entry-level Essential plan. Master Addons Free ships a separate Popup Builder at no cost, but the free version always fires on page load and always targets the entire site, regardless of the trigger or condition you pick in the editor.
Why isn’t Elementor Editor showing display conditions?
The most common reason is that Elementor Pro is not active, since Display Conditions lives entirely in Pro and free Elementor never shows the panel. If Pro is active and the panel is still missing or blank, caching, a template conflict, or an unsaved condition set are the next things to check.
Are essential addons for Elementor free?
It depends on the specific feature, not just the plugin name. Master Addons ships 55+ widgets and 20+ extensions in its free version, but individual capabilities inside that free plugin, including the Display Conditions extension, the Comparison Table widget, and the extended Entrance Animation library, are Pro-only. Check each feature separately before assuming the whole plugin is free.
What are the best free widgets for Elementor?
Widgets that ship fully unlocked in Master Addons Free include Image Comparison, Popup Trigger, Mega Menu, Dual Heading, Flipbox, and the drag-and-drop Widget Builder for turning custom HTML or CSS into a reusable widget. None of these require a paid license to use.
How to change Elementor popup conditions?
In Elementor Pro, open the popup, click the arrow next to Publish, and select Display Conditions to add or edit rules for where it appears. In Master Addons’ free Popup Builder, the condition type is fixed to Include and the rule is fixed to Entire Site. Targeting a specific page, post type, or category requires Master Addons Pro.
Is hidden content really hidden from visitors?
Only partly. On a widget with Output HTML off, which is the default, hidden content is not rendered into the page. With Output HTML on, and on sections, the markup stays in the page source and is hidden with CSS. Use Restrict Content in User Based mode or a membership plugin for anything private.
Do time-based display conditions use the visitor’s timezone?
No. Master Addons checks Date Range, Time of Day and Day of Week against your WordPress site timezone under Settings, General, so a sale that ends at midnight ends at your site’s midnight, not the visitor’s.
Related Reading