

Table of Contents
To edit the footer in WordPress using Elementor, install the free Master Addons plugin, then go to Master Addons → Theme Builder → Footer, click Add New Template, set the display conditions to Entire Site, and choose Edit with Elementor. From there you customize every column, menu, contact detail, and the copyright line with drag-and-drop — no Elementor Pro required.
The footer is the one part of a site nobody thinks about until they have to. Usually it’s a stale copyright year, an old phone number, or a client asking for a column of links you have nowhere to put. And if your theme shipped with a hard-coded footer, you’ve hit the wall already: there’s no real place to edit it, and the Customizer only hands you a sliver of control.
This guide covers every way to edit a footer in WordPress — the native block editor, Customizer, widgets, and footer.php — then walks through the Elementor method in full, including building one from scratch if you don’t have a footer yet. We’ll use the free Master Addons Theme Builder, so you can get a full custom, site-wide footer without paying for Elementor Pro.
Here I have prepared a video tutorial for you if you prefer watching video instead of screenshots –
When you’re done you’ll own every piece of it: columns, logo, menus, contact details, social icons, and the copyright line. All of it edits in the same drag-and-drop Elementor canvas you already use for pages.
Why You Can’t Easily Edit the Footer in Most WordPress Themes
In most themes the footer lives inside the template files. A few themes hand you a couple of footer widget areas under Appearance → Widgets or a copyright field in the Customizer, and that’s where it stops. You can’t reorder things, you can’t restyle the layout, and dropping in a new column is off the table unless you start editing PHP.
Elementor’s Theme Builder gets around this by swapping the theme’s footer for an Elementor template you build yourself. The snag is that Elementor’s own footer builder is a Pro feature. That’s the gap Master Addons fills. Its Header, Footer & Comment Builder hands you the same footer-template feature for free, and it works whether you’re on free Elementor or Pro.
The Ways You Can Edit a WordPress Footer (and Where Each One Stops)
Before the Elementor route, it helps to know the options WordPress gives you out of the box, because which one you reach for depends on your theme. Here’s the honest picture:
- Block themes (Full Site Editing). If you’re on a block theme like Twenty Twenty-Four, go to Appearance → Editor → Patterns → Template Parts → Footer and edit the footer as blocks in the Site Editor. It’s capable, but it’s tied to block themes, the block library is limited next to Elementor, and if your site is built in Elementor you’re now juggling two editors.
- The Customizer. Many classic themes put a footer panel under Appearance → Customize — usually just a copyright field and maybe a footer-widgets toggle. Fine for a one-line change, useless for layout.
- Footer widget areas. Under Appearance → Widgets, some themes expose one to four footer columns you can fill with widgets. You get blocks of content, but no real control over spacing, order, or design.
- Editing footer.php directly. The nuclear option: open the theme’s
footer.phpin a child theme and edit the markup by hand. Total control, but you’re writing PHP and HTML, one typo can white-screen the site, and a theme update can wipe it if you skipped the child theme.
Each of these either boxes you into a specific theme, hands you a sliver of control, or asks you to touch code. That’s exactly why so many people building in Elementor skip all four and use a footer template instead — one visual builder, any theme, no code. Here’s how to set that up.
What You Need Before You Start
Three things, none of them cost anything:
- Elementor (free is enough): installed and active.
- Master Addons for Elementor: grab it from the WordPress plugin directory and activate it.
- Theme Builder enabled: open Master Addons → Settings and confirm the Theme Builder module is switched on. If you don’t see Theme Builder in the menu later, this toggle is usually why.
A lightweight theme helps here too. A heavy theme can wrap its own markup around the footer area and fight your styling, so if you’re still picking one, our roundup of the best lightweight WordPress themes for Elementor is a good starting point.
How to Add a Footer in WordPress Using Elementor
Adding a footer and editing one run through the same builder, so let’s build one from scratch first. Already have a footer template sitting there? Jump to the editing section below.
Step 1: Open the Theme Builder
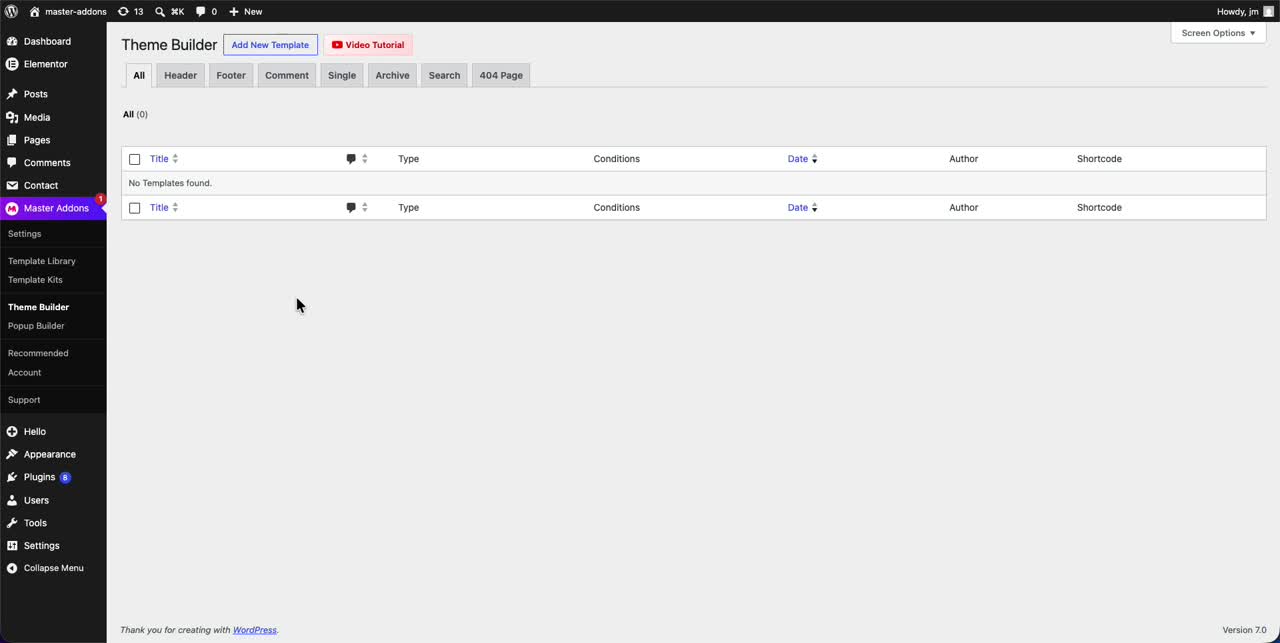
From the WordPress dashboard, head to Master Addons → Theme Builder. Across the top you’ll see tabs: Header, Footer, Comment, Single, Archive, Search, and 404 Page. Click Footer. On a fresh install the list just says “No Templates found,” which is exactly what you want to see right now.
Step 2: Add a New Footer Template
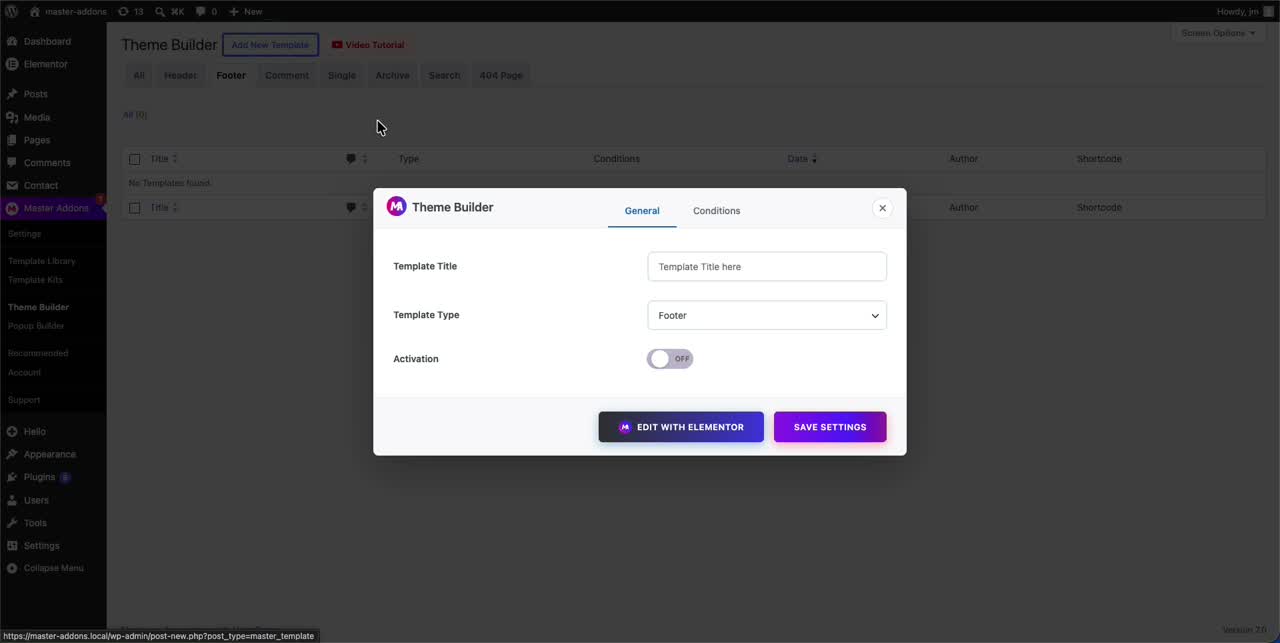
Hit Add New Template up top. A Theme Builder popup opens on the General tab. Because you started from the Footer tab, the Template Type is already set to Footer, so leave it alone.
Step 3: Name It and Switch Activation On
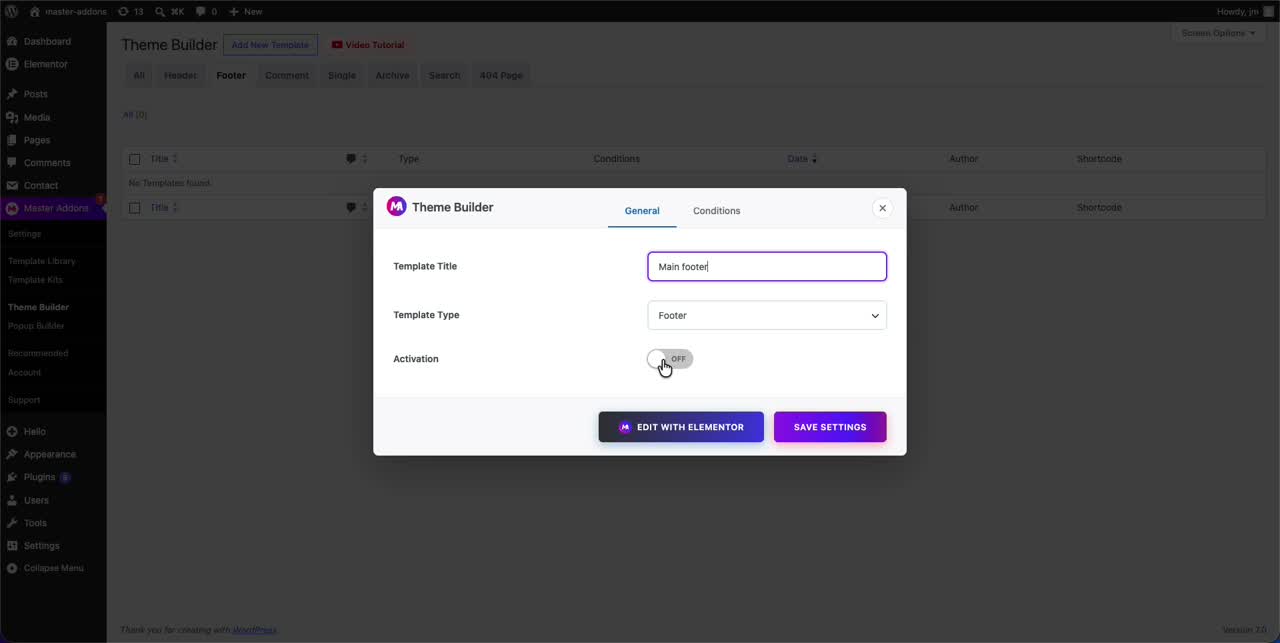
Give it a name in the Template Title field. Something plain like “Main footer” works, and future-you will thank present-you when there are five templates in the list. Then flip Activation to ON. That’s the switch that tells WordPress to actually use this as the live footer once it’s saved. Skip it and you’ll wonder why nothing shows up on the front end.
Step 4: Set the Display Conditions
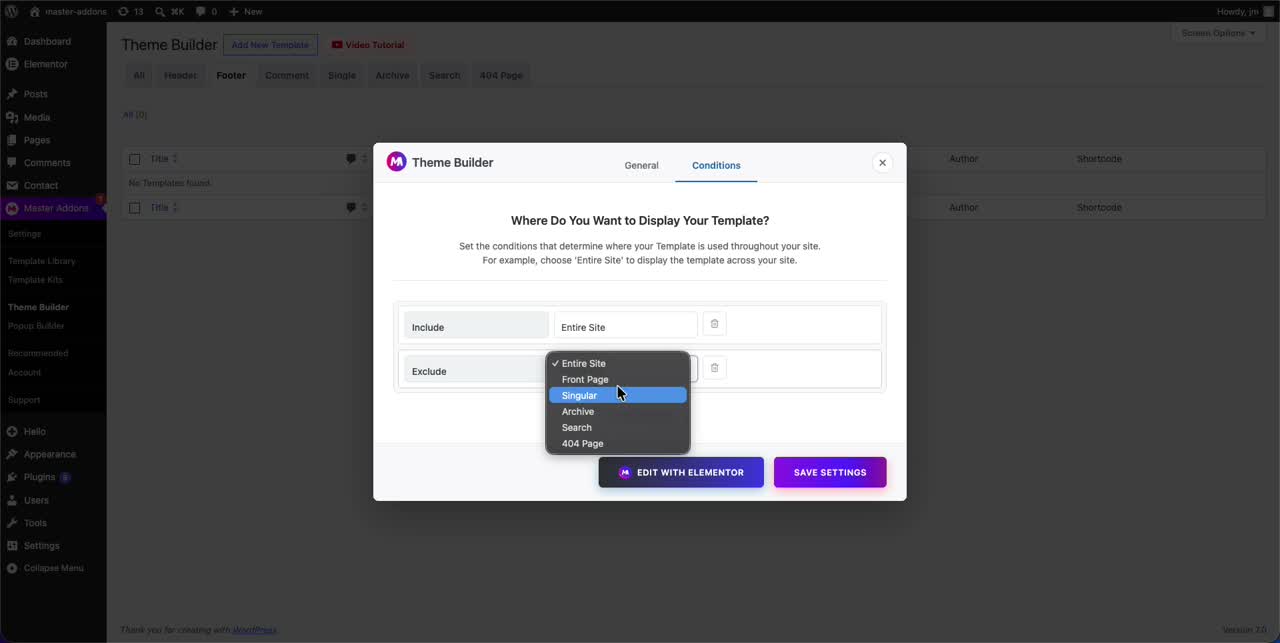
Move to the Conditions tab. This decides which pages the footer shows up on. Most sites only need one rule: Include → Entire Site, which drops the footer on every page.
You can stack rules on top of that. Add an Exclude rule and choose from Front Page, Singular, Archive, Search, or 404 Page to keep the footer off certain pages. A common setup: include the whole site, then exclude the front page because the homepage runs its own custom footer.
Step 5: Save and Open the Footer in Elementor
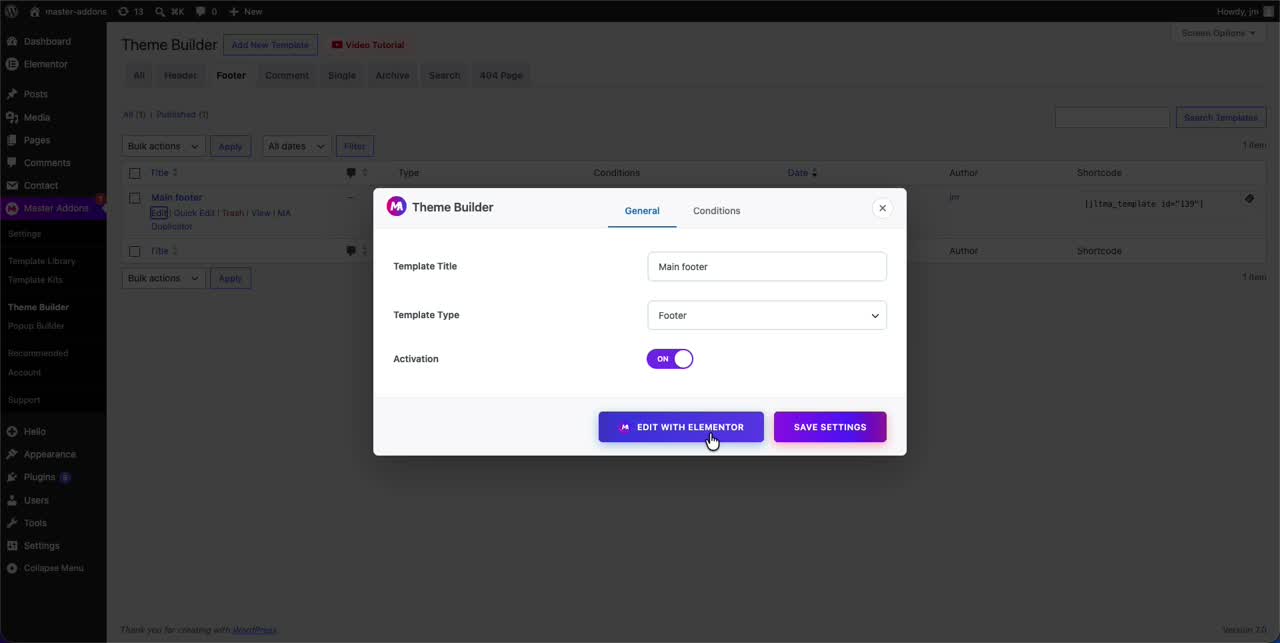
Click Edit with Elementor. Master Addons saves the template, publishes it, and gives you a shortcode (useful if you ever want to drop the footer somewhere by hand), then opens the Elementor editor with your new template loaded.
Step 6: Start From a Ready-Made Footer or a Blank Canvas
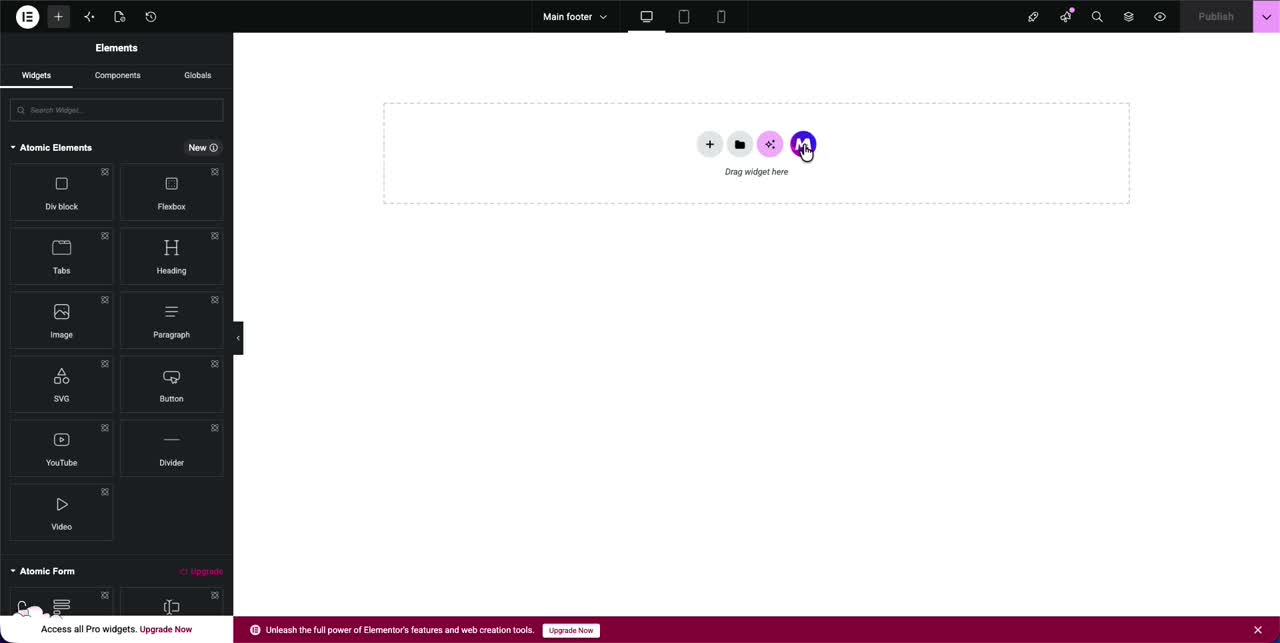
The editor opens to an empty section that reads “Drag widget here.” Two ways to fill it:
- Build from scratch: drag in your own widgets (columns, headings, an icon list, a menu) and lay the footer out yourself.
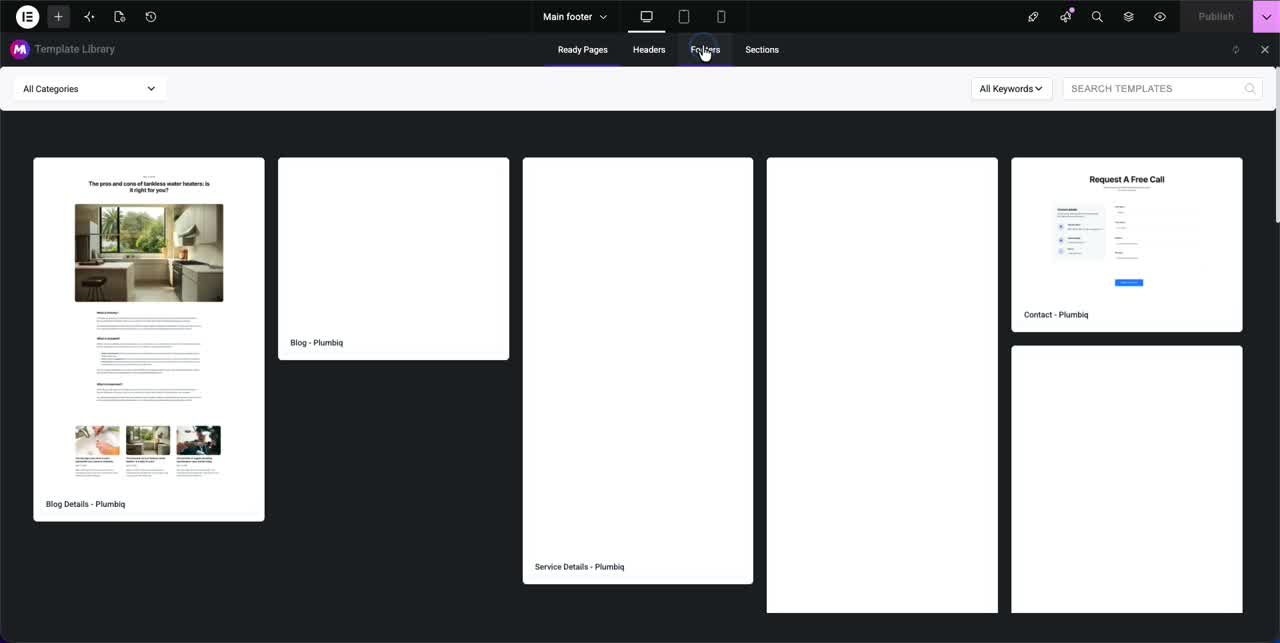
- Import a ready footer: click the Master Addons template library icon to open the Template Library, switch to the Footers tab, and drop in a pre-designed footer with one click.
Importing is the quick route, and the one I’d reach for on a client deadline. The library is stocked with footers you can edit after the fact, and if you want the rest of the site to match, the Template Kits ship headers and footers that already share a look. To compare the footers before you import one, see our 34 Elementor footer templates, each with a screenshot and a live demo. The Elementor header templates are listed the same way.
How to Edit and Customize Your Footer in Elementor
Once a footer is on the canvas, editing is plain Elementor: click any element, change it in the left panel. The example below is a footer imported from the library, with a logo, a short description, a Pages menu, a Company Info column, and a Location column.
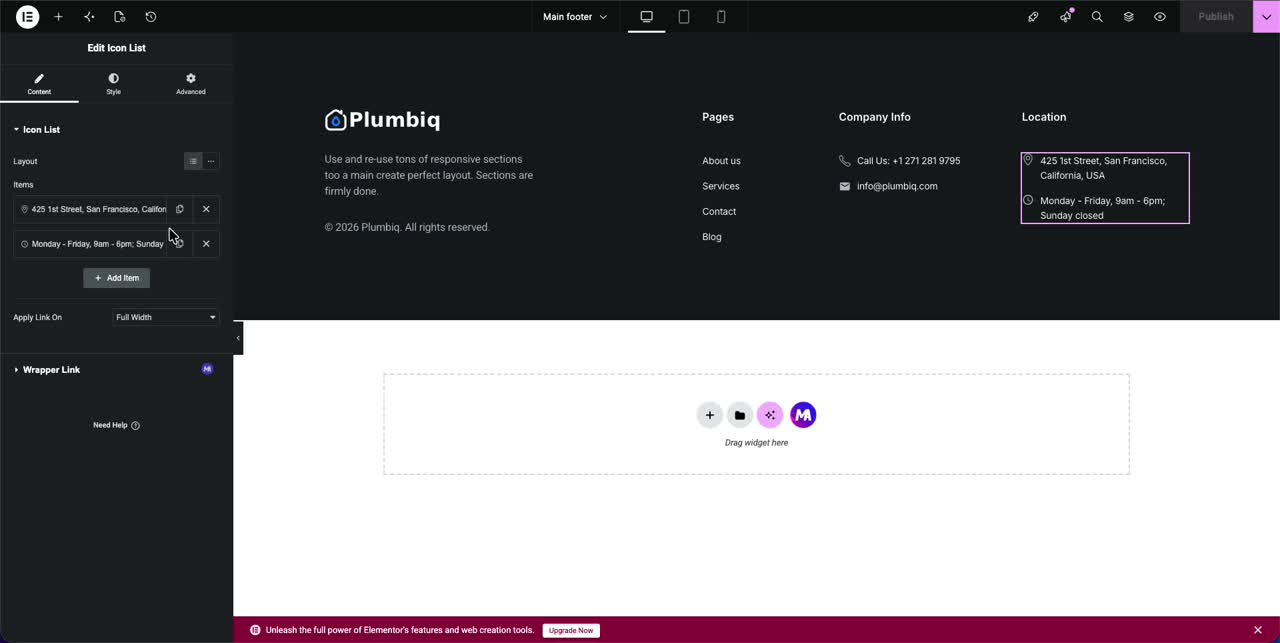
To change any piece of it:
- Text and headings: click and type, the change shows up live.
- Logo or images: click the image widget and pick a new file from your media library.
- Columns: drag the column handles to resize, or right-click a column to duplicate or delete it.
- Spacing and colors: the Style and Advanced tabs on any widget handle padding, background, and typography.
Editing Contact Details and Social Icons
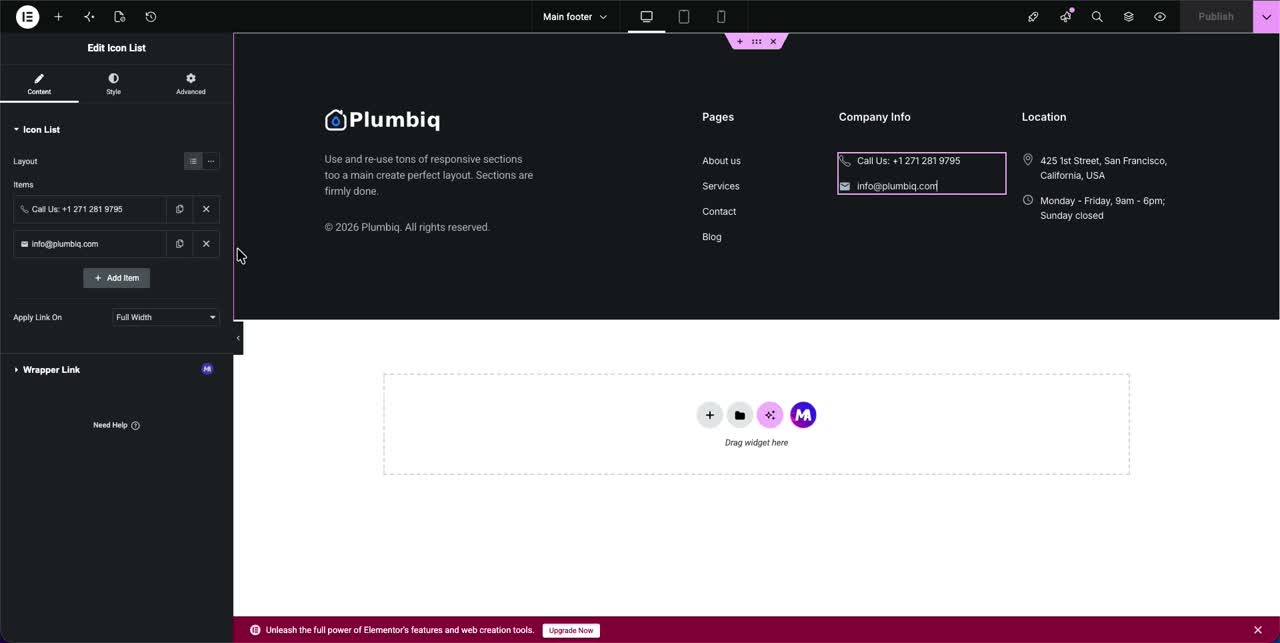
Contact rows, the phone number and email kind, are usually an Icon List widget. Click it and each line becomes an editable item in the panel. Change the text, swap the icon, or tack on a new line with the + Add Item button. One thing worth doing while you’re there: set the phone line as a real tel: link and the email as a mailto: link so they’re tappable on mobile.
For social icons, the 8 premium icon libraries bundled with Master Addons give you thousands of brand and UI icons to drop straight into the footer, so you’re not bolting on a separate icon plugin just for a row of social links.
How to Edit the Copyright Footer Text in Elementor
The copyright line (“© 2026 Your Company. All rights reserved.”) is nothing fancier than a text or heading widget at the bottom of the footer. Click it, edit the text. Two things worth doing:
- Drop in a dynamic year shortcode instead of typing a fixed year. Then the date rolls over on its own and you’re not editing this every January.
- Want the classic two-tone footer? Select the copyright row’s column on its own and give it a darker background.
When it looks right, hit Publish (or Update) in the bottom-left of the editor. Load any page on the site and the new footer is live everywhere your display conditions said it should be. If it doesn’t appear, the Activation toggle from Step 3 or a too-narrow condition rule is almost always the culprit.
Edit Your Footer for Free vs With Elementor Pro
People ask all the time whether the footer needs Elementor Pro. It doesn’t. Here’s the honest split:
| Capability | Free Elementor + Master Addons | Elementor Pro |
|---|---|---|
| Custom site-wide footer template | Yes | Yes |
| Display conditions (include/exclude pages) | Yes | Yes |
| Ready-made footer templates | Yes (Master Addons library) | Yes |
| Header, footer & comment builder | Yes (free) | Pro only |
| Cost | Free | Paid |
For most sites the free combo covers everything a footer needs. If you later want the rest of the theme parts, popups, and 80+ widgets, the Master Addons Pro plans add those on top. The footer editing itself stays free either way.
Editing the Header and Footer Together
Theme Builder isn’t a footer-only tool. The same flow builds your header, 404 page, and archive templates, so the whole site shell lives in one place. For the complete walkthrough of every template type, see our full guide on how to use the Elementor Theme Builder for free. Building a matching header next? Our guide on how to create a sticky header in Elementor pairs nicely with a custom footer, and the full footer documentation covers every setting if you want the details.
While you’ve got the site shell open, a few tweaks people usually want at the same moment: removing default page titles in WordPress, making sure the footer reflows cleanly on phones with our Elementor breakpoints responsive design guide, and a pass over SEO best practices for Elementor so the new templates don’t drag the site down. Keeping the build lean matters; here’s how to speed up Elementor websites if it starts feeling heavy.
Frequently Asked Questions
How do I edit the footer in WordPress using Elementor for free?
Install free Elementor and Master Addons, open Master Addons → Theme Builder, add a Footer template, set its display conditions, then click Edit with Elementor. You design and edit the footer with drag-and-drop, and no Elementor Pro is required.
How do I add a footer in WordPress with Elementor?
Go to Master Addons → Theme Builder → Footer, click Add New Template, name it, switch Activation on, set the conditions to Entire Site, and open it in Elementor. Drag in widgets or import a ready footer from the Template Library, then publish.
Can I edit the footer without Elementor Pro?
Yes. Elementor’s own footer builder needs Pro, but the free Master Addons Header, Footer & Comment Builder adds the same footer template feature at no cost and runs alongside free Elementor.
How do I change the copyright text in the Elementor footer?
Open your footer template in Elementor, click the text widget that holds the copyright line, and edit it directly. Use a dynamic year tag instead of a fixed year so the date updates on its own every year.
How do I make the footer show on every page?
In the footer template’s Conditions tab, add one rule: Include → Entire Site. To keep it off specific places, add an Exclude rule and choose Front Page, Singular, Archive, Search, or 404 Page.
Why is my Elementor footer not showing up?
The two most common causes are the Activation toggle left OFF when you created the template, or display conditions that are too narrow. Open Master Addons → Theme Builder → Footer, confirm Activation is ON, and set the condition to Include → Entire Site, then clear any caching plugin.
How do I edit the footer in a WordPress block theme?
On a block theme, open Appearance → Editor → Patterns → Template Parts → Footer and edit it in the Site Editor with blocks. It works, but only on block themes and with the standard block set. If your site is built in Elementor, a Master Addons footer template keeps everything in one editor instead of splitting your footer into a separate system.
How do I edit footer.php in WordPress safely?
Always edit footer.php from a child theme, never the parent, so a theme update cannot overwrite your changes, and keep a backup before you touch it. It needs PHP and HTML, and a single error can take the site down, which is why most users prefer a visual footer template. With Master Addons Theme Builder you get the same control without editing any theme file.
Can I edit the footer without a page builder at all?
Yes, through Full Site Editing on block themes, the Customizer, footer widget areas, or footer.php. Each is either limited to certain themes or gives you only partial control over layout and styling. A footer template in Elementor plus Master Addons gives you drag-and-drop control on any theme, which is why it is the route this guide recommends.
How do I edit an existing footer in WordPress?
There are three routes depending on your theme. Classic themes use Appearance → Customize or Appearance → Widgets. Block themes use the Site Editor. With Elementor, open Master Addons → Theme Builder → Footer, edit the footer template visually, and set its display condition to the entire site so the change applies everywhere.
How to edit header footer in Elementor?
Both are template types in the same place. Go to Master Addons → Theme Builder, pick Header or Footer, click Edit with Elementor, design it with normal widgets, then set display conditions. The free Master Addons Theme Builder covers header, footer, single, archive, search and 404 templates without Elementor Pro.
Why can’t I edit the footer in WordPress?
Usually the footer is hardcoded into the theme’s footer.php, or the theme is a block theme whose footer only opens in the Site Editor, or your user role lacks the capability. A theme builder solves the first two by replacing the theme footer with a template you control visually.
How do I modify the footer?
Decide first whether you want to change content, layout, or styling. Content and widgets change in the Customizer or Site Editor. Layout and design need a footer template built in a theme builder. Editing footer.php directly works but is lost on theme updates unless you use a child theme.
How do I edit the bottom footer in WordPress?
Most people mean the copyright bar, the thin strip sitting under the main footer columns. In a theme builder it is not a separate feature, just the last row of your footer template. Open Master Addons → Theme Builder → Footer, edit that bottom row like any other row, and swap the hard-coded year for a dynamic date tag so it stops going stale every January.
What can I add to a WordPress footer?
Anything you can drop onto a page. The ones that actually earn their place are a navigation menu, contact details, an address with a map, social icons, a newsletter form, trust or payment badges, and the legal links: privacy policy, terms, refund policy. Keep it to three or four columns. A footer holding every link on the site stops being useful to anyone.
What is a footer in WordPress?
The footer is the block that repeats at the bottom of every page, usually menus, contact details, and a copyright line. Where it comes from depends on your theme: a classic theme builds it in footer.php, a block theme uses a template part you edit in the Site Editor, and a theme builder replaces both with a template you design once and apply site-wide.
Related Reading
- How to Create a Sticky Header in Elementor
- Use the Elementor Theme Builder for Free
- Elementor Template Kits
- Elementor Footer Templates: 34 Ready-Made Designs
- Best Lightweight WordPress Themes for Elementor
Wrapping Up
Editing the footer in WordPress shouldn’t mean opening template files and crossing your fingers. With the free Master Addons Theme Builder you get an actual footer builder: add a template, decide where it shows, then edit every column, link, and the copyright line in the Elementor editor you already know.
Want to build yours? Explore the Master Addons Theme Builder and look through the full set of widgets and extensions to put together a footer that fits your brand.
