

يضيف حقل التاريخ والوقت منتقي التقويم إلى عنصر واجهة المستخدم المخصص الذي تقوم بإنشائه باستخدام الإضافات الرئيسية منشئ القطعة. ينقر المحررون على الحقل الموجود في Elementor، ويختارون يومًا، وإذا سمحت بذلك، وقتًا. تحصل الأداة على الاختيار كقيمة نص عادية مثل 2026-10-24 19:30، والتي يمكنك طباعتها بتنسيق HTML أو تمريرها إلى برنامج نصي للعد التنازلي.
التاريخ والوقت هو حقل احترافي. يتضمن البرنامج الإضافي المجاني أداة إنشاء عناصر واجهة مستخدم محدودة، وتأتي المجموعة الكاملة من الحقول مع ماستر أدونز برو.
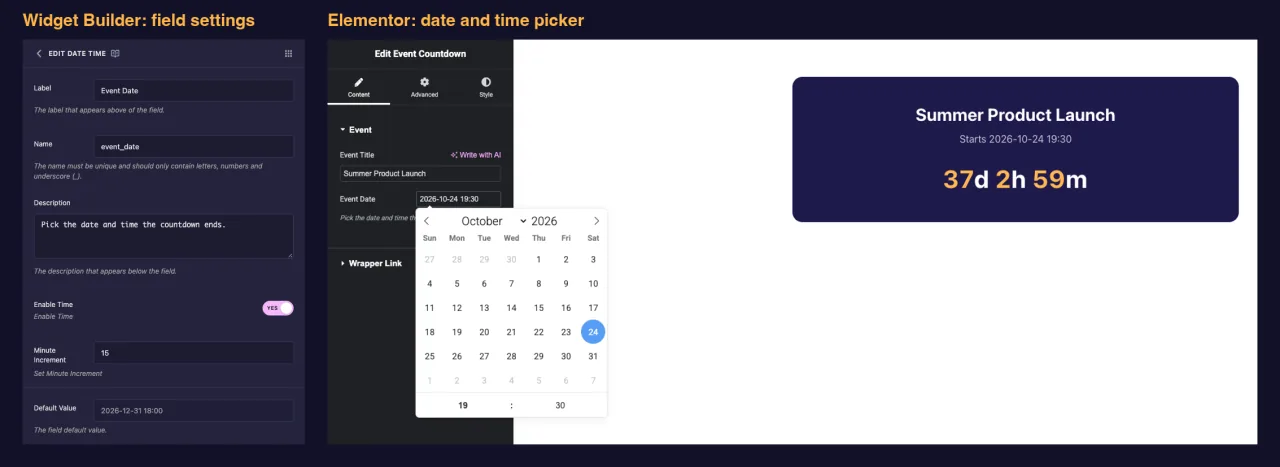
ماذا يفعل حقل التاريخ والوقت #
- يضيف إدخال تاريخ إلى لوحة عنصر واجهة المستخدم الخاص بك في Elementor. يؤدي النقر فوقه إلى فتح التقويم.
- مع تمكين الوقت في، يحصل التقويم على صف مدته ساعة ودقيقة أسفله. الساعة دائما 24 ساعة.
- يحفظ القيمة المختارة كنص:
Y-m-d H:i(على سبيل المثال2026-10-24 19:30) مع الوقت، أوY-m-d(2026-10-24) بدونها. - المطبوعات التي تقدر القيمة أينما تضع رمزها المميز، مثل
{{ event_date }}، في لوحة HTML أو CSS أو JS.
جديد على البناء؟ اقرأ نظرة عامة على منشئ القطعة أولاً، ثم عد باستخدام عنصر واجهة المستخدم مفتوحًا.
قبل أن تبدأ #
- WordPress مع تثبيت Elementor ونشطه.
- الإضافات الرئيسية لـ Elementor وMaster Addons Pro، وكلاهما نشط. ال دليل التثبيت إعداد الأغطية.
- عنصر واجهة مستخدم مفتوح في Widget Builder. المثال الموجود في هذا الدليل هو عنصر واجهة مستخدم “Event Countdown”: حقل نصي مسمى
event_title، حقل التاريخ والوقت اسمهevent_date، ونص قصير يعد تنازليًا حتى ذلك التاريخ.
كيفية إضافة حقل التاريخ والوقت #
- اذهب الى الإضافات الرئيسية > منشئ القطعة وافتح القطعة الخاصة بك.
- على ال محتوى علامة التبويب، أضف قسمًا إذا لم يكن هناك قسم بعد، على سبيل المثال “Event”.
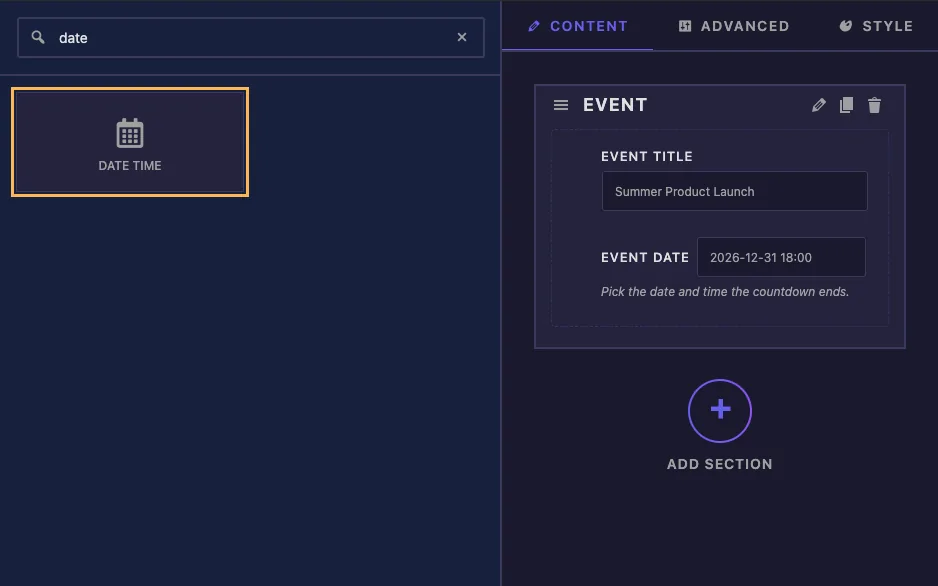
- يكتب
dateفي مربع البحث الميداني على اليسار. - يجر التاريخ والوقت في القسم. انقر فوق القلم الرصاص الموجود في الحقل لفتح إعداداته.
تم شرح خيارات حقل التاريخ والوقت #
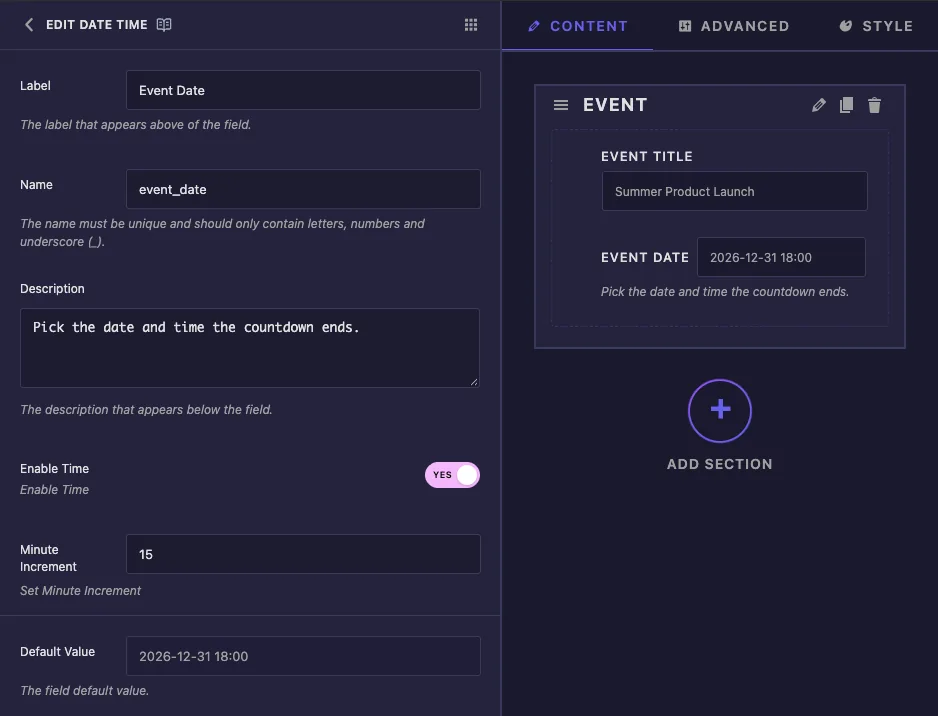
- ملصق: النص الموجود بجوار الإدخال في Elementor، على سبيل المثال “Event Date”.
- اسم: المعرف الفريد للحقل واسم الرمز المميز الخاص به. استخدم الحروف والأرقام والتسطير فقط، على سبيل المثال
event_date. - وصف: تلميح يظهر أسفل الإدخال في Elementor، مثل “Pick التاريخ والوقت الذي ينتهي فيه العد التنازلي.”
- تمكين الوقت: يضيف صف الساعة والدقيقة إلى التقويم ويقوم بتبديل التنسيق المحفوظ منه
Y-m-dإلىY-m-d H:i. - زيادة الدقيقة: إلى أي مدى تتحرك الدقائق مع كل نقرة على الأسهم. الافتراضي هو 1. مع 15، تتحرك الأسهم خلال :00 و:15 و:30 و:45.
- القيمة الافتراضية: التاريخ الذي تبدأ به النسخة الجديدة من الأداة.
يفتح مربع القيمة الافتراضية نفس التقويم، لذا يمكنك اختيار تاريخ البدء بدلاً من كتابته. يظهر صف الوقت هنا أيضًا عند تشغيل تمكين الوقت.
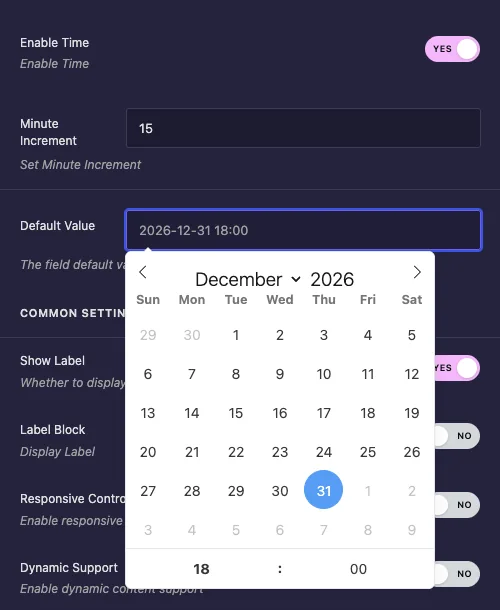
للعد التنازلي، اختر تاريخًا افتراضيًا في المستقبل. ثم تقوم أداة جديدة بالعد التنازلي على الفور بدلاً من إظهار الأصفار.
الإعدادات المشتركة #
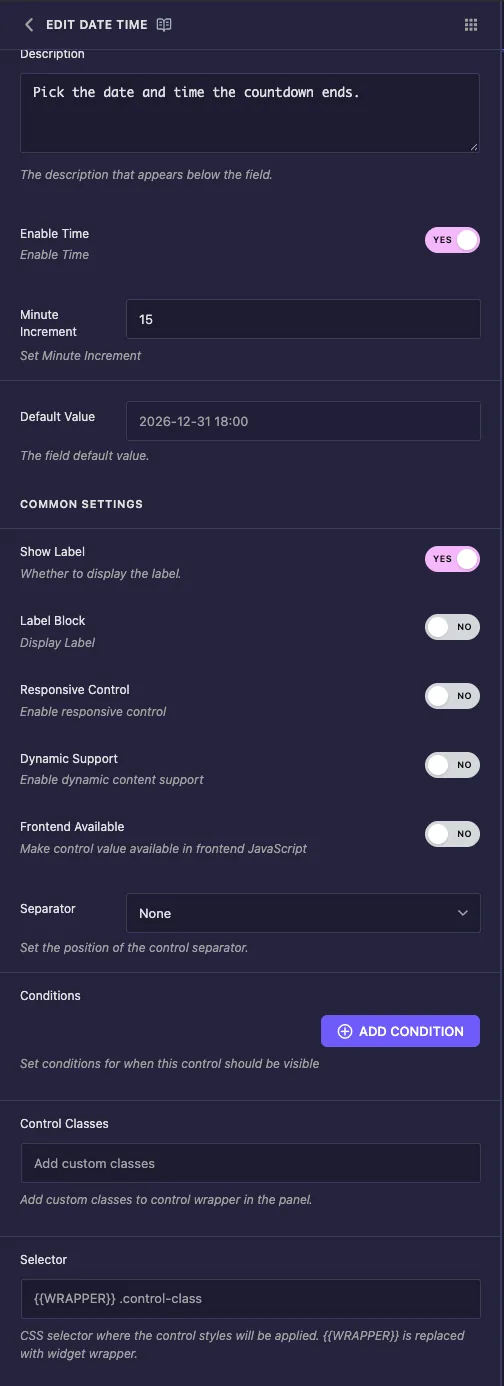
- إظهار التسمية يخفي أو يظهر الملصق في اللوحة.
- كتلة التسمية يضع الملصق على السطر الخاص به فوق الإدخال. قم بتشغيله إذا كان الملصق الخاص بك طويلًا.
- شروط يُظهر الحقل فقط عندما يكون لعنصر تحكم آخر قيمة معينة، على سبيل المثال، محول “Show للعد التنازلي”. يرى شروط.
- فاصل يرسم خط فاصل قبل أو بعد التحكم.
يظهر التحكم المستجيب والدعم الديناميكي والواجهة الأمامية المتوفرة وفئات التحكم والمحدد في كل حقل. لا تحتاج إلى أي منها للإعداد في هذا الدليل، ويمكن أن يظل المحدد فارغًا لأن منتقي التاريخ لا يكتب CSS.
ليس لدى المنتقي خيارات لساعة زمنية فقط أو لحظر التواريخ الماضية. يمكن للمحررين الاختيار في أي يوم.
استخدم التاريخ في القالب الخاص بك #
اطبع الرمز المميز أينما يجب أن يظهر التاريخ. في أداة العد التنازلي للحدث، يضع HTML التاريخ في سطر من النص وفي ملف data-deadline السمة التي يقرأها البرنامج النصي:
<div class="event-card">
  <p class="event-title">{{ event_title }}</p>
  {% if event_date %}
  <p class="event-when">Starts {{ event_date }}</p>
  <div class="event-countdown" data-deadline="{{ event_date }}">
    <span class="days">0</span>d <span class="hours">0</span>h <span class="mins">0</span>m
  </div>
  {% endif %}
</div>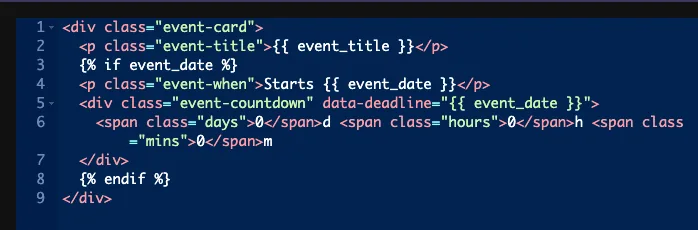
ال {% if event_date %} التحقق مهم. إذا قام المحرر بمسح الإدخال، فلن يطبع الرمز المميز شيئًا. لا يتم استخدام القيمة الافتراضية مرة أخرى، وبدون التحقق سيظهر العد التنازلي NaN.
قم بإنشاء العد التنازلي في لوحة JS #
تقوم لوحة JS بتشغيل هذا البرنامج النصي. فهو يعثر على كل عد تنازلي، ويحول النص المحفوظ إلى تاريخ، ويقوم بتحديث الأرقام كل 30 ثانية
document.querySelectorAll(".event-countdown").forEach(function (el) {
  var deadline = new Date(el.dataset.deadline.replace(" ", "T"));
  if (isNaN(deadline)) return;
  function tick() {
    var diff = Math.max(0, deadline - new Date());
    el.querySelector(".days").textContent = Math.floor(diff / 86400000);
    el.querySelector(".hours").textContent = Math.floor(diff / 3600000) % 24;
    el.querySelector(".mins").textContent = Math.floor(diff / 60000) % 60;
  }
  tick();
  setInterval(tick, 30000);
});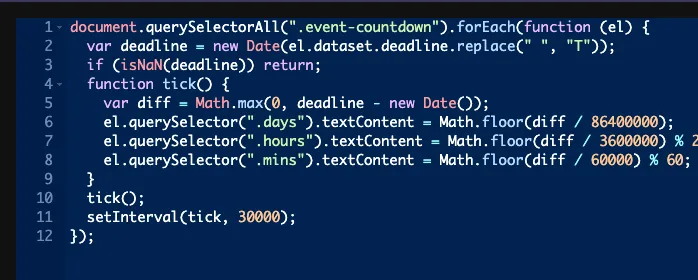
replace(" ", "T")المنعطفات2026-10-24 19:30في2026-10-24T19:30، تنسيق يقرأه كل متصفح بنفس الطريقة.isNaN(deadline)يوقف البرنامج النصي عندما يكون التاريخ فارغًا أو لا يمكن قراءته.- تؤدي قراءة القيمة من سمة البيانات إلى إبقاء كل عنصر واجهة مستخدم في الصفحة يقوم بالعد التنازلي حتى تاريخه الخاص.
تعمل الرموز أيضًا مباشرة في لوحة JS. في اختباراتنا، var deadline = "{{ event_date }}"; طباعة التاريخ المحفوظ. احتفظ بعلامات الاقتباس، لأن التاريخ المجرد غير صالح لـ JavaScript.
القيمة المحفوظة ليس لها منطقة زمنية. يقرأه المتصفح على أنه التوقيت المحلي للزائر، لذا ينتهي العد التنازلي حتى الساعة 19:30 عند الساعة 19:30 في لندن ومرة أخرى عند الساعة 19:30 في نيويورك. للحظة واحدة في جميع أنحاء العالم، أضف إزاحة إلى السلسلة قبل التحليل، على سبيل المثال 2026-10-24T19:30:00+00:00.
استخدم التحكم في التاريخ والوقت في Elementor #
أضف عنصر واجهة المستخدم إلى الصفحة، أو أعد تحميل المحرر إذا كانت الصفحة مفتوحة بالفعل. الحقل موجود على محتوى علامة التبويب تحت التسمية الخاصة بك. انقر فوق الإدخال لفتح التقويم، واختر يومًا، ثم اضبط الساعة والدقائق في الصف أدناه. يتم تحديث المعاينة بمجرد اختيارك.
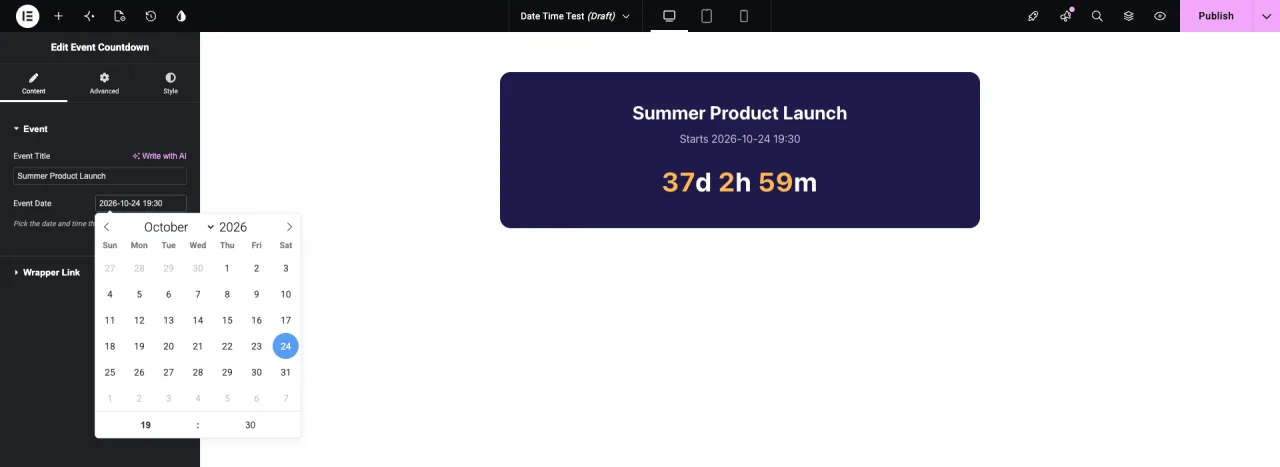
يحتوي اسم الشهر على قائمة منسدلة والسنة عبارة عن مربع أرقام، لذا فإن المضي قدمًا بالأشهر لا يتطلب الكثير من النقرات.
حالات الاستخدام الشائعة #
- العد التنازلي لعمليات الإطلاق والمبيعات والندوات عبر الإنترنت.
- بطاقات الأحداث التي توضح التاريخ بجوار العنوان والمكان.
- قم بتقديم لافتات يخفيها البرنامج النصي بمجرد انقضاء الموعد النهائي.
- أوقات الفتح أو الإغلاق مطبوعة في عنصر واجهة المستخدم الجدول.
نصائح للعمل مع حقل التاريخ والوقت #
- قرر تمكين الوقت قبل أن يستخدم المحررون الأداة. يتغير التنسيق فقط للتواريخ المحددة بعد تبديله. قيمة محفوظة ك
2026-10-24 19:30يحافظ على وقته حتى بعد إيقاف تشغيل تمكين الوقت. - تعامل دائمًا مع قيمة فارغة. لف العلامات في
{% if %}وتحقق من وجود تاريخ غير صالح في البرنامج النصي. - خطط للتواريخ في الماضي. يتوقف المثال عند الصفر. يمكنك أيضًا إخفاء عنصر واجهة المستخدم أو إظهار “، وقد انتهى هذا الحدث برسالة”.
- استخدم زيادة دقيقة قدرها 5 أو 15 أو 30 للأحداث التي تبدأ في الساعة أو نصف الساعة.
- اكتب وصفًا واضحًا. قل ما إذا كان التاريخ هو البداية أم النهاية أم الموعد النهائي، لذلك يختار المحررون التاريخ الصحيح.
الأسئلة المتداولة #
هل حقل التاريخ والوقت مجاني؟
يعد No. Date Time أحد حقول Pro في Widget Builder، لذا يجب أن يكون Master Addons Pro نشطًا قبل أن تتمكن من إضافته إلى عنصر واجهة المستخدم.
ما هو التنسيق الذي يستخدمه التاريخ المحفوظ؟
مع تمكين الوقت، Y-m-d H:i، على سبيل المثال 2026-10-24 19:30. مع إيقاف تشغيله، Y-m-d، على سبيل المثال 2026-10-24. الساعة دائما 24 ساعة.
لماذا يظهر العد التنازلي NaN؟
حقل التاريخ فارغ أو لا يمكن قراءة القيمة. لف العد التنازلي في {% if event_date %} وتخطي البرنامج النصي متى isNaN(deadline) صحيح.
هل يمكنني عمل منتقي للوقت فقط أو حظر التواريخ الماضية؟
ليس من إعدادات الحقل. يعرض حقل التاريخ والوقت دائمًا تقويمًا، ويمكن للمحررين اختيار أي يوم.
هل يمكنني استخدام الرمز المميز داخل JavaScript؟
نعم. تعمل الرموز المميزة في لوحة JS. ضع الرمز المميز بين علامتي اقتباس، كما في "{{ event_date }}"، أو اقرأها من سمة بيانات في HTML الخاص بك.
إلتحاق بالركب #
أضف حقل التاريخ والوقت إلى قسم المحتوى، واختر ما إذا كان يحتاج إلى وقت، ثم قم بالطباعة {{ event_date }} في HTML الخاص بك أو قراءته في لوحة JS. تحقق من القيم الفارغة وتستمر الأداة عند مسح المحرر للتاريخ. إقرانه مع حقل الجلاد للسماح للمحررين بإخفاء العد التنازلي، ورؤية التسعير لما تتضمنه كل خطة.


