


Key Takeaways
- Elementor has no single setting to change an image on hover, so the swap is done with a container background behind the image or with a widget that accepts a second image.
- The no-plugin way to change an image on hover in Elementor is to set the second image as a container background and set the Image widget’s hover Opacity to 0.
- The Master Addons Advanced Image widget swaps images with one switch, Display Hover Image, found in the Hover Image section of the Content tab.
- Elementor’s Hover Animation preset Grow zooms an image to 110 percent on hover, and the image grows past its original edges.
- A zoom on hover that stays inside its frame needs a CSS class on the Image widget and three short CSS rules that scale the image inside a hidden overflow.
To change an image on hover in Elementor, you put a second image behind or inside the first and reveal it when the pointer arrives. Elementor can do this without a plugin through a container background, and a hover image widget does it with one switch. Zooming on hover takes one preset for a basic zoom, or a few lines of CSS for a zoom that stays in its frame.
All four methods below were built and tested on Elementor 4.3.
Table of Contents
Which method to use
Two of these methods swap the image and two zoom it. Within each pair, one uses only Elementor and the other is quicker or neater.
| Goal | Method | Needs | Code |
|---|---|---|---|
| Change to a second image | Container background plus hover opacity | Elementor | None |
| Change to a second image | Advanced Image widget | Master Addons | None |
| Zoom the image | Hover Animation: Grow | Elementor | None |
| Zoom inside a fixed frame | CSS class on the Image widget | Elementor and a place to add CSS | Three rules |
Change an image on hover with a container background
This method needs no plugin. The second image is the background of a container, and the first image sits on top of it as a normal Image widget. On hover, the top image fades out and the background shows through.
- Add a container and set its padding to 0.
- In the container’s Style tab, open Background, choose Classic and upload the image that should appear on hover. Set Position to Center Center and Size to Cover.
- Drag an Image widget into the container and choose the image that should show first.
- Select the Image widget, open Style and switch to the Hover tab.
- Set Opacity to 0 and Transition Duration to about 0.4.
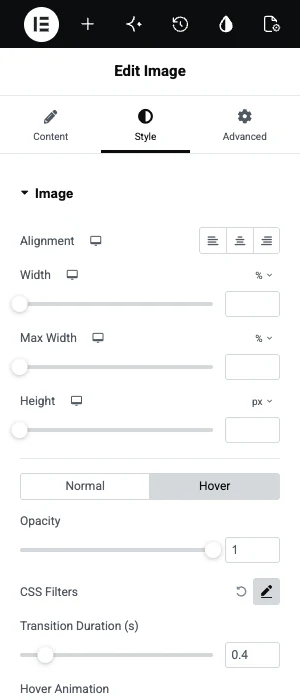

Use two images with the same proportions. The container takes its height from the Image widget, so a background with a different shape gets cropped.
Change an image on hover with a hover image widget
A widget with a hover image field does the same swap from one panel. The steps below use the Advanced Image widget from Master Addons.
- Search the widget panel for Advanced Image and drag it onto the page.
- In the Image section, choose the main image.
- Open the Hover Image section and turn on Display Hover Image.
- Choose the second image in the field that appears.
- Preview the page and hover.
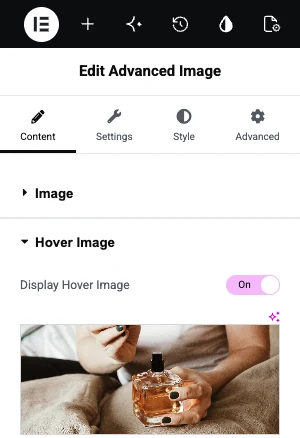

The widget also has a ribbon, a link and a lightbox, which suits product photos: front view first, back view on hover, with a New ribbon in the corner.
Want text on hover? Image Hover Effects animates a title and description over one image, with 30 effects to choose from.
Zoom an image on hover with the Grow preset
The quickest zoom is a preset. Select the Image widget, open Style, switch to the Hover tab and set Hover Animation to Grow. The image scales to 110 percent while the pointer is over it.

Grow works well for a single image with space around it. In a tight grid it overlaps the images next to it, so use the next method there.
Zoom an image on hover inside its frame
For a zoom that stays inside the picture’s own box, give the Image widget a CSS class and add three rules. The widget keeps its size, and the image scales up inside it.
- Select the Image widget and open Advanced. In CSS Classes, type
hover-zoom. - Add the CSS below to your site.
.hover-zoom { overflow: hidden; border-radius: 10px; }
.hover-zoom img { transition: transform 0.4s ease; display: block; }
.hover-zoom:hover img { transform: scale(1.08); }
Where the CSS goes depends on your setup. Elementor Pro has a Custom CSS box in the Advanced tab. Without it, use Appearance, Customize, Additional CSS in WordPress, or the Custom CSS extension in Master Addons. Change 1.08 to 1.15 for a stronger zoom.
Four things that go wrong
Most problems with these effects come from image sizes and from testing on the wrong device.
- The two images have different proportions. The swap then jumps or crops. Export both at the same width and height.
- The zoomed image covers nearby content. Grow has no frame. Use the CSS method when images sit close together.
- Nothing happens on a phone. Touch screens have no hover. Make sure the first image works alone, because phone visitors may never see the second.
- The hover image is heavy. Compress both files, because a large second image can show as a blank flash on the first hover.
Frequently asked questions
How do I change an image on hover in Elementor without a plugin?
Put the hover image on a container as its background, then place an Image widget with the first image inside that container. In the Image widget’s Style tab, open the Hover tab and set Opacity to 0 with a Transition Duration of about 0.4 seconds.
How do I zoom an image on hover in Elementor?
Select the Image widget, open Style, go to the Hover tab and set Hover Animation to Grow. For a zoom that stays inside the image’s frame, add a CSS class to the widget and scale the image with transform inside a wrapper that has overflow set to hidden.
Can the Image Hover Effects widget change the image on hover?
No. Image Hover Effects keeps one image and animates a title and description over it. To swap to a second image, use the Advanced Image widget and turn on Display Hover Image, or use the container background method.
Why does my image overlap other content when it zooms?
The Grow animation scales the whole image beyond its box. Give the Image widget a class, set overflow to hidden on it and scale the img element inside. The box then stays the same size and clips the zoom.
Can I change a product image on hover in WooCommerce with this?
These methods work on images you place yourself in Elementor. Product grids generated by WooCommerce or a products widget are a different case and depend on the theme or the widget that prints them.
Final thoughts
To change an image on hover in Elementor, use a container background with a fading Image widget, or a widget with a hover image field. To zoom, use Grow for a quick result and the CSS class when the image must stay in its frame.
The Advanced Image widget handles the swap in one panel, and Image Hover Effects covers text overlays.
Related reading
