

Table of Contents
A restaurant mega menu is a wide dropdown panel that puts your entire food menu, dietary info, opening hours, and a booking button in one place instead of burying them behind several clicks. Diners arrive wanting to see food, prices, hours, and a way to book. Usually on a phone. Often while deciding between you and somewhere else.
This guide builds one with free Elementor and the free Master Addons Mega Menu. No Elementor Pro is needed. Here is the finished result. Hovering “Dishes” opens the full restaurant menu with categories, prices, dietary tags, tonight’s special, and a Reserve a Table button:
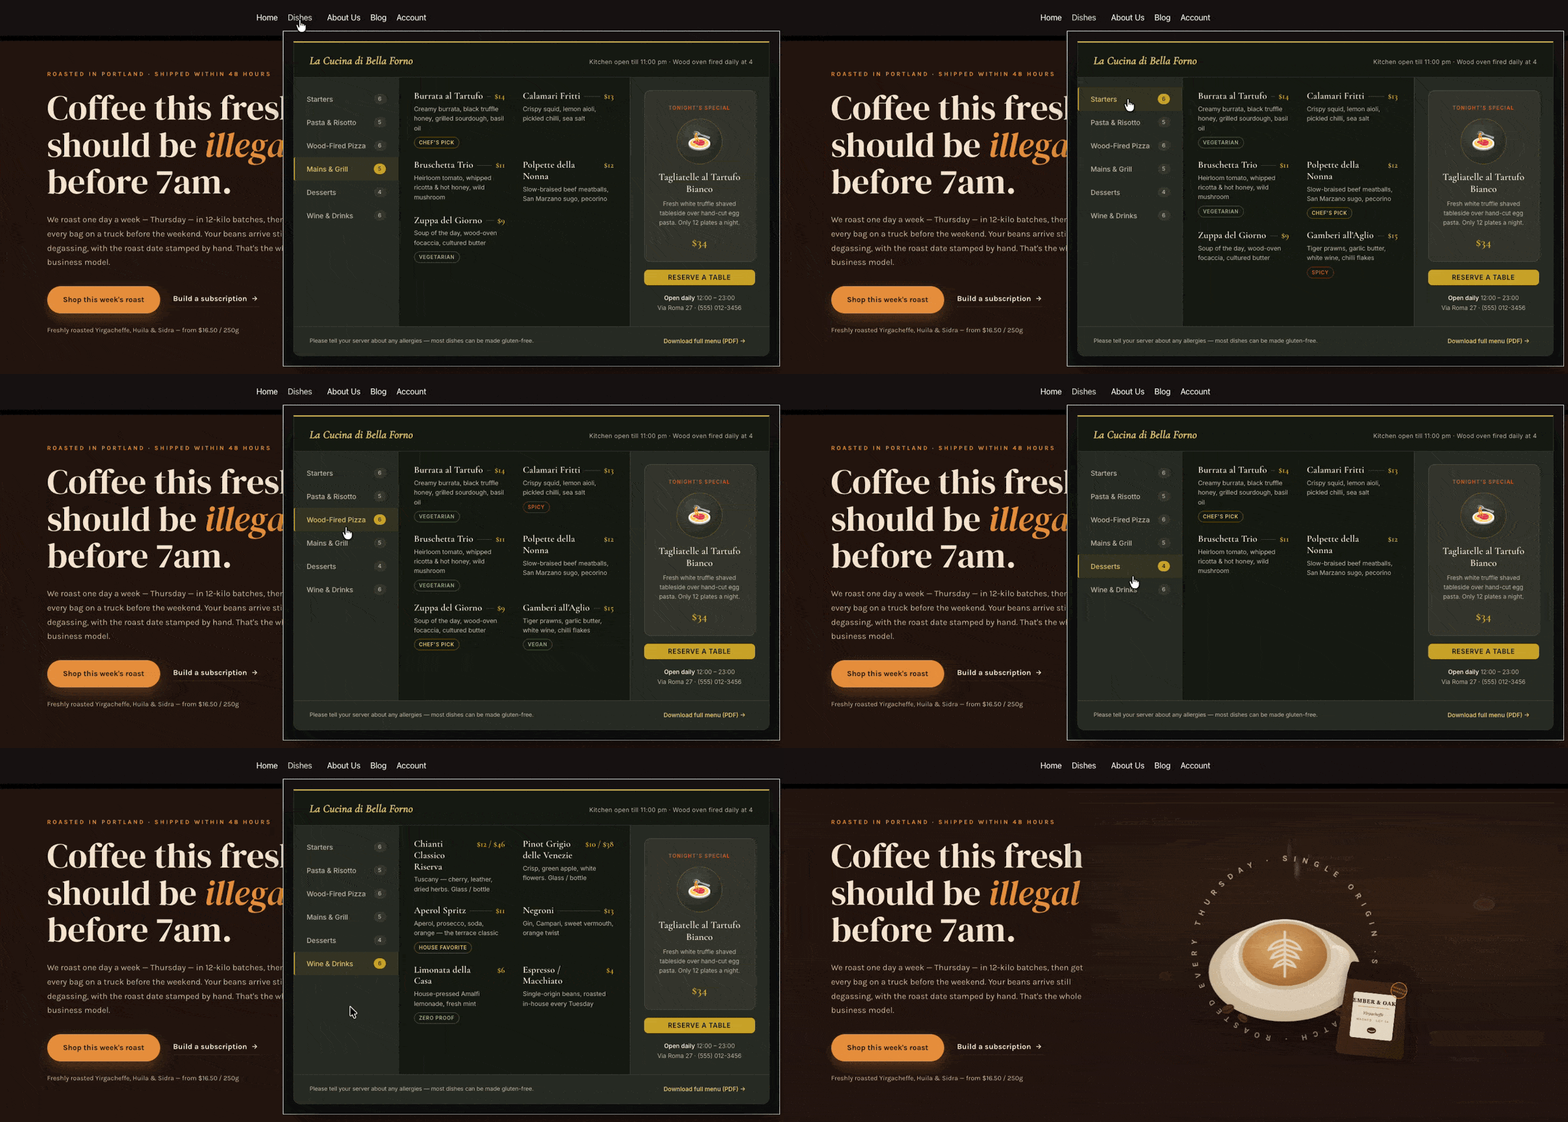
If you like the restaurant mega menu style then you can download it and import it in the master addons widget builder. Then you can easily customize the text color, image, url etc based on your needs and use it in your mega menu on your restaurant website.
Download the Restaurant mega Menu
What a Restaurant Mega Menu Should Contain
Before building anything, decide what earns a place in the panel. The layout we build in this guide has four zones, and they cover almost every restaurant:
| Zone | Contents | Why it’s there |
|---|---|---|
| Category sidebar | Starters, Pasta & Risotto, Wood-Fired Pizza, Mains & Grill, Desserts, Wine & Drinks | Lets diners jump straight to the section they care about |
| Dish grid | Dish names, short descriptions, prices, tags like Vegetarian, Spicy, Chef’s Pick | The single most-wanted content on any restaurant site — with dietary info built into the tags |
| Featured card | Tonight’s special with a photo, description and price | Gives the kitchen a place to sell its best plate |
| Action footer | Reserve a Table button, opening hours, address, full menu PDF link | Converts the visit instead of just informing it |
What to leave out: your full About story, press mentions, and social feeds. Those belong in the footer. A navigation panel is for getting people somewhere, not for telling the whole story.
Do You Need Elementor Pro for This?
No. Elementor’s own mega menu widget sits inside Elementor Pro, but the free route below builds the same panel without a subscription.
| Route | Cost | Trade-off |
|---|---|---|
| Elementor Pro Mega Menu widget | Paid annual license | Requires Pro on every site you build, plus enabling experimental features |
| Custom CSS / hand-coded dropdown | Free | Fragile, hard to edit between menu changes, no visual editing |
| Master Addons Mega Menu | Free | Adds one plugin; the panel is designed visually in Elementor like any other page |
For a single-location restaurant updating its menu a few times a year, the free extension is enough. A larger multi-location group juggling several editors might still get value from Pro’s wider toolset, but that is a decision about the whole site, not about the mega menu specifically. Elementor documents its Pro mega menu workflow here if you want to compare it directly.
What You Need
- Elementor (free version is fine)
- Master Addons for Elementor, installed and active
- Pages already created for your menu sections (they can be placeholders for now)
Step 1: Enable the Mega Menu Extension
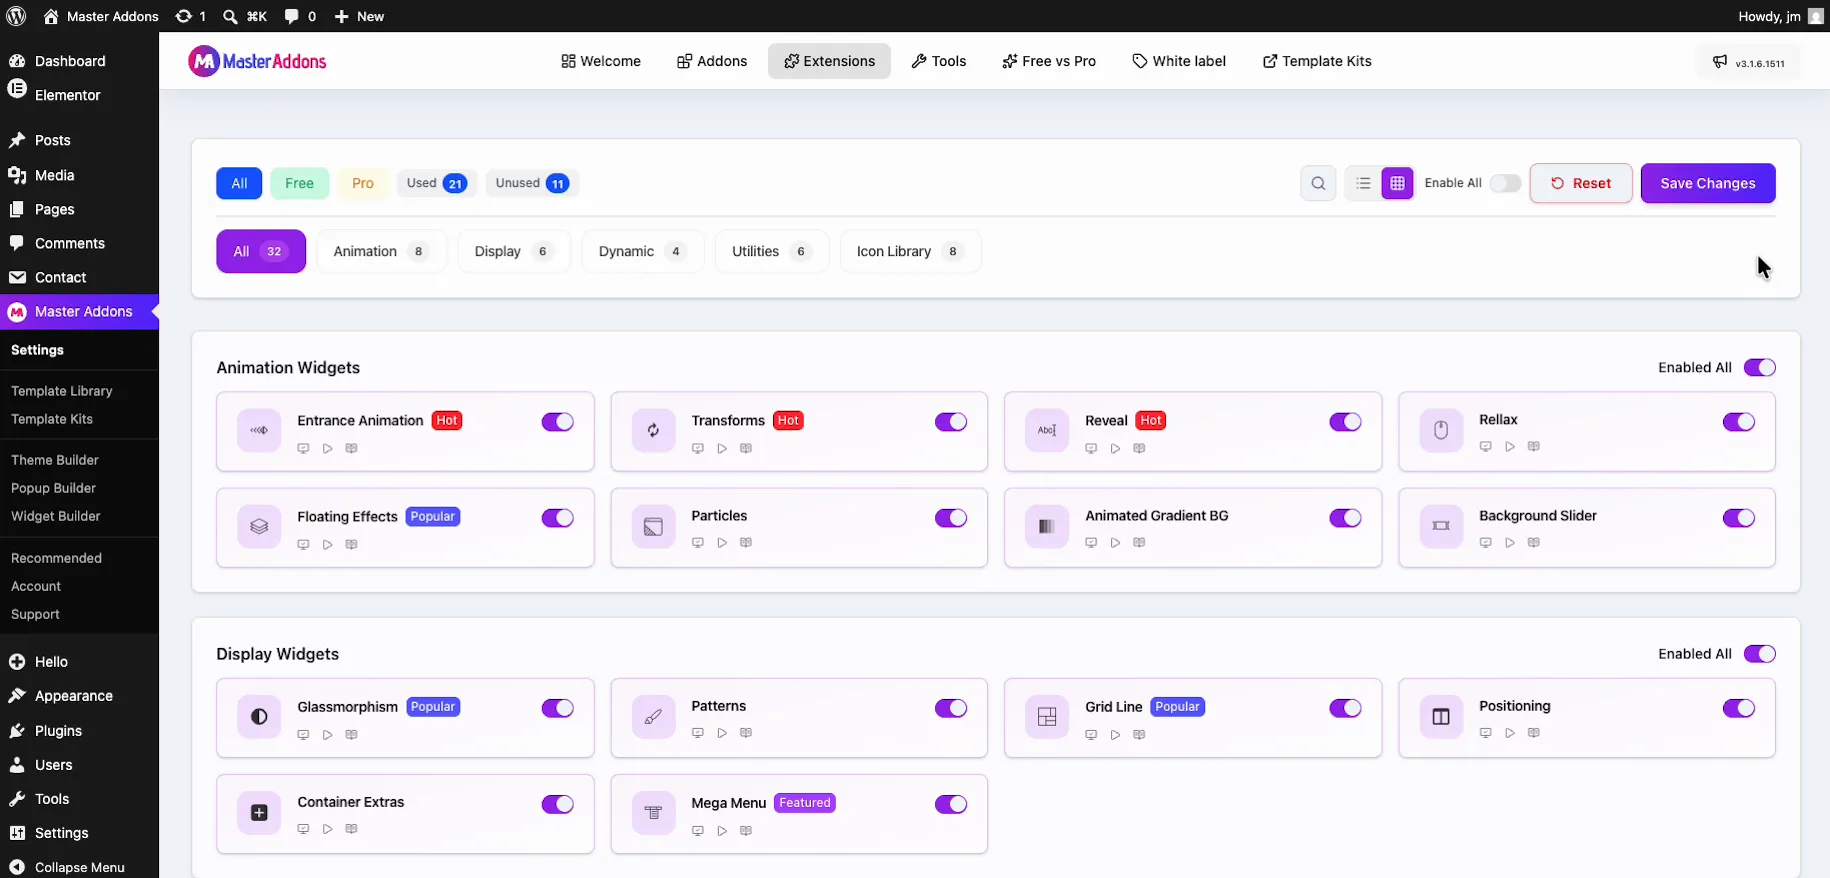
Master Addons keeps every widget and extension behind a toggle so unused ones never load. Go to Master Addons → Settings, open the Extensions tab, and find Mega Menu in the Display group. Flip its toggle on and click Save Changes. If you don’t see the toggle, you’re probably on an old plugin version, so update first.
Step 2: Structure the WordPress Menu and Switch On Mega Menu
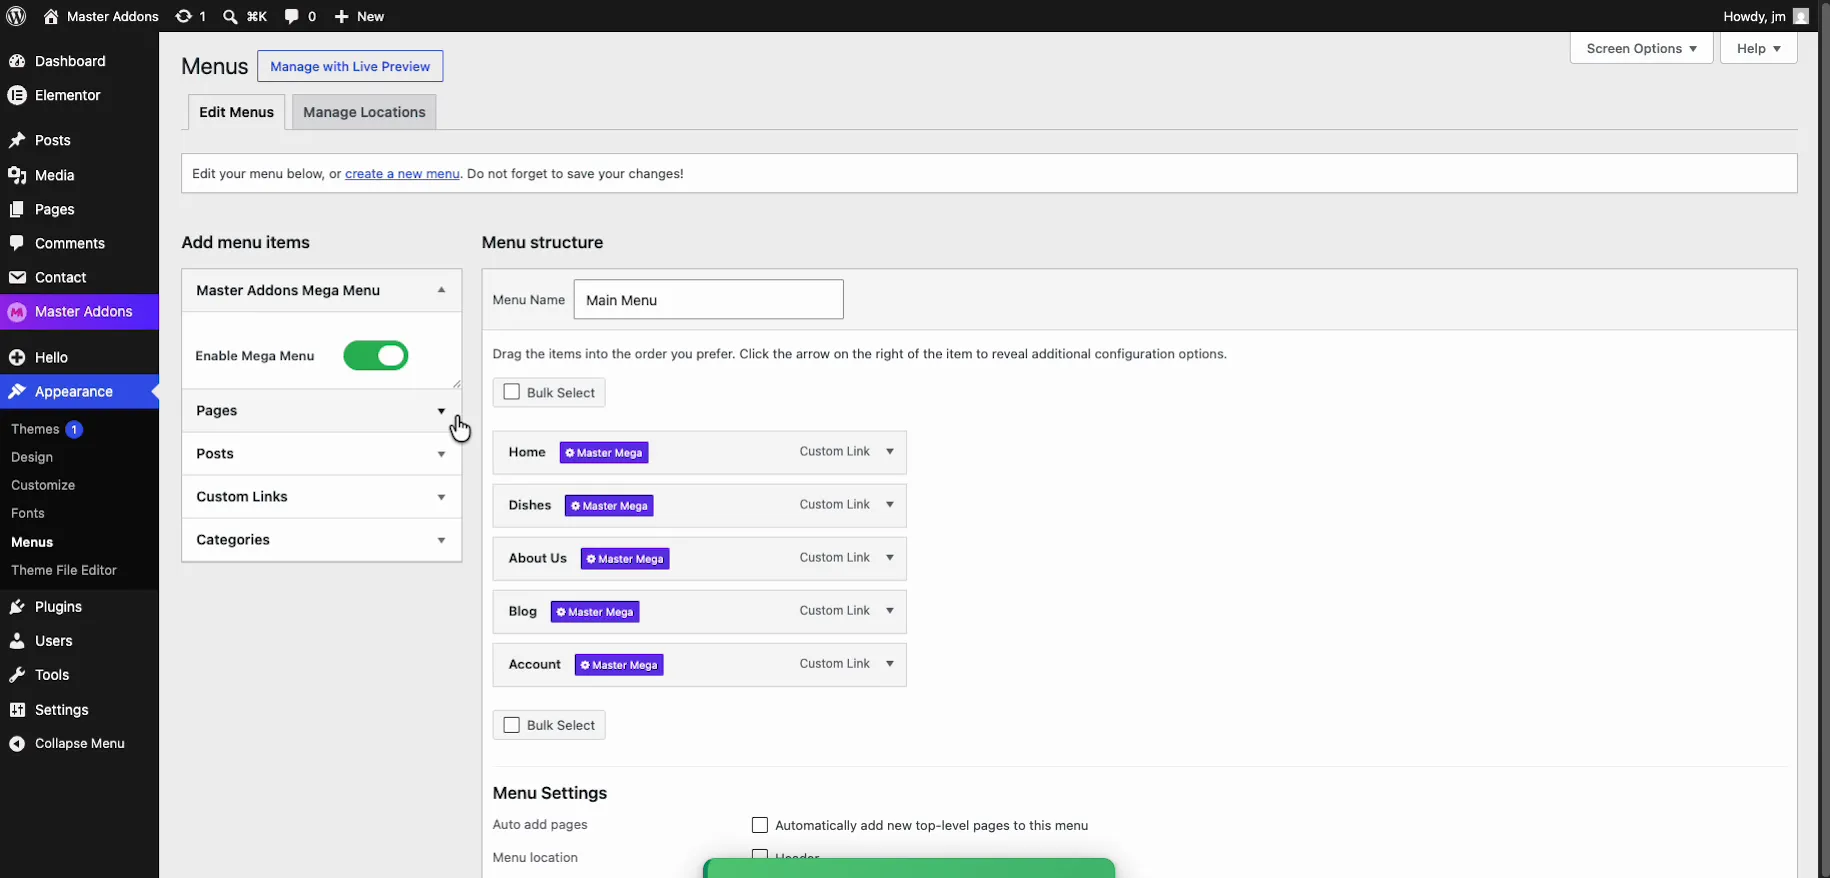
Go to Appearance → Menus and build the skeleton before touching any design. In this build the menu is called Main Menu with five items: Home, Dishes, About Us, Blog, Account. “Dishes” is the item that gets the mega panel.
Get the structure right first. The mega panel is attached to a menu item, so rearranging afterwards means redoing design work.
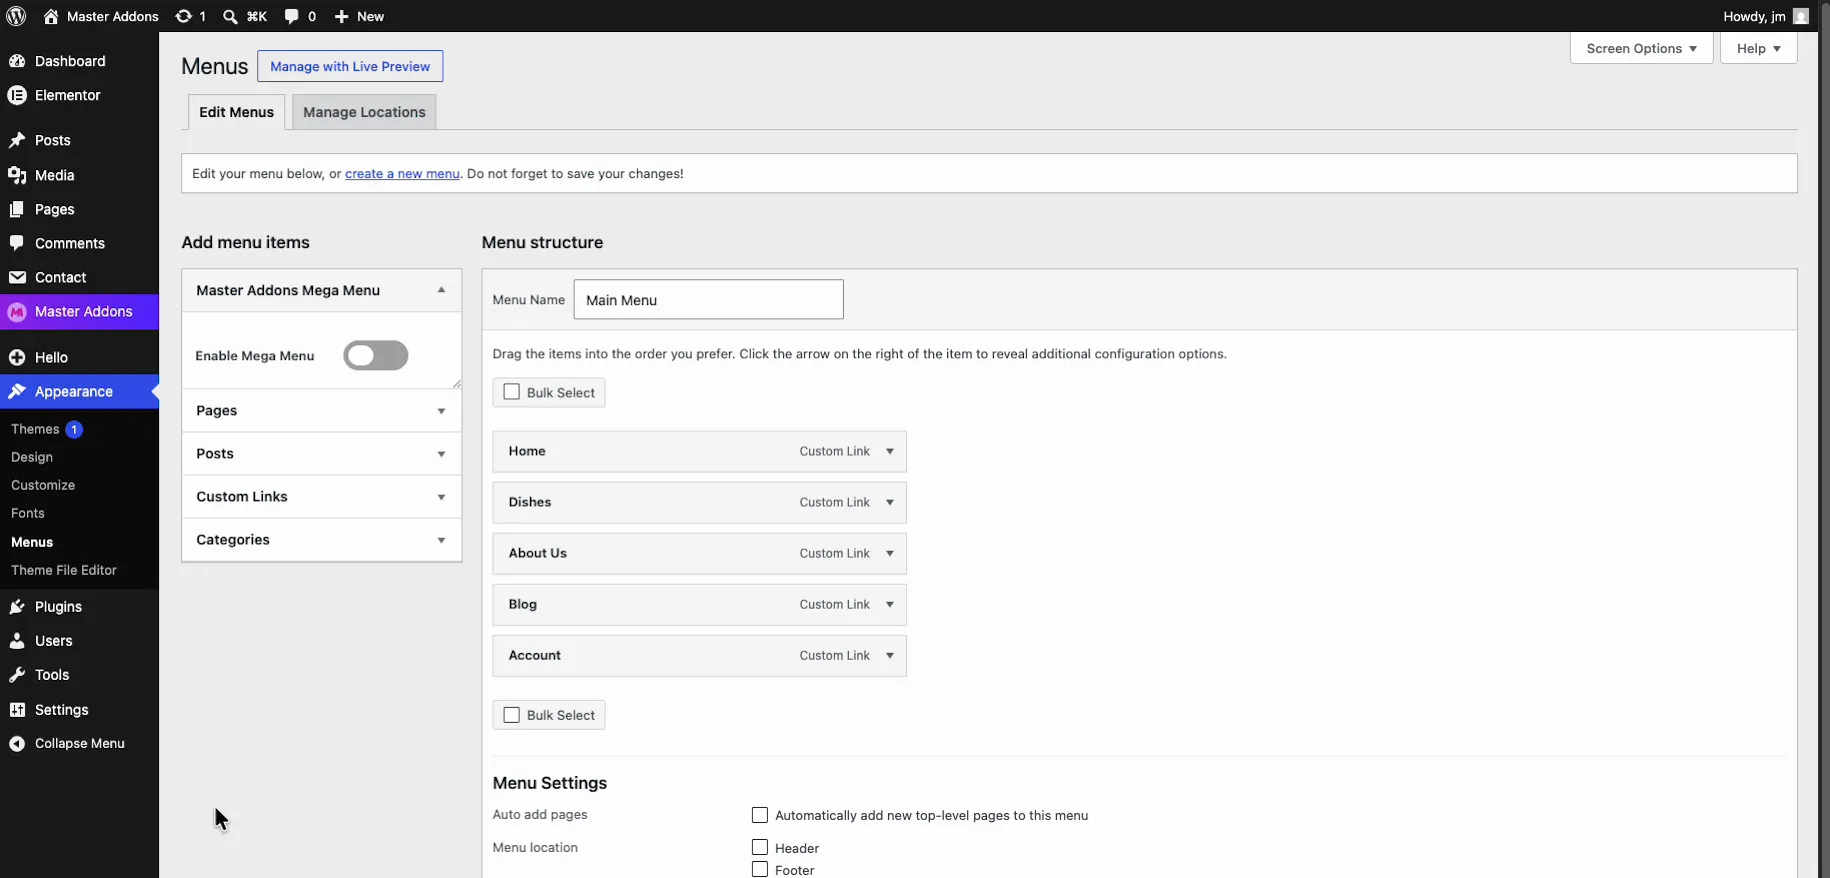
With the extension active, a Master Addons Mega Menu box appears in the left column of the Menus screen. Switch its Enable Mega Menu toggle on. The moment you do, a purple Master Mega badge shows up next to every menu item. That badge is where each item’s mega menu options live.
Step 3: Turn On the Mega Menu for Your Dishes Item
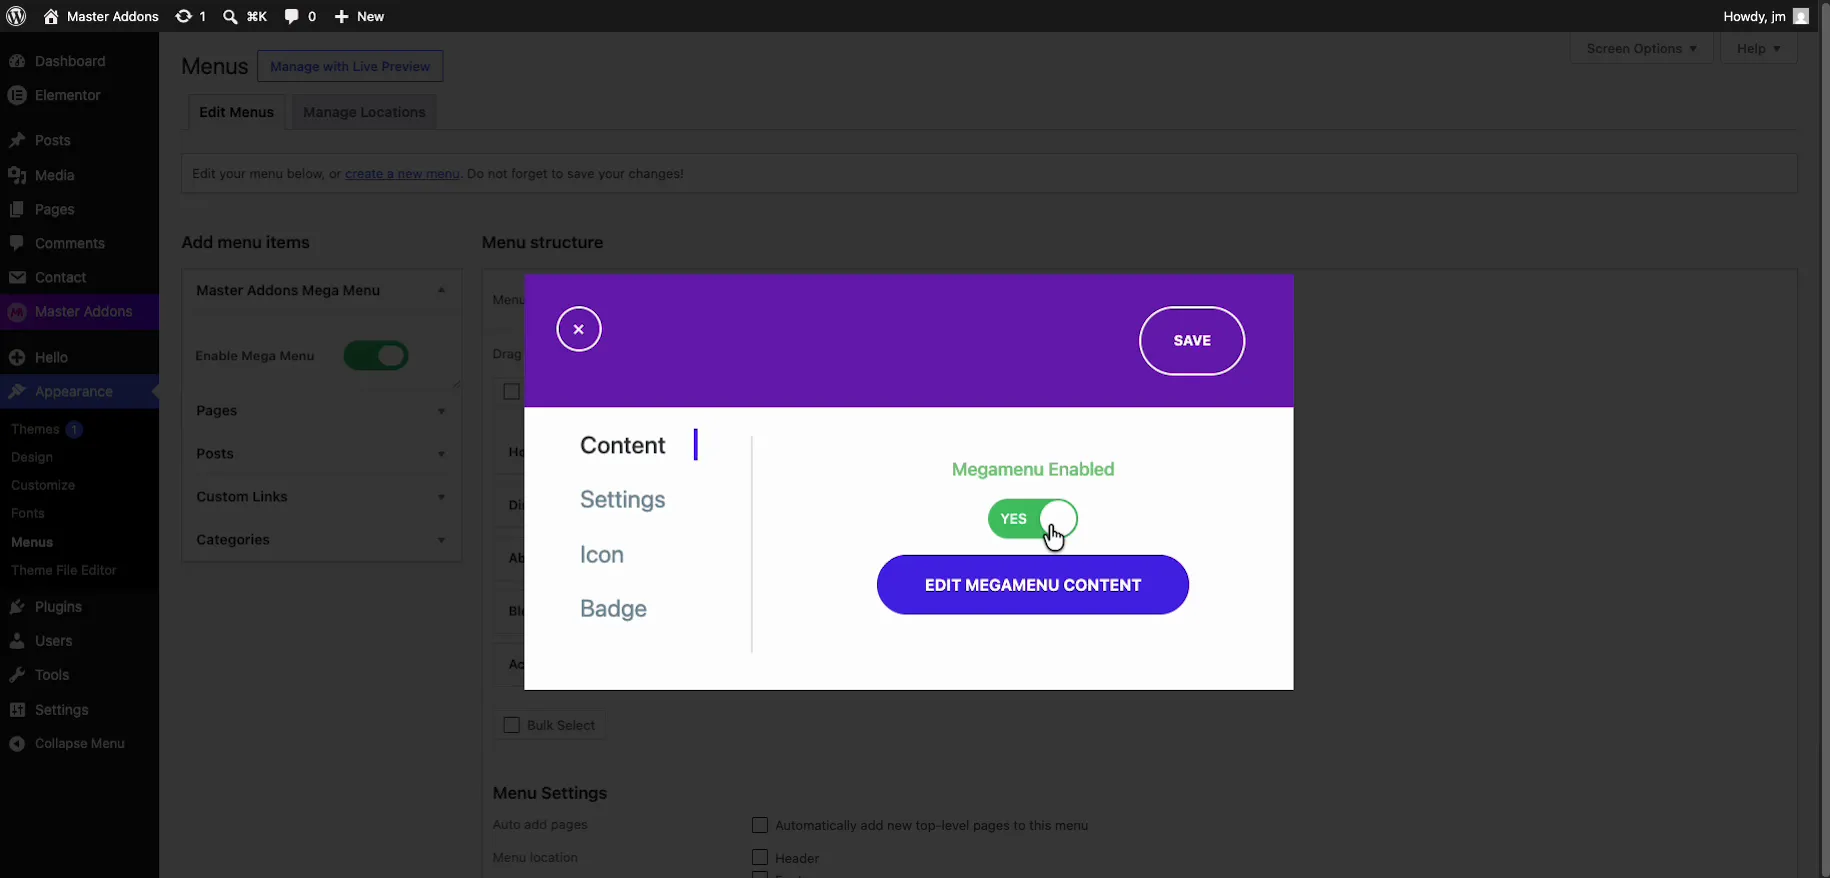
Click the Master Mega badge on the “Dishes” item. A settings popup opens with four tabs: Content, Settings, Icon, and Badge.
- On the Content tab, flip the Megamenu Enabled switch to YES. The Edit Megamenu Content button lights up.
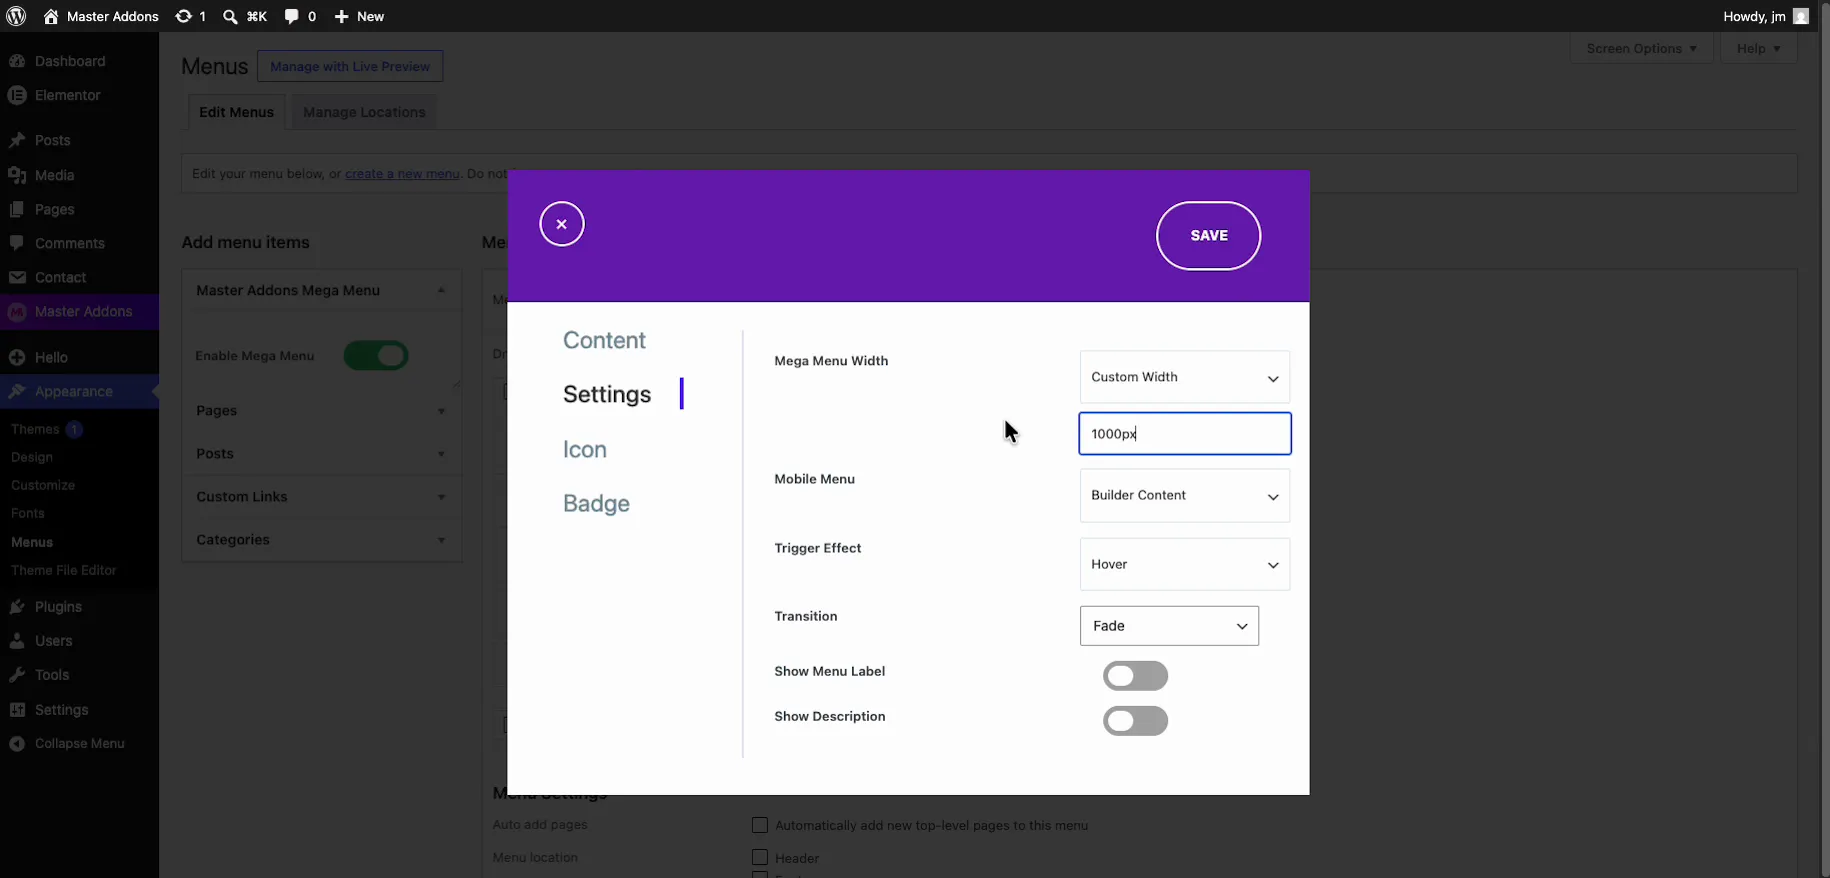
- On the Settings tab, set the panel size and behaviour. We used Custom Width at 1000px, wide enough for a dish grid plus a featured card. Full Width is also there if your design needs the whole screen.
- Set Mobile Menu to Builder Content, Trigger Effect to Hover, and Transition to Fade. Icon and Badge tabs are optional extras (a “New” badge on a seasonal menu, for example).
- Click Save.
You configure the mega menu width from the Settings tab: Full Width, Default, or a Custom Width like our 1000px. The same tab holds the Mobile Menu source, the Trigger Effect (hover or click), the transition animation, and toggles for the menu label and description:
Step 4: Design the Panel in Elementor
Back on the Content tab, click Edit Megamenu Content. The panel opens in the normal Elementor editor, so you design it like any other page. Build out the four zones from the table above:
- Header strip: restaurant name plus a short kitchen note (“Kitchen open till 11:00 pm · Wood oven fired daily at 4”). The note quietly answers the “are they open?” question without anyone hunting for hours.
- Category sidebar: Starters, Pasta & Risotto, Wood-Fired Pizza, Mains & Grill, Desserts, Wine & Drinks, each with a dish count.
- Dish grid: name, one-line description, price, and tags such as Vegetarian, Spicy, or Chef’s Pick. The tags handle dietary filtering without a separate column.
- Featured card and action footer: tonight’s special with photo and price, a Reserve a Table button, opening hours and address, and a “Download full menu (PDF)” link. If you’d rather show structured opening times, the Business Hours widget keeps them editable in one place.
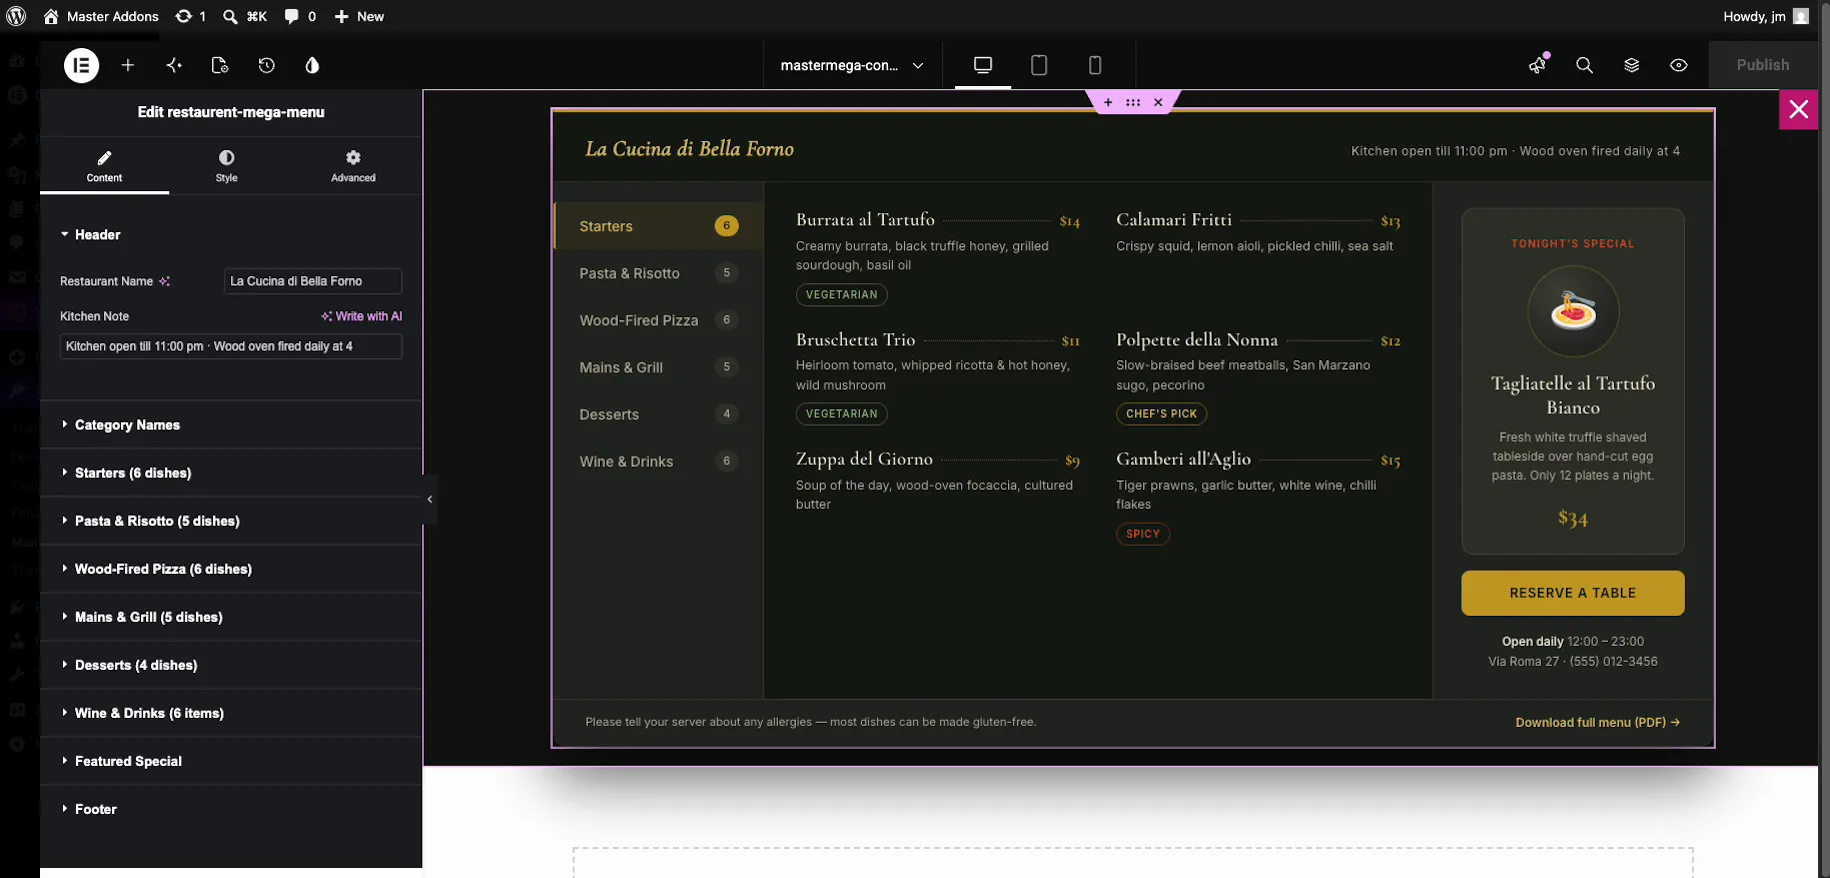
Every dish name, price, and tag stays editable from the Elementor panel on the left. Updating the menu later is a content edit, not a design job. Publish the template when you are done and close the editor.
Step 5: Put the Menu in Your Header
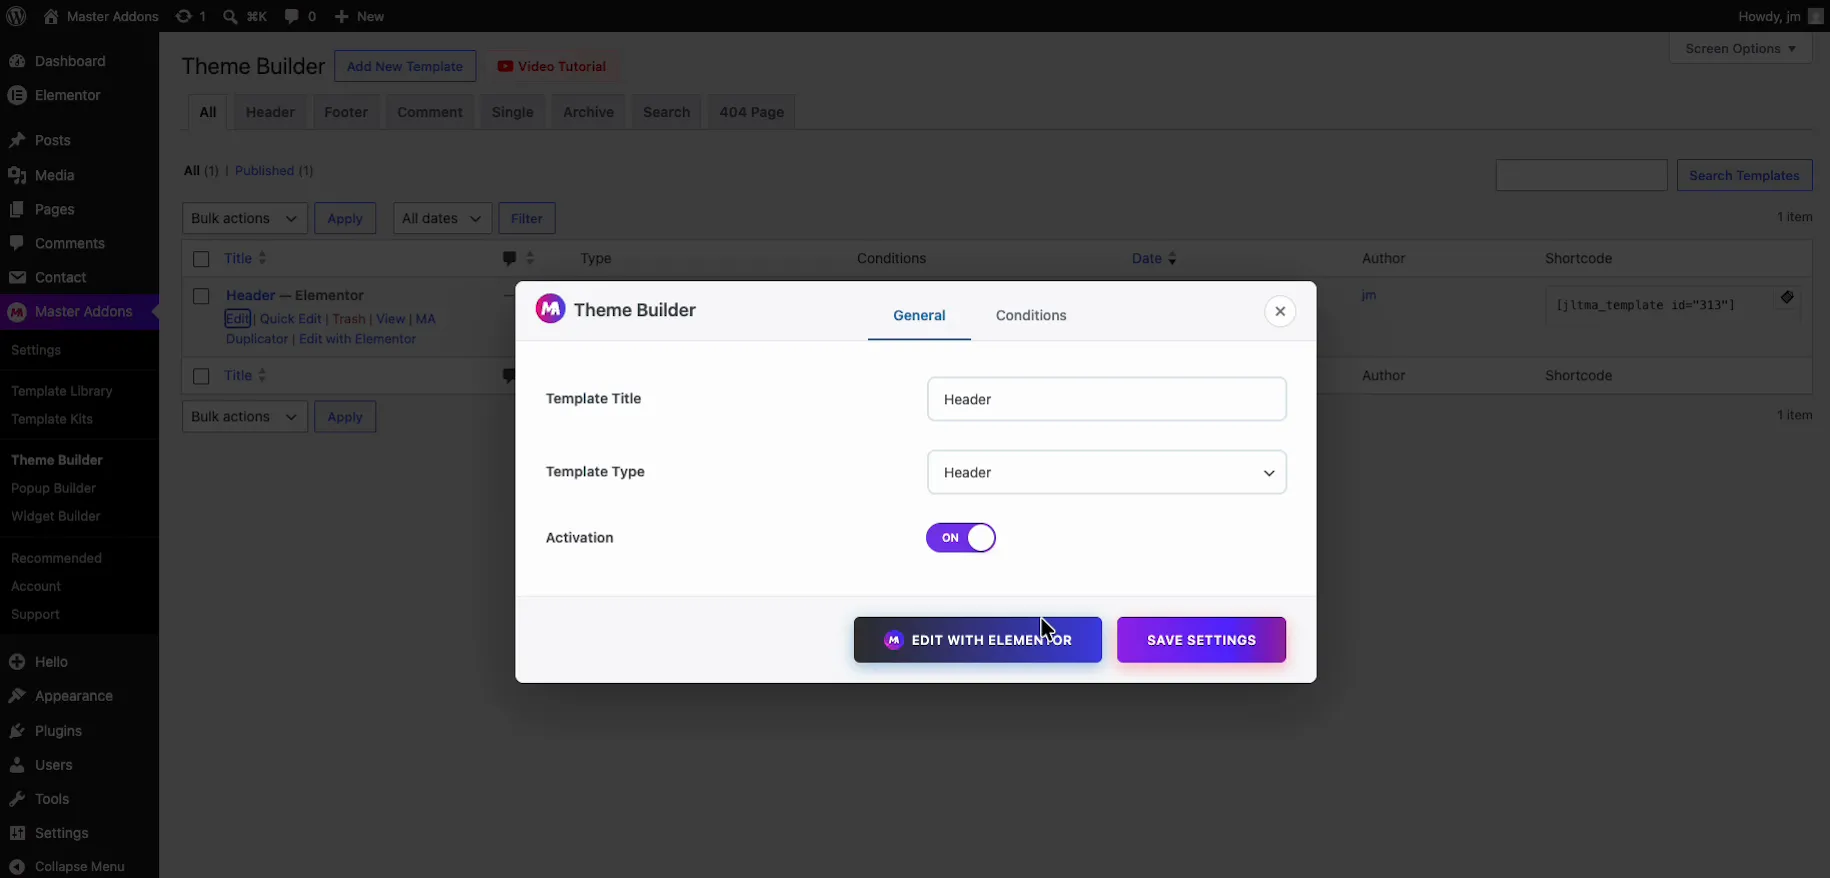
The mega menu needs a header to live in. If your theme’s header already displays the Main Menu you can skip this step, but building the header with Master Addons keeps everything in one editor. The Theme Builder is free, unlike Elementor Pro’s.
- Go to Master Addons → Theme Builder and click Add New Template.
- Set the Template Type to Header, switch Activation on, and under Conditions choose Include → Entire Site.
- Click Edit with Elementor.
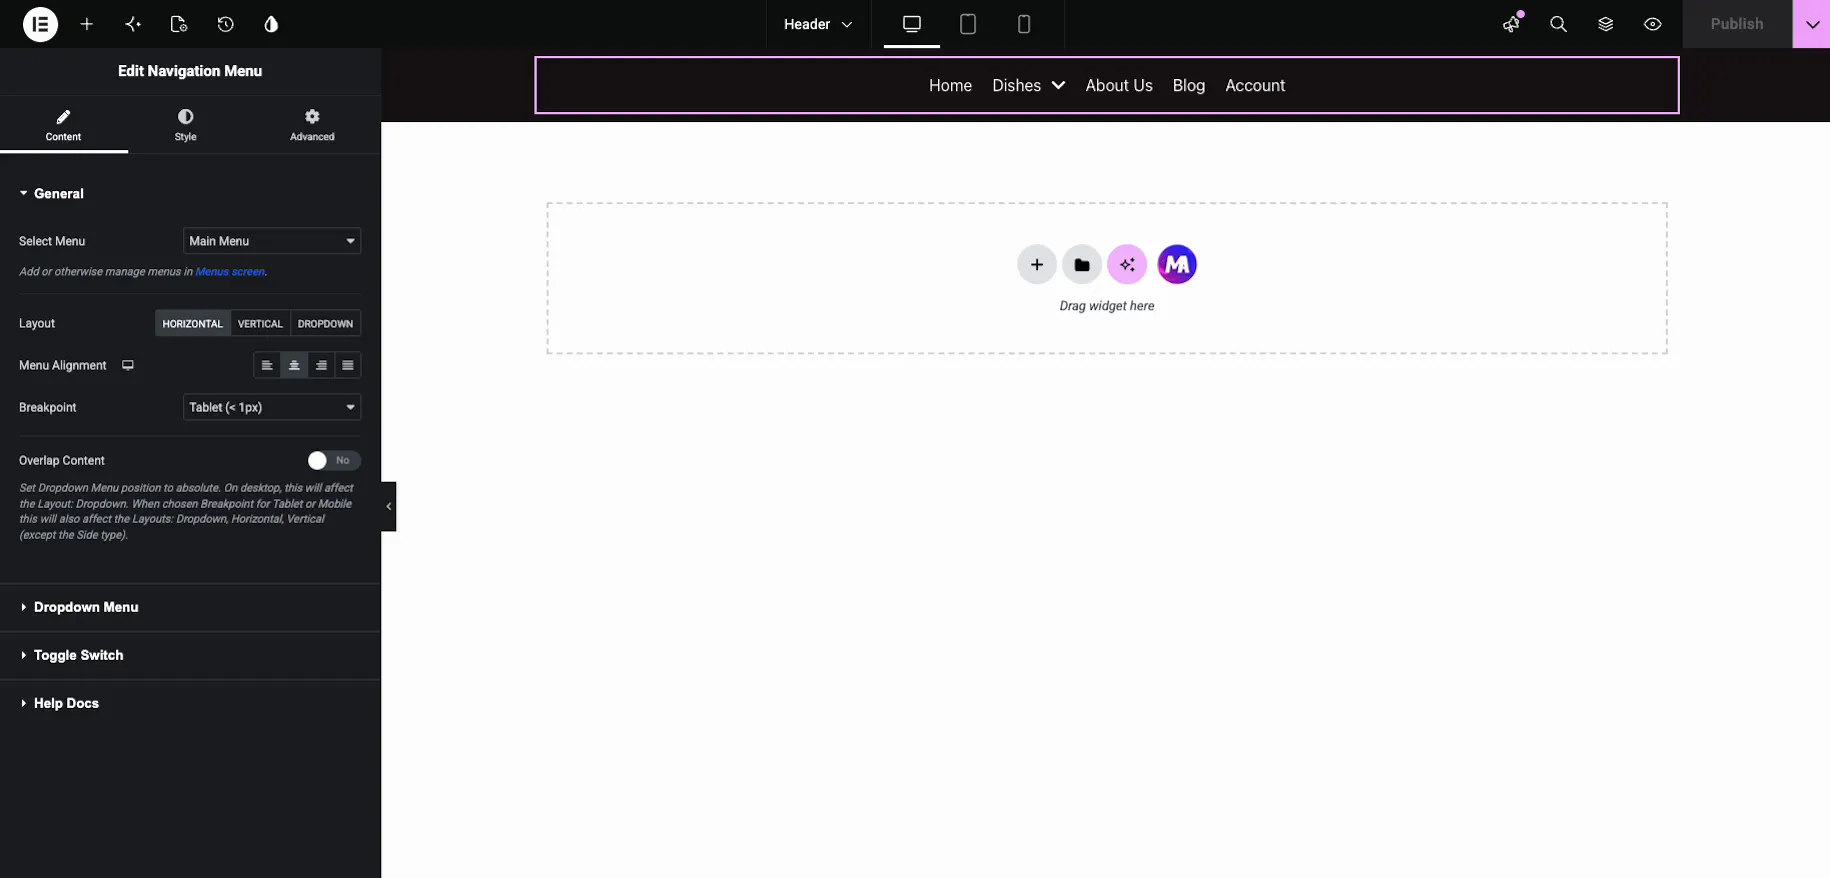
Inside the header template, drag in the Navigation Menu widget and pick Main Menu under Select Menu. Set the layout to Horizontal and align it however your header design calls for. The “Dishes” item carries its mega panel with it automatically.
Step 6: Hover and Check the Result
Publish the header and open your site. Hover “Dishes” and the full restaurant menu drops down over the page: categories on the left, dishes with prices in the middle, tonight’s special and the Reserve a Table button on the right.
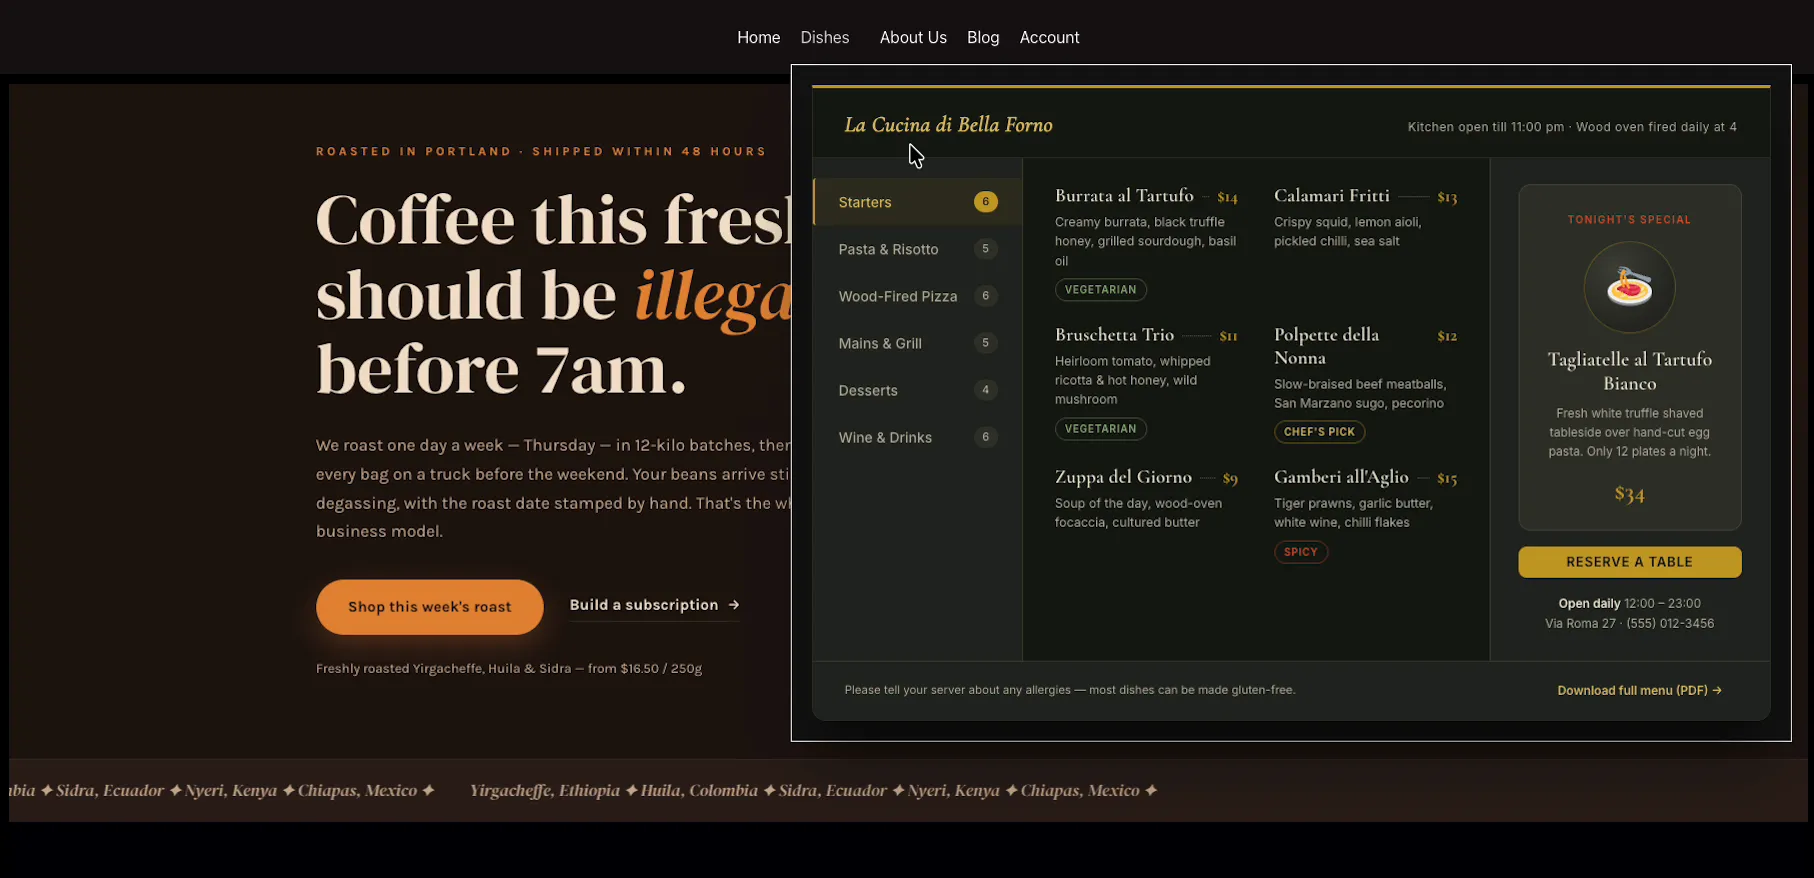
Click through each category to make sure the dish counts and links behave, then check the panel against the page behind it. A dark panel over a dark hero needs a border or shadow so its edges stay visible.
Step 7: Keep It Fast
Menu images load on every page of your site, so a careless mega menu slows down the entire restaurant website. Slow restaurant sites lose diners who are comparing options on mobile data.
- Use one photo in the panel (the featured special), not a gallery.
- Compress it and serve WebP; size it to the space it actually occupies.
- Write real alt text (“wood-fired margherita pizza”). It helps accessibility and image search.
- Check your overall Elementor page speed after adding the menu, not before.
Step 8: Make It Work on Phones
Most restaurant traffic is mobile, frequently from people standing outside deciding whether to come in. This is why we set Mobile Menu to Builder Content back in Step 3. The same panel you designed serves the phone layout instead of a bare link list. A wide panel still has to collapse gracefully:
- Hide the special’s photo on mobile, keep the Reserve a Table button. Elementor’s responsive visibility controls handle this per element.
- Put the category links first in the stacking order; that is what phone visitors came for.
- Keep the “Reserve a Table” button reachable without long scrolling.
- Test on a real phone. The editor preview approximates touch behaviour; it does not reproduce it.
If the default tablet breakpoint cuts your panel awkwardly, set your own with the free Custom Breakpoints extension.
Optional: Show Seasonal Items Automatically
Restaurants run time-bound offers constantly: lunch specials, festive menus, happy hour. With the free Display Conditions extension you can set a date range or day-of-week rule on a panel element so the Christmas menu link appears in December and removes itself in January, with nobody editing the site at midnight.
Frequently Asked Questions
How do I create a restaurant mega menu in Elementor?
Enable the free Master Addons Mega Menu extension, build your menu under Appearance > Menus, switch on Enable Mega Menu, then click the Master Mega badge on your Dishes item and set Megamenu Enabled to yes. Click Edit Megamenu Content and design the panel in Elementor: menu categories, dishes with prices and dietary tags, a featured special, and a Reserve a Table button. Finally, display the menu with the Navigation Menu widget in your header.
Do I need Elementor Pro for a restaurant mega menu?
No. Elementor’s mega menu widget is a Pro feature, but the free Master Addons Mega Menu extension adds the same capability to free Elementor, and you design the dropdown panel in the normal Elementor editor.
What should a restaurant website menu include?
Food menu categories such as starters, mains, desserts and drinks; dish prices with dietary tags like vegetarian, vegan and spicy; opening hours and address; and a clear booking or online-order action. Leave your About story, press mentions and social feeds for the footer.
Will a mega menu slow down my restaurant website?
It can, because menu images load on every page. Use a single compressed WebP photo sized to its display space rather than a gallery, write real alt text, and re-check your page speed after adding the menu. Done carefully the impact is negligible.
How do I make a restaurant mega menu work on mobile?
Set the Mobile Menu option to Builder Content so phones get your designed panel, hide the dish photo on mobile while keeping the booking button, stack category links first, and keep the Reserve a Table button reachable without long scrolling. Always test on a real phone rather than the editor preview.
Can I show seasonal menu items only during certain dates?
Yes. The free Display Conditions extension lets you set a date range or day-of-week rule on any element inside the mega menu panel, so a festive menu link appears and disappears on schedule without anyone editing the site.
Is Max Mega Menu free, and is it a good fit for a restaurant site?
Max Mega Menu has a free version in the WordPress repository plus a paid Pro add-on. It is a standalone menu plugin, not built specifically for Elementor, so panels are edited in its own interface rather than the Elementor editor you already use for pages. For an all-Elementor restaurant build, Master Addons Mega Menu keeps the whole panel in one editor.
Related Reading
