


Tabla de contenidos
Elementor gratuito no puede enumerar sus publicaciones. El widget de publicaciones, las publicaciones de archivo, el título de la publicación y el resto de los widgets de publicaciones son todos Elementor Pro. En una instalación gratuita se muestran en el panel de widgets con un candado y nada más. Para crear una página de blog sin pagar Pro, instale la gratuita Complementos maestros complemente y use su widget Blog Posts, que enumera publicaciones en cuadrícula, lista o mampostería y funciona dentro del editor Elementor normal.
Esta guía crea de principio a fin, con capturas de pantalla de Elementor 4.2.4 y Master Addons 3.2 en una instalación gratuita. Cubre las opciones de diseño, los filtros de consulta, las pestañas de filtro de categorías que la mayoría de los tutoriales omiten y las dos configuraciones que deciden si su cuadrícula se ve ordenada o irregular. Si prefiere importar un diseño terminado, comience con estos Plantillas de blog de Elementor.
¿elementor free tiene un blog o un widget de publicaciones?
No. Busque en el panel de widgets “publicar” en una instalación gratuita y esto es lo que regresa.
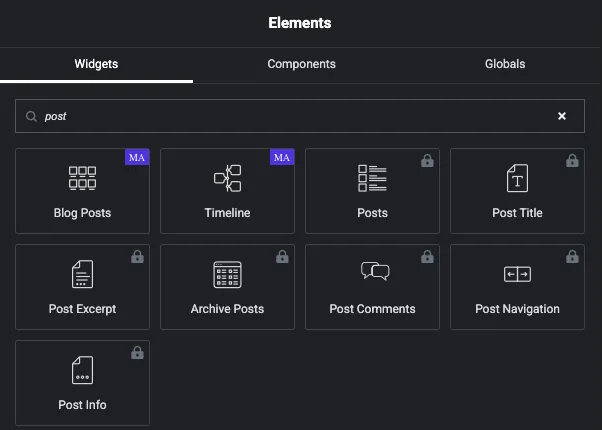
Publicaciones de blog y Cronograma lleva la insignia de complementos maestros morados y está listo para arrastrar. Publicaciones, título de la publicación, extracto de la publicación, publicaciones de archivo, comentarios de la publicación, navegación de la publicación e información de la publicación llevan un candado, que es Elementor publicitario Pro desde el interior del complemento gratuito.
Entonces tienes cuatro opciones:
| Opción | ¿listas de publicaciones? | Costo | Diseños |
|---|---|---|---|
| Elementor (gratis) por sí solo | prohibido | Gratis | no está |
| Widget de publicaciones de Elementor Pro | Sí | Pagado, anualmente | Clásico, Tarjetas, Contenido Completo |
| Publicaciones de blog de complementos maestros (gratis) | Sí | Gratis | Cuadrícula, Lista, Albañilería, más 14 estilos de cartas y listas |
| El blog predeterminado de tu tema | Sí | Gratis | Cualquiera que sea el tema que envíe |
El resto de esta guía utiliza el widget Master Addons gratuito. Todos los controles que se muestran a continuación se encuentran en el complemento gratuito. Nada en el widget de publicaciones de blog está bloqueado.
Lo que necesitas antes de empezar
- WordPress con elemento instalado. La versión gratuita está bien.
- El complemento gratuito Master Addons. Las notas de instalación están aquí si los quieres.
- Algunas publicaciones publicadas. Seis o más hacen que el diseño sea más fácil de juzgar.
- Una imagen destacada en cada publicación. Una publicación sin uno deja un espacio en la cuadrícula y ninguna configuración de diseño lo soluciona.
Cómo crear una página de blog de Elementor gratis, paso a paso
Paso 1: crea la página
Ir a Páginas → Agregar nueva página, titulalo Blog y luego haz clic Editar con Elementor. Deje vacía el área de contenido de WordPress. Todo sucede en el lienzo Elementor.
No configure esta página como página de publicaciones de WordPress en Configuración → Lectura. Eso entrega la URL a su tema y descarta el diseño de Elementor. Hay una sección sobre la forma correcta de hacerlo más abajo.
Paso 2: agregue el widget Publicaciones de blog
Busque en el panel de widgets blog y arrastrar Publicaciones de blog sobre el lienzo. Representa tus últimas publicaciones de inmediato, para que puedas ver lo que estás cambiando a medida que lo cambias.
Paso 3: elige un diseño
Abierto Opciones de visualización. Los controles aquí establecen la forma de la página.
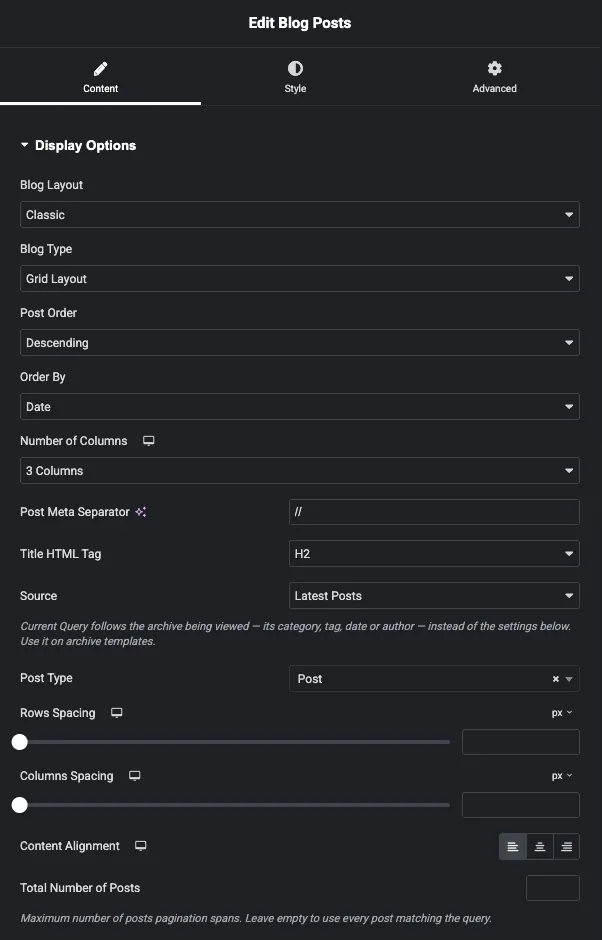
Los dos controles más importantes se sientan en la parte superior:
- Diseño de blogs: Clásico o Tarjetas. Classic pone el texto en el fondo de la página. Cards envuelve cada publicación en su propio panel.
- Tipo de blog: Diseño de cuadrícula, Diseño de lista o Diseño de mampostería.
Debajo de ellos, establezca Número de columnas. Es un control responsivo, por lo que puede darle al escritorio tres columnas y al móvil un dispositivo conmutando en la parte superior del editor. Tres es el valor predeterminado seguro para un blog con imágenes.
Ahora vale la pena configurar dos más. Título Etiqueta HTML el valor predeterminado es H2, que es correcto para un índice de blog, ya que el encabezado de la página es H1 y el título de cada publicación se encuentra debajo. Y Fuente elige entre las últimas publicaciones y la consulta actual. Déjelo en las últimas publicaciones para una página de blog normal; La consulta actual es para plantillas de archivo, donde el widget debe seguir la categoría o autor que se está viendo en lugar de su propia configuración.
Paso 4: elige una tarjeta o estilo de lista
Establezca el diseño del blog en Tarjetas y a Diseño de tarjetas el control aparece con siete diseños.
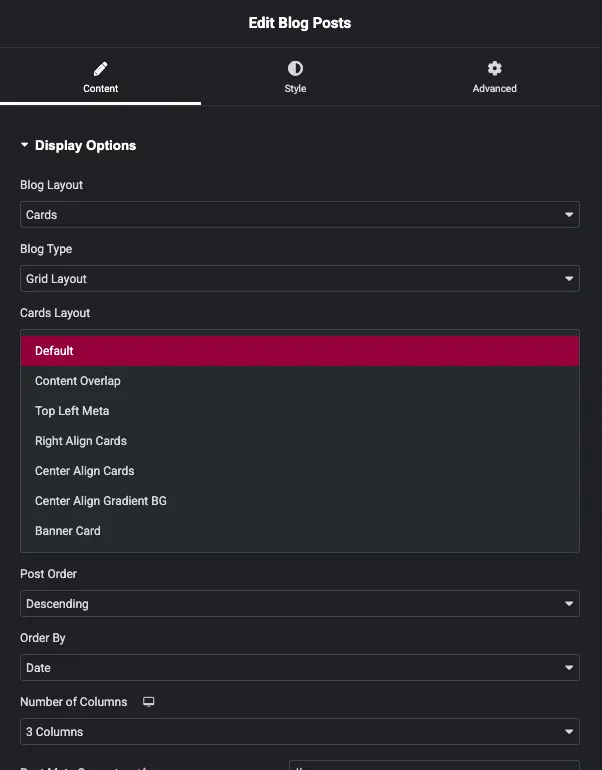
Predeterminado, superposición de contenido, meta superior izquierdo, tarjetas de alineación derecha, tarjetas de alineación central, gradiente de alineación central BG y tarjeta de encabezado. La superposición de contenido y la tarjeta de encabezado colocan el texto sobre la imagen, por lo que necesitan fotografías con espacio en ellas. Las tarjetas de alineación predeterminada y derecha son las opciones más seguras para un conjunto mixto de imágenes destacadas.
Cambie el tipo de blog a Lista y el control de la tarjeta se reemplazará por Tipo de diseño de lista, con siete más.
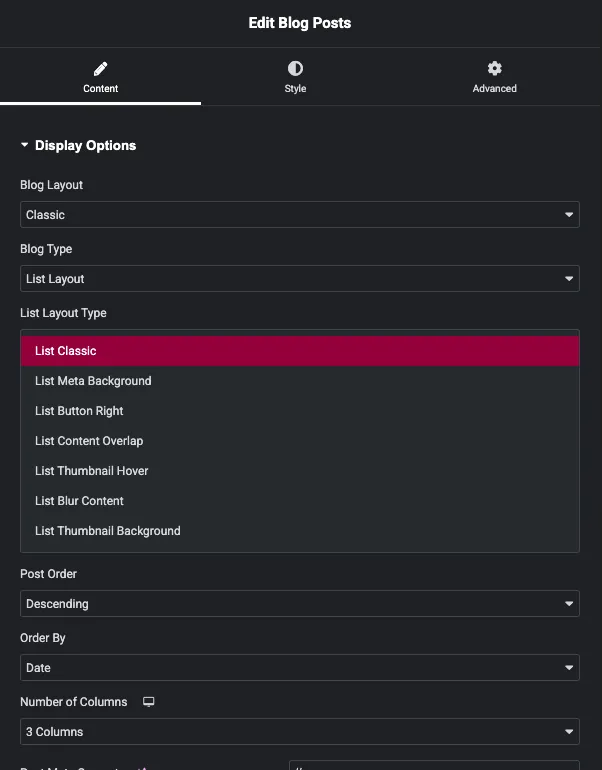
Son 14 diseños ya preparados en total, siete para cuadrículas y siete para listas, además de los tres tipos de diseño, por lo que rara vez es necesario diseñar una tarjeta desde cero.
Paso 5: establezca el tamaño de la miniatura y el efecto de desplazamiento
Abierto Configuración de miniaturas. Una página de blog irregular normalmente se soluciona aquí.
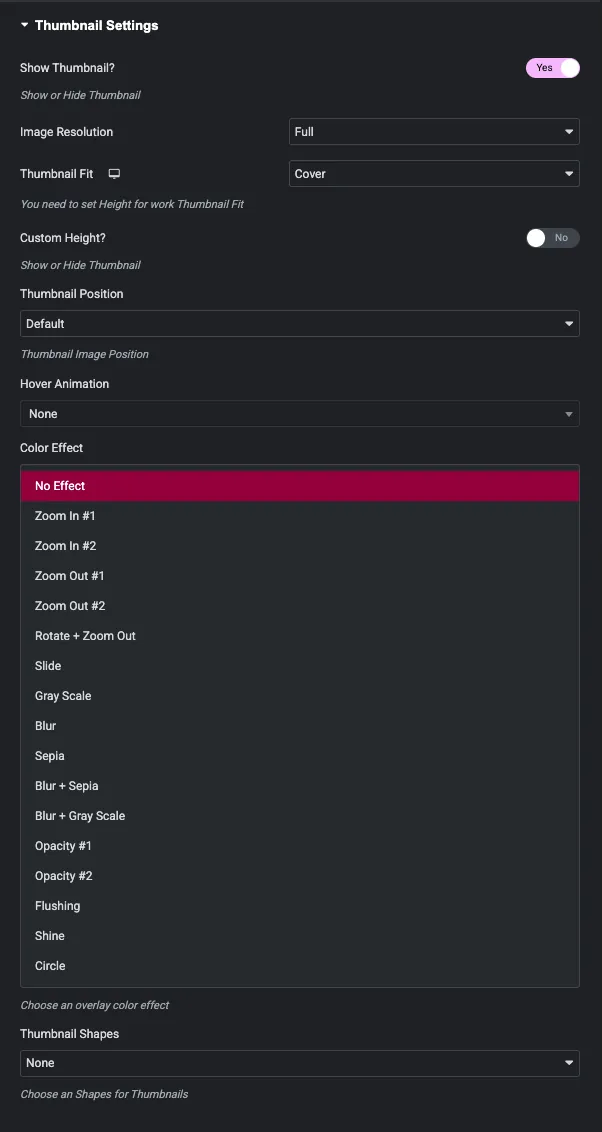
De forma predeterminada, el widget mantiene cada imagen destacada en su propia proporción, por lo que una foto de retrato en una fila de paisajes empuja esa tarjeta hacia abajo en la página. Girar Altura personalizada active y establezca min y max en el mismo valor, alrededor de 200 a 240 px, y cada miniatura recortará la misma caja. Ajuste de miniatura set to Cover evita que la cosecha aplaste nada.
Bajo eso, Animación flotante utiliza las propias animaciones de Elementor y Efecto de color agrega uno de los dieciséis efectos de superposición: acercar y alejar, rotar y alejar, deslizar, escala de grises, desenfocar, sepia, las dos combinaciones de desenfoque, dos desvanecimientos de opacidad, enrojecimiento, brillo y círculo. Formas de miniaturas agrega cinco marcos en la parte superior: enmarcado, diagonal, bordeado, bordeado degradado y cuadrados.
Elige un efecto y úsalo en todas partes. Tres diferentes en una página leída como ruido.
Esta configuración solo afecta a las miniaturas de las publicaciones en el widget del blog. Para un efecto de desplazamiento en una sola imagen en otra parte de la página, utilice el Widget de efectos de desplazamiento de imagen.
Paso 6: elige qué meta mostrar
Abierto Configuración de publicaciones y apague todo lo que el lector no necesite.
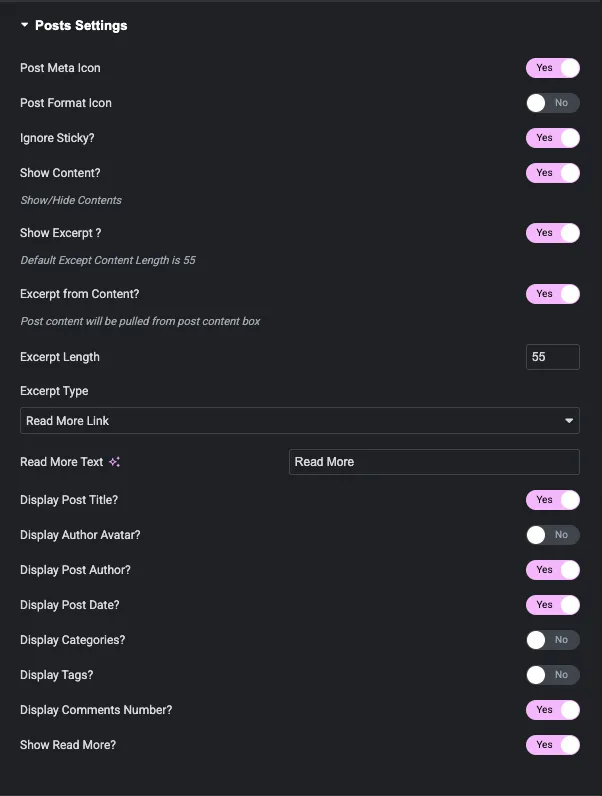
Longitud del extracto el valor predeterminado es 55 palabras, lo cual es largo para una tarjeta. Déjelo caer de 15 a 25 para que la cuadrícula permanezca escaneable y el clic vaya a la publicación en lugar del resumen. Leer más texto es texto libre, por lo que “Leer la guía” funciona tan bien como “Leer más”.
Los cambios a continuación controlan el título de la publicación, el avatar del autor, el nombre del autor, la fecha, las categorías, las etiquetas y el recuento de comentarios de forma independiente. Girando ¿mostrar categorías? generalmente vale la pena, ya que brinda a los lectores una segunda forma de acceder a publicaciones relacionadas.
Paso 7: filtra qué publicaciones aparecen
Abierto Ajustes avanzados. Esta es la sección de consultas.
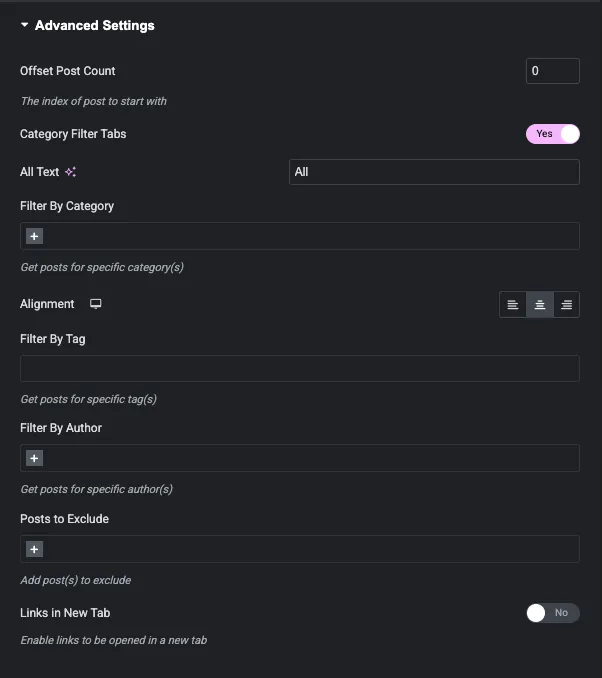
- Filtrar por categoría, Filtrar por etiqueta y Filtrar por autor limita la consulta. Cada uno acepta varios valores.
- Publicaciones para excluir elimina publicaciones específicas por nombre, que es como se mantiene un anuncio fijado fuera de la cuadrícula principal.
- Recuento de publicaciones compensadas se salta las primeras N publicaciones. Establezca un widget destacado encima de la cuadrícula para mostrar los últimos tres, luego compense la cuadrícula en tres y ninguna publicación aparecerá dos veces.
- Enlaces en la nueva pestaña hace lo que dice.
Paso 8: Publica y comprueba el resultado
Presione Publicar y abra la página en una pestaña normal del navegador. Aquí está la cuadrícula terminada: tres columnas, tarjetas, miniaturas uniformes, pestañas de categorías en la parte superior.
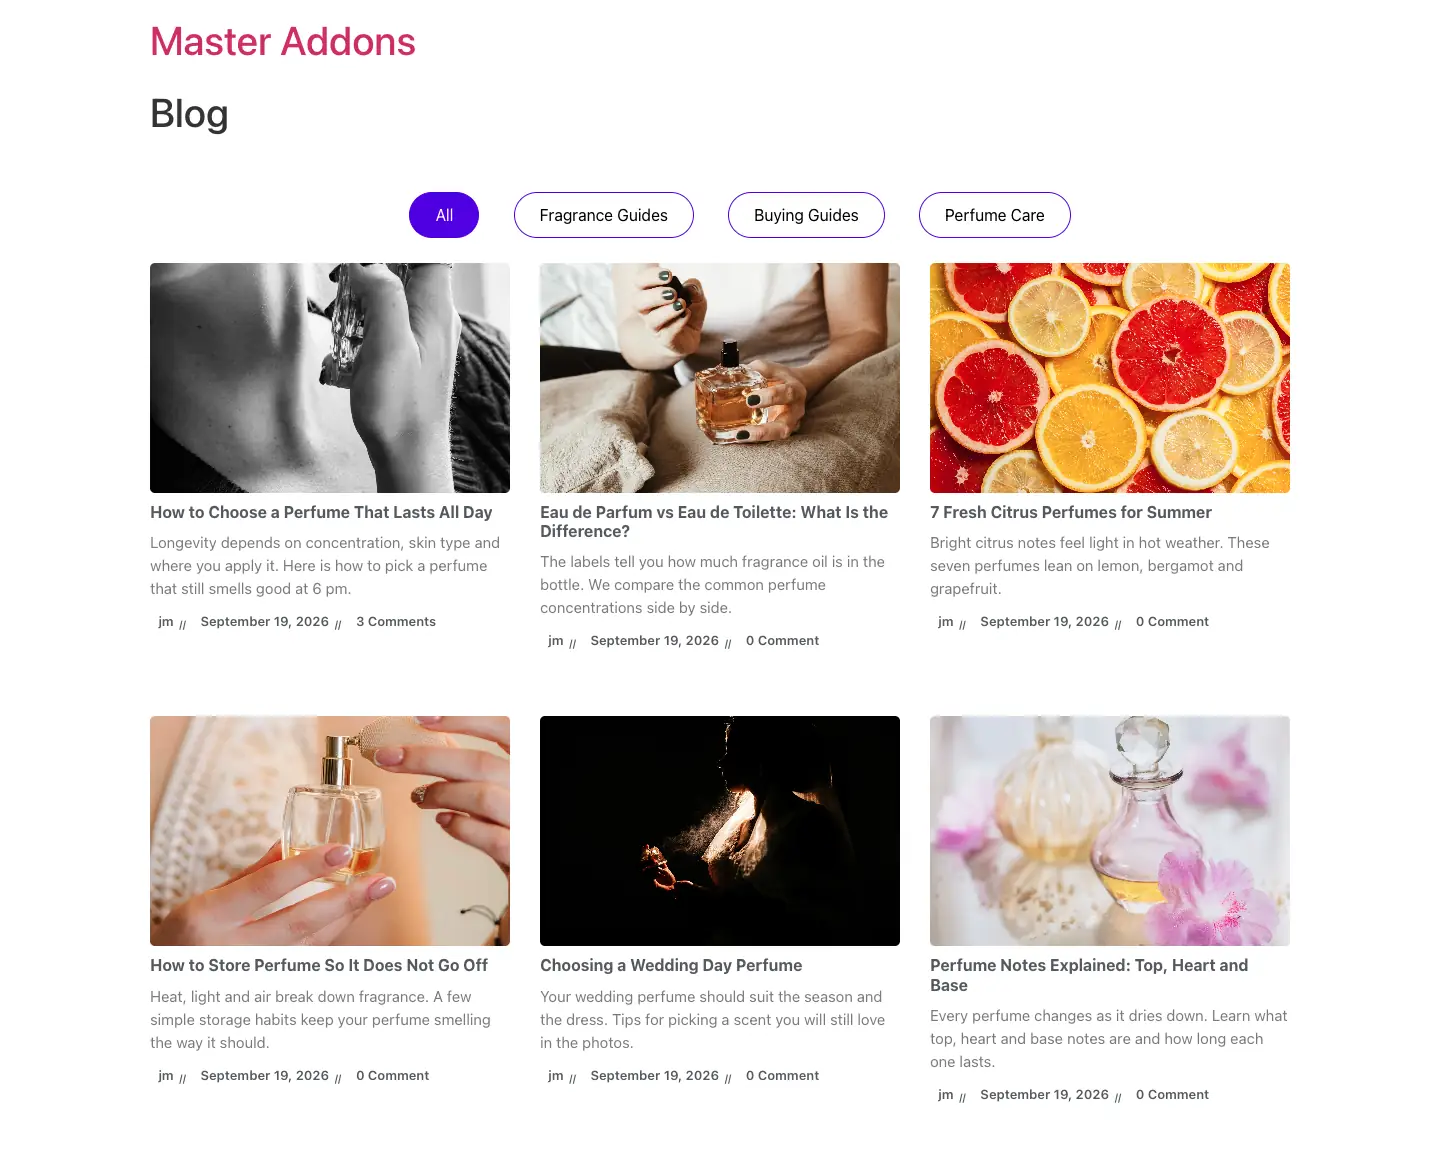
El tiempo total, una vez que sabes dónde están los controles, es inferior a diez minutos.
Agregue pestañas de filtro de categoría a la página del blog
Las pestañas de filtro en la parte superior de esa captura de pantalla son gratuitas y son la parte que la gente extraña. Los lectores pueden limitar la cuadrícula por categoría sin salir de la página.
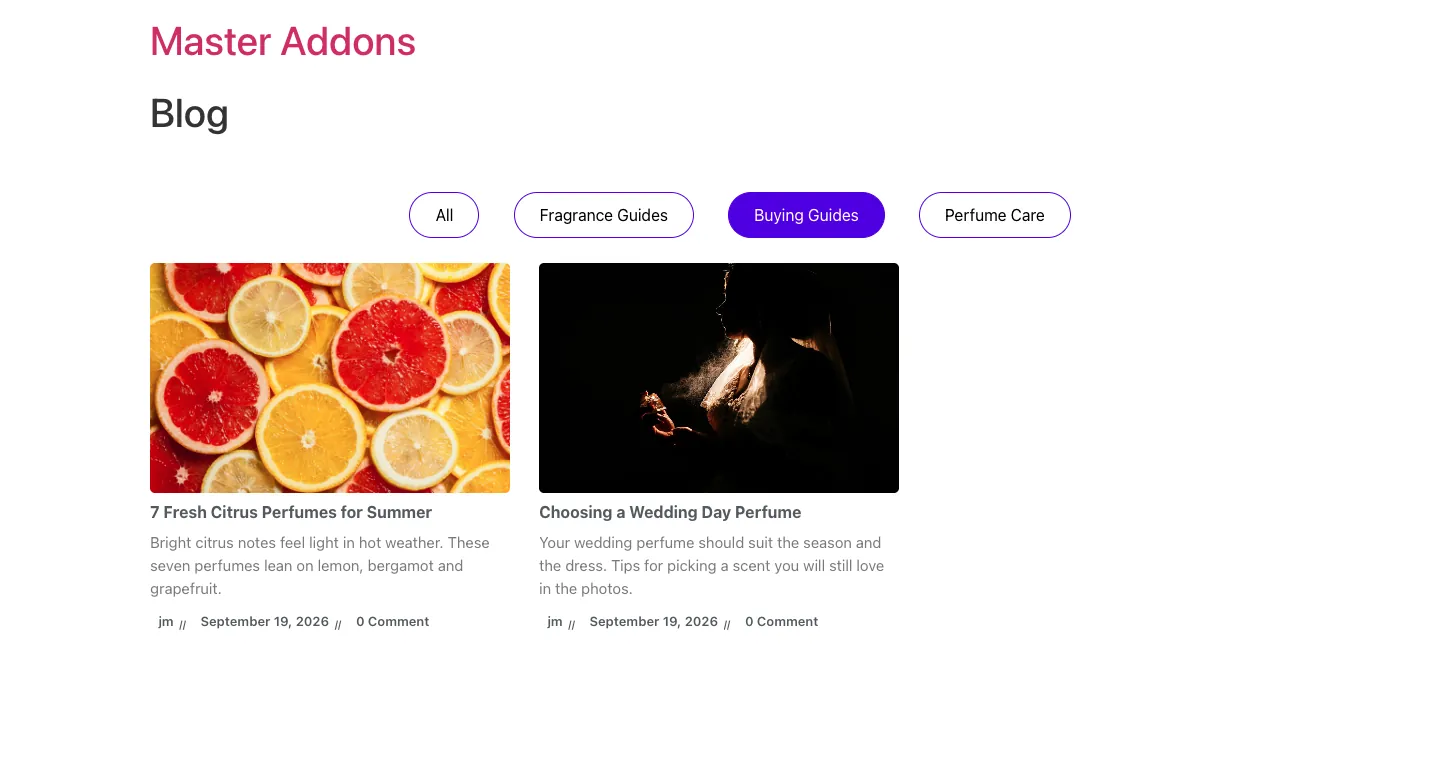
Encender Pestañas de filtro de categoría en Configuración avanzada. Luego elija las categorías que desee como pestañas en el campo Filtrar por categoría. Las pestañas se crean a partir de esa selección, no de las categorías de las publicaciones de la página. Deje el campo vacío y obtendrá una sola pestaña Todo y nada más, que parece rota pero funciona según lo diseñado.
Todo texto cambia el nombre de la primera pestaña y Alineación mueve la fila hacia la izquierda, el centro o la derecha. Las pestañas de filtro y el carrusel son mutuamente excluyentes, por lo que si habilita el carrusel, las pestañas dejan de renderizarse.
Cuadrícula, listado o mampostería: qué diseño utilizar
Cuadrícula es el valor predeterminado y se adapta a la mayoría de los blogs. Tarjetas iguales, de tres de ancho, escaneables. Úselo con una altura de miniatura personalizada para que las filas se alineen.
Lista coloca una publicación por fila con la miniatura al lado del texto. Establezca el número de columnas en 1 columna cuando cambie a Lista, o obtendrá tres elementos de la lista abarrotados uno al lado del otro.
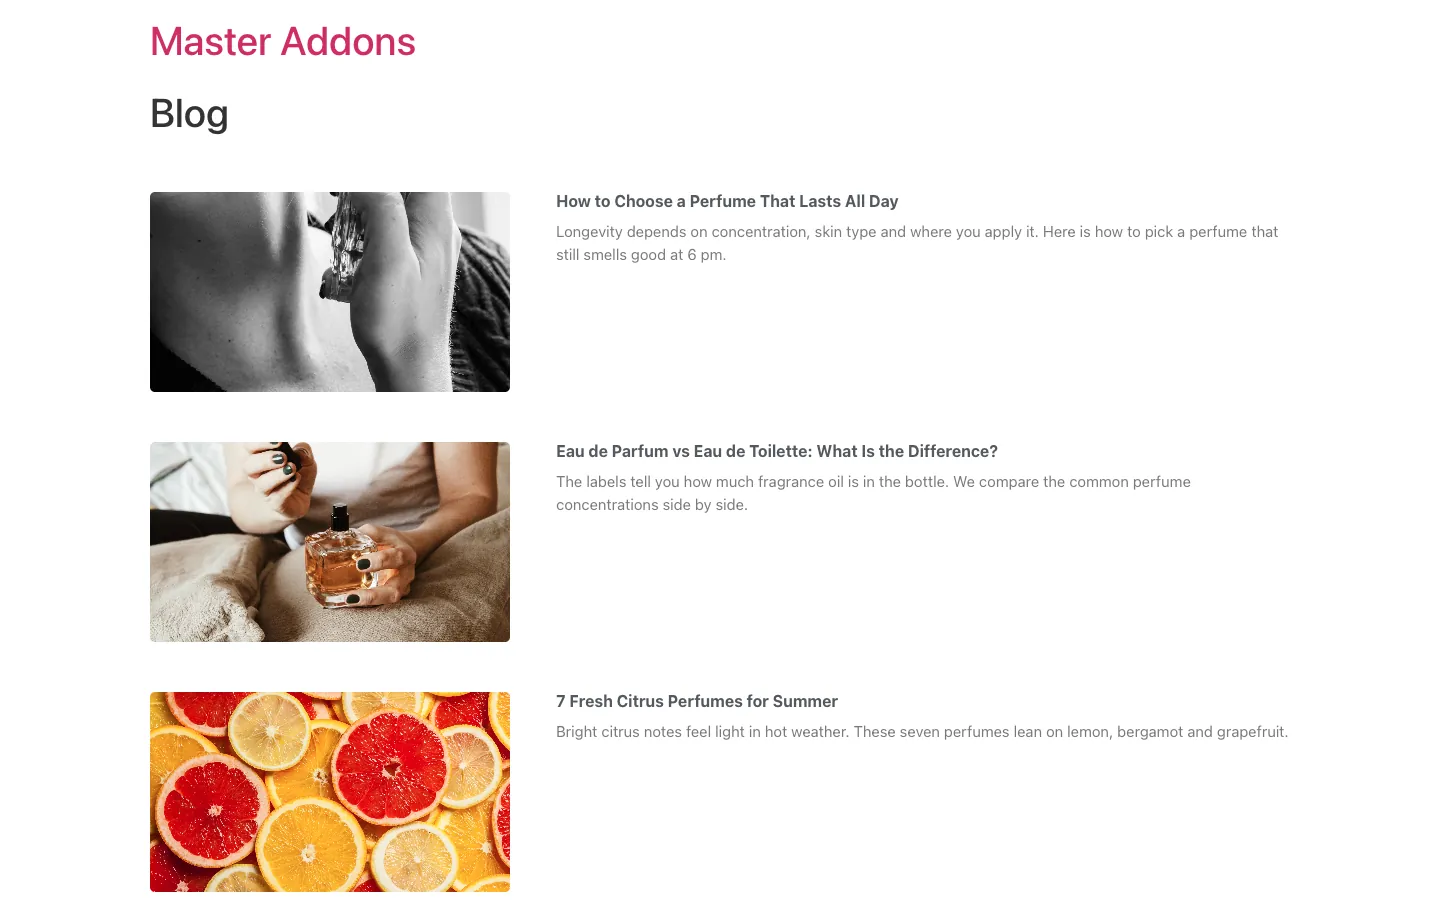
La lista le da al extracto espacio para respirar, por lo que funciona para blogs estilo ensayo donde el resumen se vende.
Albañilería mantiene las columnas pero reduce la altura fija de la fila, por lo que las tarjetas se apilan por contenido y los espacios se cierran.
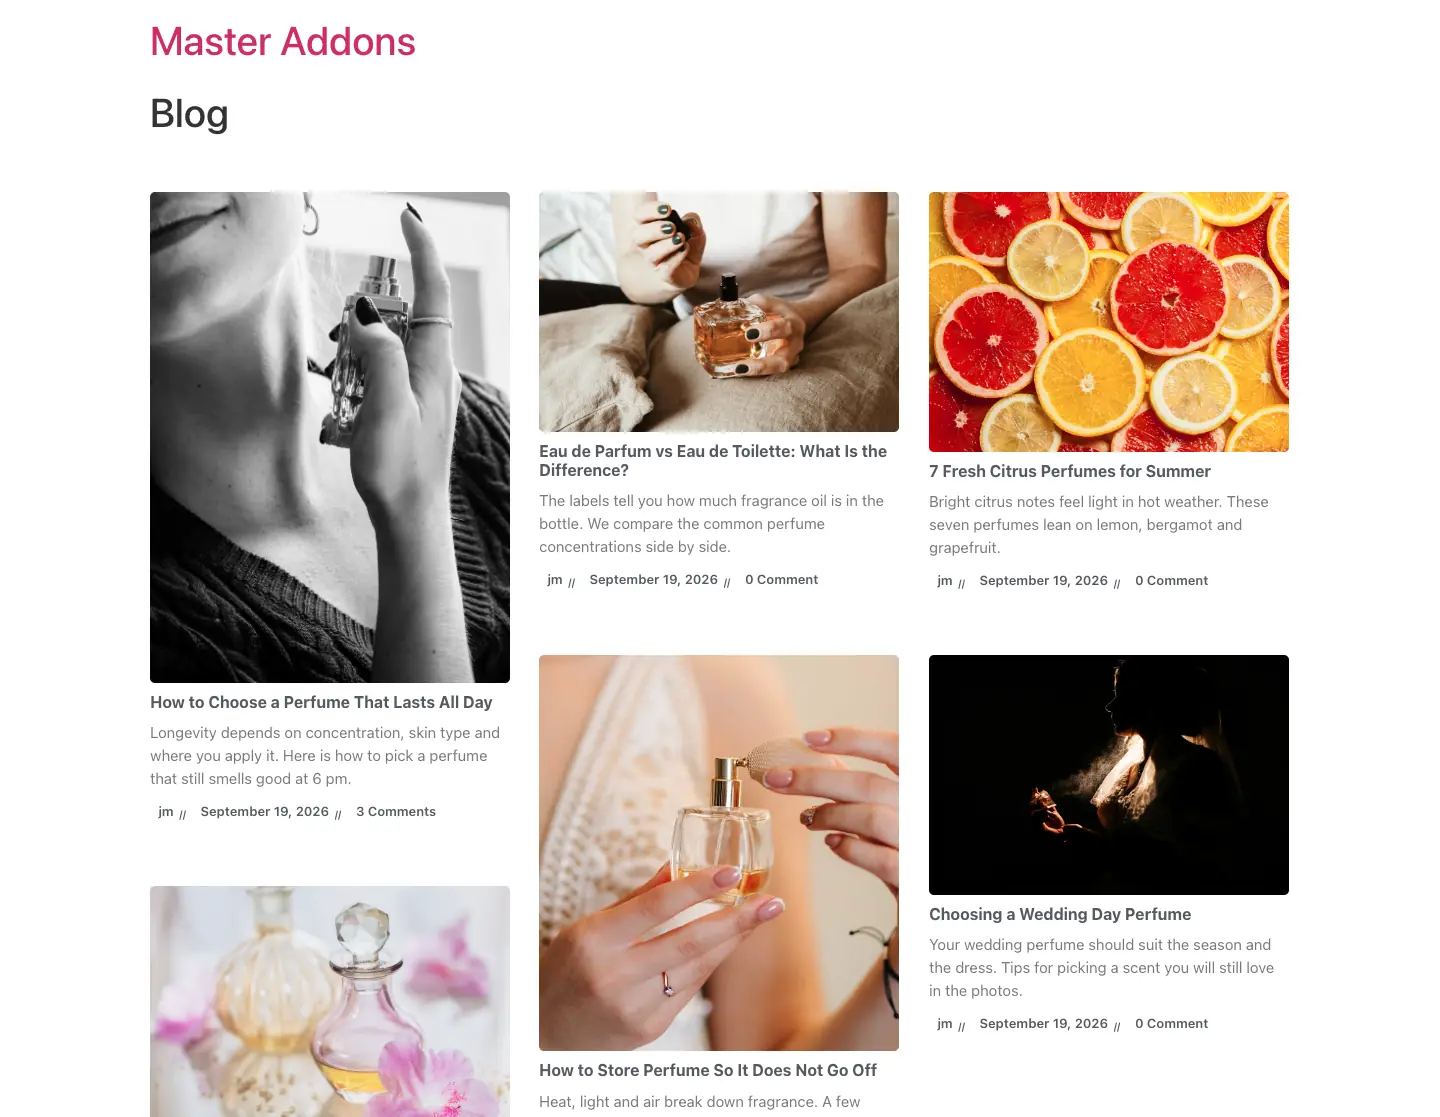
La mampostería es el único caso en el que debes dejar de lado la altura personalizada, ya que las alturas desiguales son las que la hacen funcionar. Se adapta a blogs basados en fotografías y se desmorona cuando cada imagen destacada tiene la misma forma.
Hay una cuarta opción cuando las fechas importan más que las miniaturas. El Widget de línea de tiempo tiene un tipo de línea de tiempo de publicación que coloca sus publicaciones en una línea vertical en orden de fecha. Utiliza los mismos filtros de consulta que las publicaciones de blog y necesita Master Addons Pro.
Convierte la cuadrícula del blog en un carrusel
El mismo widget también funciona como carrusel de publicaciones, que es lo que desea en una página de inicio en lugar de en la página del blog en sí.
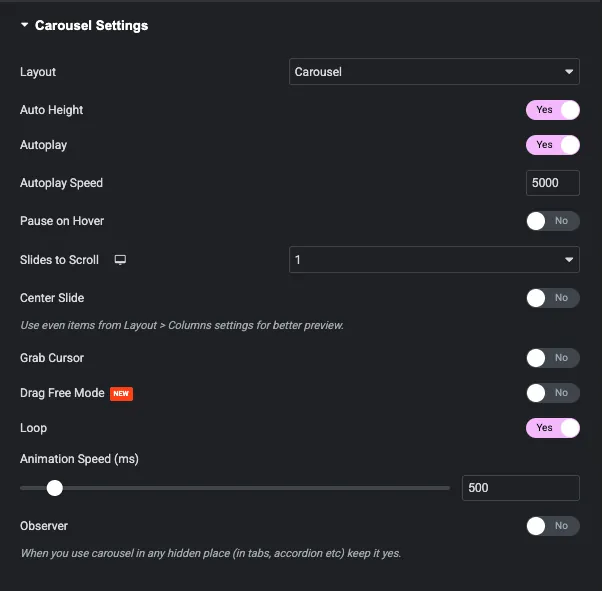
Cambiar ¿habilitar carrusel? se abre la sección Configuración del carrusel y: reproducción automática y velocidad de reproducción automática, pausa al pasar el cursor, diapositivas para desplazarse por dispositivo, diapositiva central, toma el cursor, modo sin arrastre, bucle y velocidad de animación. El control de diseño también ofrece un efecto de flujo de cobertura con sus propias configuraciones de rotación, estiramiento, modificador y profundidad.
Observador debería ser Sí si el carrusel se encuentra dentro de una pestaña, un acordeón o cualquier otra cosa oculta en la carga de la página; de lo contrario, se mide a cero de ancho y se representa como una pila.
Mostrando la fecha modificada en lugar de la fecha publicada
El widget de publicaciones de blog puede hacerlo ordenar por fecha modificada: establecida Ordenar por to Last Modified in Display Options y las publicaciones actualizadas recientemente suben a la cima. Eso por sí solo suele ser lo que la gente realmente quiere, porque mantiene visible el contenido actualizado.
Mostrar la fecha modificada como texto visible es diferente. El widget imprime la fecha de publicación en la tarjeta, mientras que la subyacente <time datetime> el atributo lleva la fecha modificada. Los motores de búsqueda leen el atributo, por lo que sus fechas actualizadas se publican incluso cuando la tarjeta dice lo contrario, pero un lector ve la fecha original.
Para mostrar la fecha modificada como texto, necesita las etiquetas dinámicas de Elementor Pro, donde la etiqueta Post Date tiene una opción Modificada, utilizada dentro de un widget Pro Posts o Loop Grid. No existe un equivalente gratuito de Elementor, porque las etiquetas dinámicas son una característica profesional en primer lugar. La alternativa gratuita es un pequeño fragmento que filtra get_the_time para la plantilla de tu blog.
¿Página de blog o página de publicaciones? Configure correctamente
WordPress tiene su propia página de publicaciones, configurada en Configuración → Lectura. La página que acaba de crear es una página normal y las dos se comportan de manera diferente.
Si asigna su página Elementor como página Publicaciones en Configuración → Lectura, WordPress entrega la URL a la plantilla de archivo del tema y se ignora su diseño Elementor. Esa es la razón más común por la que una página de blog terminada muestra la lista predeterminada del tema.
Dos formas de hacerlo correctamente:
- Mantenlo como una página normal. Deje la Configuración → Lectura sola y agregue su página de Blog al menú en Apariencia → Menús. La página representa el diseño de su Elementor, que es lo que desea.
- Construye el archivo real. Si desea que la URL del archivo de WordPress utilice su diseño, cree una plantilla de archivo en Creador de temas de complementos maestros y configure la fuente del widget Publicaciones de blog en Consulta actual, para que siga cualquier archivo que se esté viendo.
Master Addons Publicaciones de blog frente al widget Elementor Pro Posts
| Característica | Publicaciones profesionales de Elementor | Publicaciones de blog de complementos maestros (gratis) |
|---|---|---|
| Precio | Requiere Elementor Pro | Gratis |
| Funciona en Elementor gratuito | prohibido | Sí |
| Tipos de diseño | Rejilla, mampostería | Cuadrícula, lista, mampostería |
| Estilos confeccionados | 3 pieles | 7 estilos de cartas, 7 estilos de lista |
| Efectos flotantes en miniatura | Filtros CSS | Animaciones de Elementor más 16 efectos de color |
| Formas de miniaturas | Radio fronterizo | 5 formas |
| Metaopciones | Autor, fecha, hora, comentarios, avatar | Avatar, autor, fecha, categorías, etiquetas, comentarios |
| Filtros de consulta | Tipo de publicación, incluir y excluir términos | Categoría, etiqueta, autor, excluir, compensar |
| Pestañas de filtro de categoría | prohibido | Sí |
| Carrusel | Widget de carrusel de bucle separado | Integrado, con flujo de cobertura |
| Paginación | Números, anterior/siguiente, cargar más, desplazamiento infinito | Números con etiquetas personalizadas anteriores/siguientes |
| Etiquetas dinámicas (fecha modificada y similares) | Sí | No, característica Pro Elementor |
| Tipos de publicaciones personalizadas | Sí | Sí |
Elementor Pro gana en etiquetas dinámicas, carga más y desplazamiento infinito. El widget gratuito Master Addons gana en variedad de diseño, efectos de desplazamiento, pestañas de filtro y carrusel incorporado. Si las ventanas emergentes, los formularios y la creación de temas ya lo están empujando hacia Pro, compre Pro. Si la página del blog es la única razón por la que lo estaba considerando, esto la cubre por nada, y el Licencia de complemento maestro vale la pena echarle un vistazo sólo si desea los widgets Pro en otro lugar.
Siete correcciones para un diseño de blog que se ve mal
- Alturas de cartas irregulares. Active la altura personalizada en la configuración de miniaturas y establezca min y max en el mismo valor. Esta es la solución nueve de cada diez veces.
- Un rectángulo en blanco en la cuadrícula. Esa publicación no tiene imagen destacada. Agregue uno, incluso un gráfico de marca simple.
- Extractos tragándose la tarjeta. Longitud del extracto de caída de 55 a aproximadamente 20 palabras.
- Tres elementos de la lista uno al lado del otro. Necesidades de diseño de lista Número de columnas establecidas en 1 columna.
- Pestañas de filtro que muestran solo Todos. Elija las categorías en Filtrar por categoría. Las pestañas provienen de ese campo.
- Todo apilado en el móvil en una larga columna. Esto suele ser correcto. Compruébelo con el conmutador de dispositivos y configure las columnas móviles deliberadamente en lugar de dejarlo al azar. Nuestra guía para Puntos de interrupción del elementor cubre el resto.
- Página de blog lenta. Verifique el tamaño de sus imágenes destacadas antes de culpar al widget. Comprímalos primero; ver nuestro resumen del optimizador de imágenes y las notas sobre acelerar los sitios Elementor.
Preguntas frecuentes
¿puedo crear una página de blog con la versión gratuita de Elementor?
No solo con Elementor, ya que el widget Publicaciones es Pro. Agregue el complemento gratuito Master Addons y su widget Blog Posts le brinda diseños de cuadrícula, lista y mampostería, 14 estilos de listas y tarjetas, pestañas de filtro de categorías, filtros de consulta y un carrusel sin costo alguno.
¿elementor free tiene un widget de publicaciones?
No. En una instalación gratuita, las publicaciones, las publicaciones de archivo, el título de la publicación, el extracto de la publicación, los comentarios de la publicación, la navegación de la publicación y la información de la publicación aparecen en el panel de widgets con un candado. Cada uno está bloqueado y solo anuncia Elementor Pro.
¿cómo agrego mi página de blog de Elementor al menú del sitio?
Publique la página, luego vaya a Apariencia → Menús, agréguela a su menú principal y guárdela. Manténgalo como una página normal en lugar de asignarlo como página de Publicaciones en Configuración → Lectura, o WordPress entregará la URL a su tema.
¿Cuántas publicaciones de blog debo mostrar por página?
De seis a doce. Menos de seis parecen delgados en una cuadrícula de tres columnas y más de doce ralentizan la página porque cada tarjeta carga una imagen destacada. Active la paginación y deje que los lectores profundicen más.
¿Puedo mostrar publicaciones de una sola categoría?
Sí. En Configuración avanzada, elija la categoría en Filtrar por categoría. Puede crear varias páginas de esta manera, una por categoría, o activar las pestañas de filtro de categorías y permitir que los lectores cambien entre categorías en una sola página.
¿cuál es el mejor diseño de blog de Elementor para SEO?
Una cuadrícula con imágenes destacadas, títulos de publicaciones configurados en H2, extractos de alrededor de 20 palabras, categorías mostradas en meta y paginación habilitada. Configure el control de etiqueta HTML de título en H2 para que la página mantenga un H1 y un orden de encabezado limpio.
¿puede el widget del blog Master Addons mostrar la fecha modificada?
Puede ordenarlo: establezca Orden por hasta la última modificación. La fecha visible en cada tarjeta es la fecha de publicación, aunque la time elementele datetime el atributo lleva la fecha modificada. Mostrar la fecha modificada según el texto necesita etiquetas dinámicas de Elementor Pro.
¿El widget del blog funciona con tipos de publicaciones personalizadas?
Sí. El control Tipo de publicación en Opciones de visualización enumera todos los tipos de publicación pública registrados, por lo que el mismo widget crea una cartera, un estudio de caso o un índice de producto.
¿Por qué la página de mi blog muestra el diseño del tema en lugar de mi diseño?
La página probablemente esté asignada como página Publicaciones en Configuración → Lectura. WordPress enruta esa URL a la plantilla de archivo del tema e ignora el contenido de Elementor. Desasignalo o crea una plantilla de archivo en el Creador de temas.
Lectura relacionada
- Widget de publicaciones de blog, la página de funciones con cada configuración enumerada
- Documentación del elemento del blog
- Cómo crear un encabezado adhesivo en Elementor
- Cómo editar el pie de página en WordPress usando Elementor
- Plantillas de página de Elementor, si prefieres importar una página ya preparada
- Complementos maestros en WordPress.org
