

Tabla de contenidos
El Widget de comparación de imágenes de complementos maestros le permite colocar un control deslizante gratuito de antes y después en cualquier página de Elementor, sin Elementor Pro ni suscripción adicional a complementos. Instalas complementos maestros, arrastras el widget a tu página, cargas dos imágenes y los visitantes obtienen un identificador arrastrable que se borra entre ellos.
Esta guía recorre cada configuración: habilitar el widget, agregarlo a una página, la regla de dimensión que hace tropezar a casi todos en su primer intento, la orientación, la proporción visible, el tipo de identificador, el estilo y qué hacer cuando el control deslizante se comporta mal. móvil. Para obtener más ideas de diseño de antes y después, una vez que la mecánica haga clic, consulte guía completa de exhibición de antes y después.
Lo que necesitará antes de comenzar
- WordPress con Elementor instalado y activo. La versión gratuita de Elementor es suficiente.
- Complementos maestros para Elementor instalados y activos. El plan gratuito cubre este widget. Ver el guía de instalación si el complemento es nuevo para usted.
- Dos imágenes recortadas exactamente con las mismas dimensiones de píxeles. Más sobre por qué en un momento, importa más de lo que la gente espera.
Paso 1: habilite el widget de comparación de imágenes
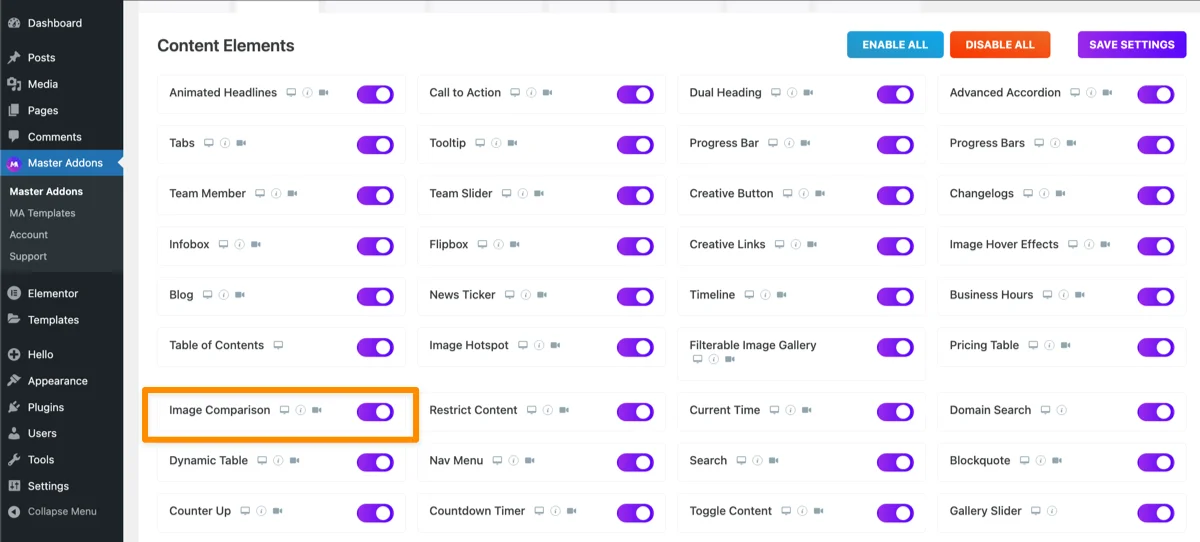
Master Addons viene con docenas de widgets y no todos se cargan de forma predeterminada en cada instalación. Ir a Complementos maestros → Widgets en su panel de WordPress y confirme Comparación de imágenes está encendido. Si no aparece en el panel Elementos de Elementor un momento después, casi siempre es por eso.
Paso 2: agregue el widget a su página
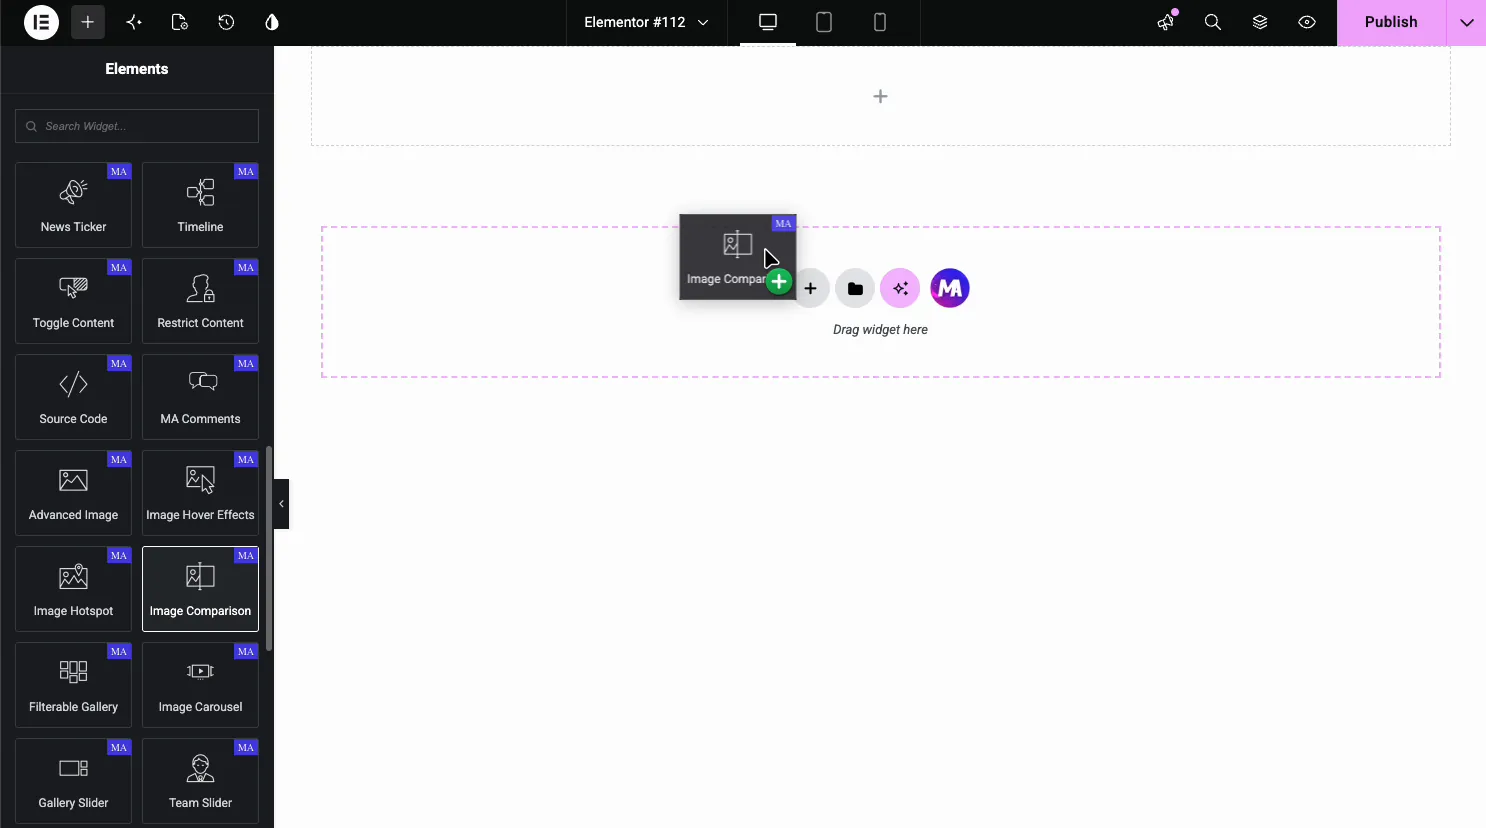
Abra una página con Elementor, busque Comparación de imágenes en el panel Elementos (busque la insignia MA violeta) y arrástrela a su página. Se carga con dos imágenes de marcador de posición y un control deslizante que funciona, para que pueda ver el diseño antes de tocar una sola configuración.
Paso 3: cargue sus imágenes de antes y después
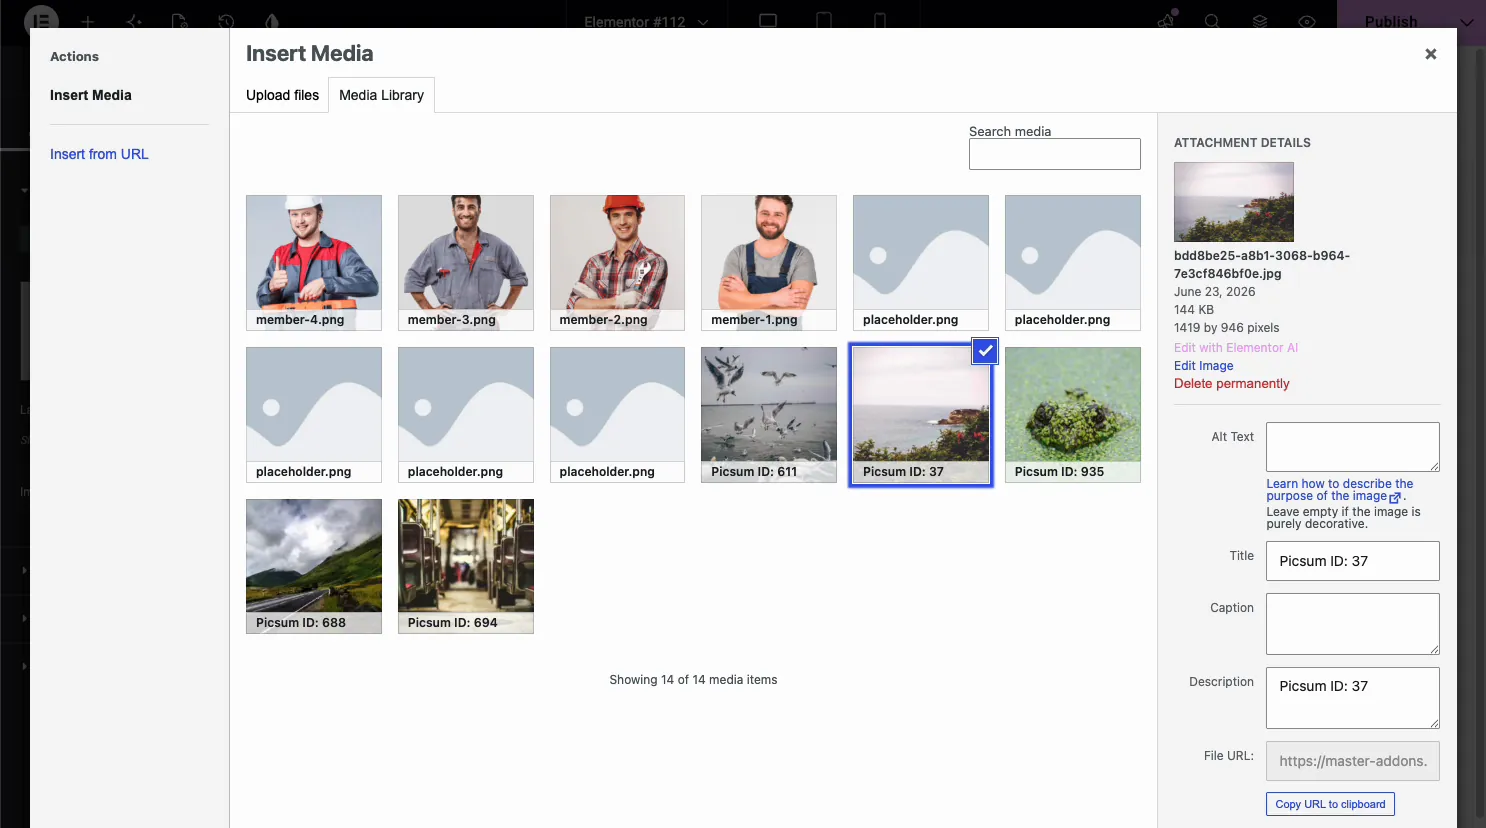
Abre el Contenido pestaña, luego el Imágenes sección. Tiene un Antes pestaña y un Después tab, y cada uno tiene su propia configuración Elija un campo Imagen, campo Etiqueta y Resolución de imagen. Configure la foto de antes en la pestaña Antes, cambie a Después y configure la segunda foto. Es fácil cargar ambas imágenes en la misma pestaña por error, así que verifique qué pestaña está activa antes de elegir una imagen.
Escriba una etiqueta breve en cada pestaña si desea un título superpuesto, algo como “Antes” y “Después” o “Diseño antiguo” y “Rediseño”.
La regla que hace tropezar a todos: hacer coincidir las dimensiones de la imagen
Ambas imágenes deben tener exactamente las mismas dimensiones de píxeles, el mismo ancho y la misma altura. Si una foto es 1600×1000 y la otra 1200×800, el control deslizante estira o corta una de ellas para que quepa, y la comparación parece deformada o desalineada en el momento en que alguien arrastra el mango.
Arregle esto recortando ambas imágenes a dimensiones idénticas antes de cargarlas, en cualquier editor que use normalmente o con el propio WordPress editor de imágenes incorporado después de cargar. Configurar una resolución de imagen fija en ambas pestañas del widget ayuda, pero no solucionará una relación de aspecto tremendamente diferente entre las dos fotos fuente.
Paso 4: establece la orientación
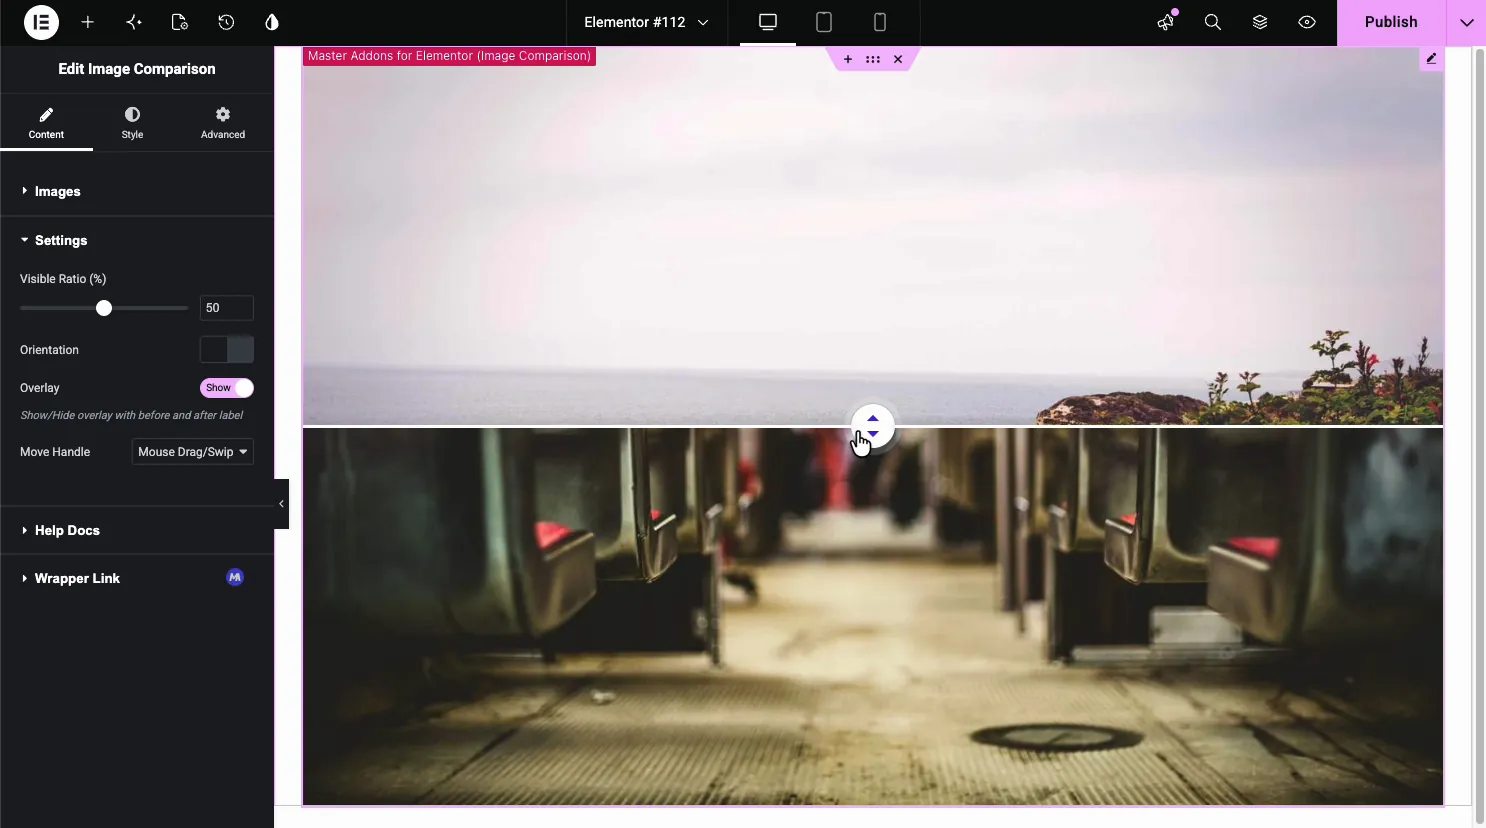
En la sección Configuración, el interruptor Orientación cambia entre una división vertical (borrado de izquierda a derecha, el valor predeterminado) y una división horizontal (borrado de arriba a abajo). Vertical se adapta a tomas de paisajes amplios. Horizontal generalmente se lee mejor para imágenes altas o de retrato, ya que una estrecha franja de izquierda a derecha no muestra suficiente fotografía alta a la vez.
Paso 5: establezca la relación visible y el tipo de mango
La relación visible establece dónde se encuentra el identificador cuando se carga la página, como porcentaje. Ábralo alrededor del 50% para obtener una primera impresión neutral, o empiece a acercarlo a un lado si desea que la imagen de antes o después domine durante la carga.
Move Handle decide qué activa la diapositiva: arrastrar o deslizar, hacer clic o flotar. La arrastre funciona bien en el escritorio, donde los visitantes esperan agarrarla y tirarla. El desplazamiento se siente resbaladizo con el mouse, pero puede fallar para los usuarios táctiles que nunca se desplazan en absoluto, por lo que arrastrar/deslizar o hacer clic es el valor predeterminado más seguro si gran parte de su tráfico es móvil.
Paso 6: diseña el control deslizante
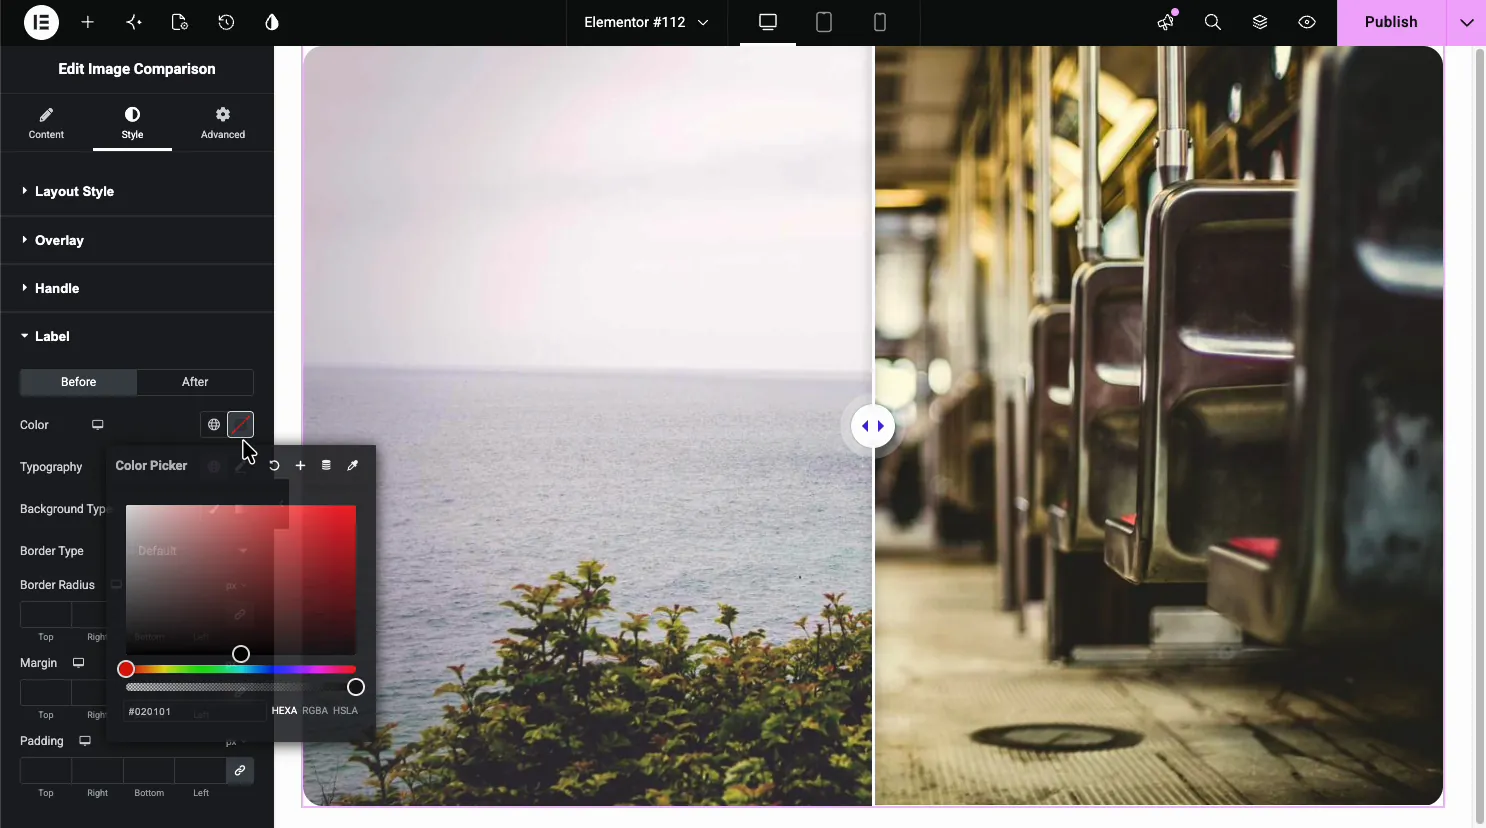
La pestaña Estilo cubre Estilo de diseño (borde, radio, sombra de cuadro alrededor de todo el widget), Mango (color, tamaño, ícono) y Etiqueta (color por lado, tipografía, fondo y espaciado para la superposición de subtítulos). Nada de esto cambia el funcionamiento del control deslizante, solo su apariencia, por lo que es seguro omitir una primera pasada y regresar una vez que la mecánica sea correcta.
Comportamiento móvil y táctil
Elementor responde de forma predeterminada, por lo que el widget cambia de tamaño con la ventana gráfica sin configuración adicional. Lo que realmente necesita ser probado en un teléfono es la configuración Mover manija. Arrastrar y deslizar funciona naturalmente con un dedo y hacer clic también funciona. Hover no existe en una pantalla táctil, por lo que un control deslizante configurado en Hover simplemente permanece quieto para los visitantes móviles, mostrando solo la relación visible inicial sin forma de moverla.
La propia guía de Elementor sobre diseño responsivo cubre los conceptos básicos del punto de interrupción si también necesita cambiar el tamaño del widget para tableta o móvil, aparte del comportamiento del identificador.
Complementos maestros frente a otras opciones de comparación de elementadores
| Opción | Costo | Control de orientación | Manejar disparadores |
|---|---|---|---|
| Comparación de imágenes de complementos maestros | Gratis | Horizontal y vertical | Arrastrar/deslizar, hacer clic, flotar |
| Comparación de imágenes de complementos esenciales | Nivel gratuito disponible | Sí | Arrastrar |
| Control deslizante de comparación de imágenes antes y después (WordPress.org) | Complemento independiente y gratuito | Limitado | Arrastrar |
| Elementor Pro (nativo) | Sin widget incorporado | No aplicable | No aplicable |
Elementor core, gratuito o profesional, no tiene un widget de comparación de imágenes nativo propio. Cualquiera que sea la ruta que tome, está instalando un widget de terceros de cualquier manera, por lo que la comparación honesta es entre esos widgets, no entre un complemento y “Elementor integrado”
Solución de problemas comunes
- Falta widget en el panel Elementos: vuelva a verificar los complementos maestros → Widgets y confirme que la comparación de imágenes esté habilitada.
- El control deslizante parece estirado o sesgado: las dos imágenes no tienen las mismas dimensiones de píxeles; recórtalos para que coincidan.
- La manija no se mueve en un teléfono: Mover manija está configurado en Flotar; cámbielo a Arrastrar/Deslizar o Hacer clic.
- Las etiquetas no se muestran: confirme que el interruptor Superposición en Configuración esté activado y que una etiqueta esté escrita en ambas pestañas.
Si te gusta esta interacción de arrastrar para revelar, el Widget de hotspot de imagen y el Widget de efectos de desplazamiento de imagen utilice un patrón similar de desplazamiento y clic para anotar o animar imágenes.
Preguntas frecuentes
¿cómo hacer un control deslizante de imagen en Elementor?
Instale un widget que lo admita, ya que ni gratis ni Pro Elementor envía uno de forma nativa. El complemento gratuito Master Addons agrega un widget de comparación de imágenes que arrastra a la página, luego carga dos imágenes y establece la orientación, la proporción y el identificador de las secciones Contenido y Configuración.
¿cómo agrego un control deslizante de imagen en WordPress?
Instale Elementor más un complemento de widget como complementos maestros, luego arrastre el widget de comparación de imágenes a cualquier página. Funciona dentro del editor Elementor en lugar de a través de una pantalla de configuración de WordPress separada, por lo que no hay ningún código corto para recordar.
¿Cómo hacer un control deslizante de imagen de antes y después?
Cargue una imagen de antes y una imagen de después de dimensiones de píxeles idénticas en las pestañas Antes y Después del widget, luego elija orientación vertical u horizontal. El widget genera automáticamente el divisor arrastrable, no diseña esa parte usted mismo.
¿Cómo mostrar antes y después en una diapositiva?
Un control deslizante de antes y después apila las dos imágenes en el mismo cuadro con un divisor entre ellas, por lo que una diapositiva reemplaza dos imágenes estáticas. Los visitantes arrastran o golpean la manija para mover el divisor y revelar más de una imagen u otra.
¿cómo edito un control deslizante en Elementor?
Seleccione el widget Comparación de imágenes en el lienzo y su configuración se abrirá en el panel izquierdo. La pestaña Contenido contiene las imágenes y etiquetas, y las secciones Configuración y estilo debajo controlan la proporción, manejan el comportamiento y el estilo visual. Los cambios se muestran en vivo en el lienzo.
¿Cómo comparar si dos imágenes son iguales?
El widget de comparación de imágenes está diseñado para una revelación visual, una al lado de la otra, en lugar de una diferencia a nivel de píxel. Si necesita que las dos imágenes se alineen limpiamente, lo que el widget requiere para obtener un resultado limpio, recórtelas al mismo ancho y alto antes de cargarlas en lugar de depender del widget para detectar una discrepancia.
¿Cómo hacer una imagen de antes y después?
Dispara o exporta la versión anterior y posterior con la misma resolución y encuadre, recórtalos para que coincidan si no se alinean y luego carga ambos en un widget de comparación como Comparación de imágenes de complementos maestros. Hacer coincidir el encuadre importa más que hacer coincidir la configuración de la cámara para obtener un resultado convincente.
Lectura relacionada
